### In **Part One** of this [**two-part**](http://www.indesignskills.com/skills/create-a-magazine-two/ "Create a Magazine Part Two of Two") tutorial, ***Create a Magazine in InDesign***, we’ll create a new print document in InDesign and apply a simple grid. This will lay down the foundation for creating Master Pages and your first feature for ‘Foodie’ magazine.
- ### **Learn how to set up a New Document for print**
- ### **Create a simple grid for your two-spread magazine feature**
- ### **Create Master spreads for the layouts in your magazine**
---
### **What you’ll create:[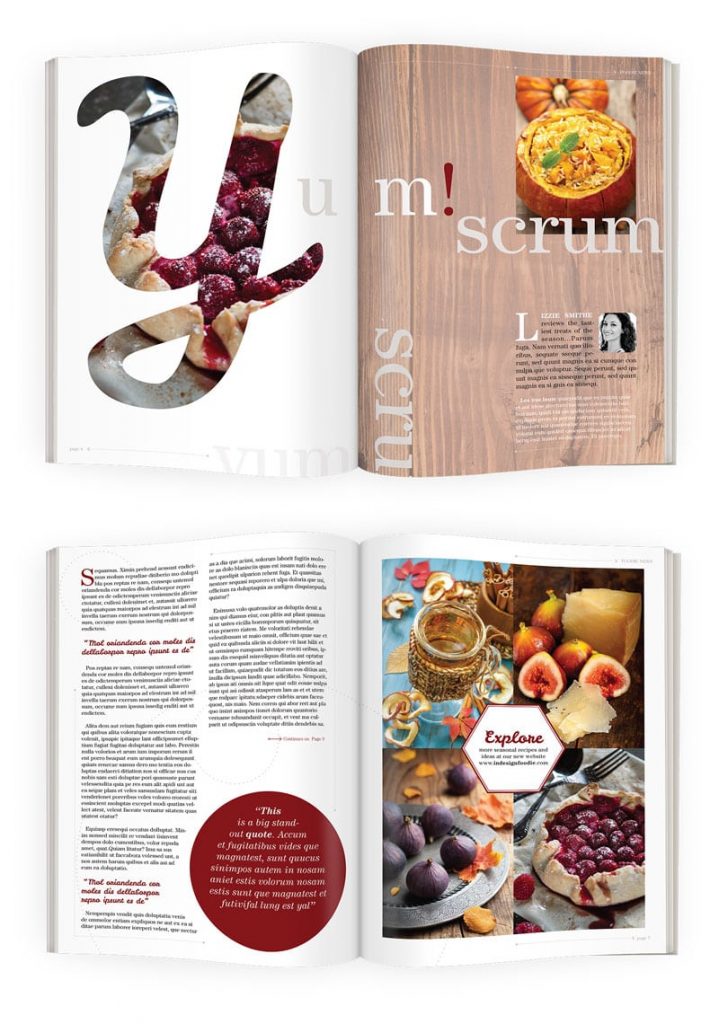](http://www.indesignskills.com/wp-content/uploads/2014/09/Intro-Image_.jpg)**
In this two-part tutorial we’ll be creating **two complete spreads**[ ](http://www.indesignskills.com/wp-content/uploads/2014/07/Intro-Image.jpg)
---
### **1. Create a New Document in InDesign**
---
### **Step 1**
---
Let’s get started. **Open InDesign**. From the **Welcome Window**, select **Document** from the **Create New** list.
In the **New Document** window, set the **Intent** to **Print** from the drop-down menu.
We’ll set up the whole magazine, although in this two-part tutorial we’ll be working on just one spread. Set the **Page No.** to **16** and keep **Facing Pages** checked.
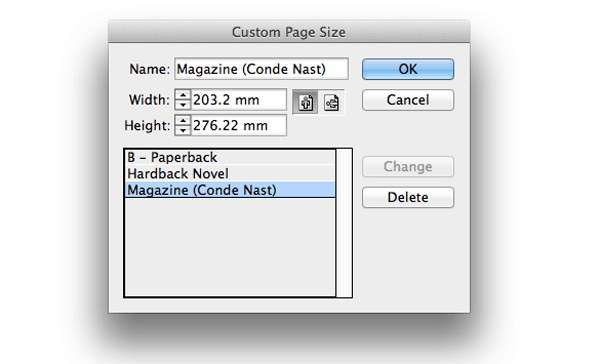
From the **Page Size** drop-down menu select **Custom…** In the **Custom Page Size** window type a **Name** for your custom page size. As we’ll be using a standard size in this tutorial, which is used by a number of commercial publishers, including *Condé Nast*, a suitable name might be ***Magazine Conde Nast***. Set the **Width** to **203.2 mm** and the **Height** to **276.22 mm**. Click **Add**, then **OK.**
### [](http://www.indesignskills.com/wp-content/uploads/2014/09/1.1.1.png)
---
### **Step 2**
---
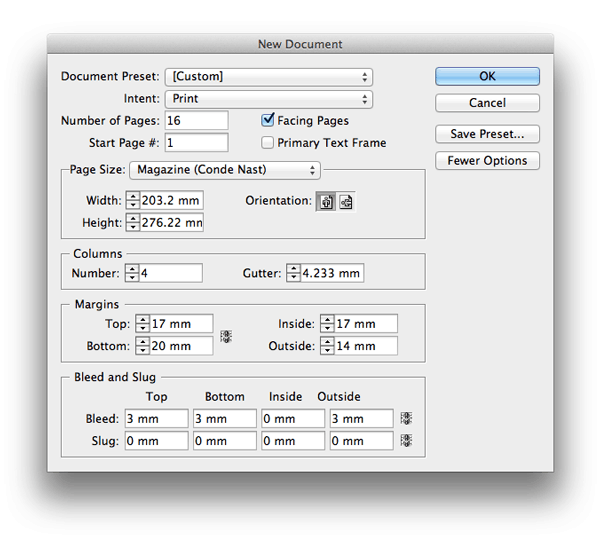
Back in the **New Document** window, keep the **Orientation** as the default selection, **Portrait**. Moving down to the **Columns** section, set the **Number** of columns to **4**. This will create a basic grid framework for arranging text columns.
Set the **Margins** to: **Top 17 mm, Bottom 20 mm, Inside 17 mm, Outside 14 mm.**
Set the Bleed to: **Top 3 mm, Bottom 3 mm, Inside 0 mm, Outside 3 mm.** You won’t need a Bleed on the Inside edge. Click **OK**.
### [](http://www.indesignskills.com/wp-content/uploads/2014/09/1.1_.png)[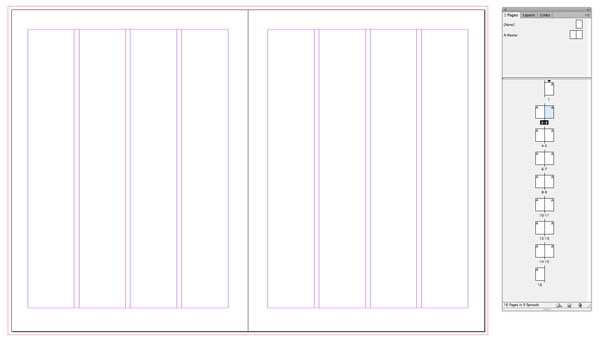](http://www.indesignskills.com/wp-content/uploads/2014/09/1.1.2.jpg)
---
### **2. Set up Master Pages**
---
### **Step 1**
---
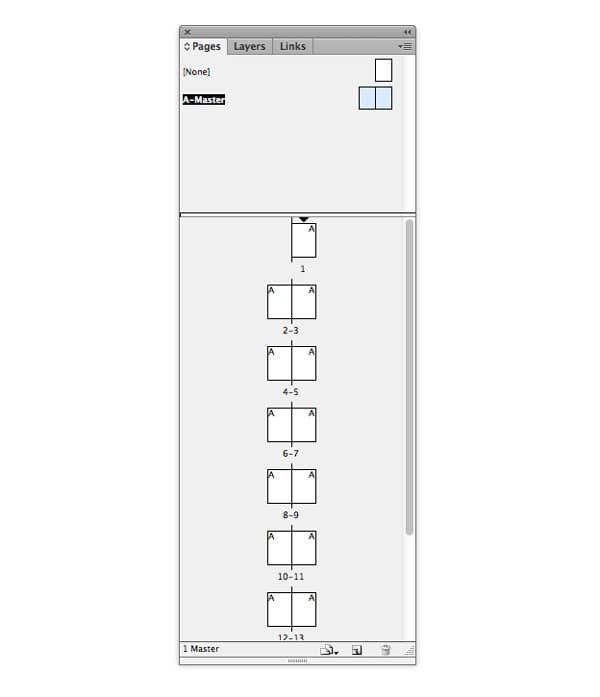
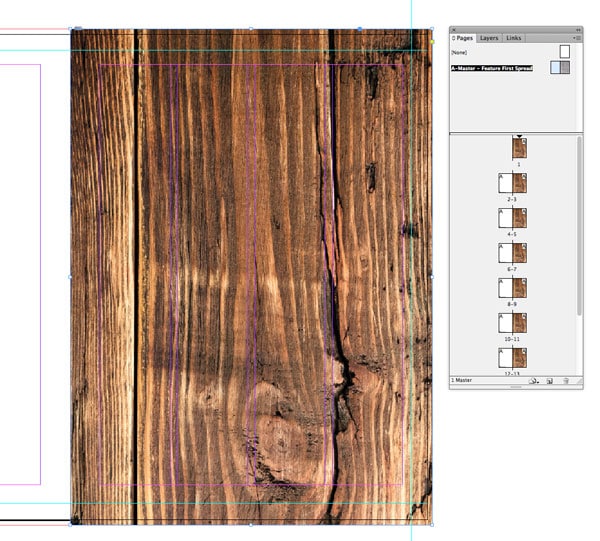
In the **Pages Panel** (go to **Window > Pages** to open) you’ll see that at the top of the panel InDesign has already created a default ***A-Master*** for you. This consists of a two-page facing spread. Any content you place on this Master spread will appear on all pages with the A-Master applied to them. By default, InDesign has applied the Master already to all pages in your document. You can see this due to the appearance of a small **A** icon at the top corner of each page in the **Pages Panel**.
[](http://www.indesignskills.com/wp-content/uploads/2014/09/2.1.1.jpg)
Double-click the ***A-Master*** icon (the image of the two facing pages at the top of the **Pages Panel**) to bring it up on screen. Now we can begin adding features to the **Master** like **Page Numbers** and any other decorative background content we’d like to appear consistently across a number of pages.
The **Columns** and **Margins** (highlighted in purple and pink) mark out where our columns of text will go. Let’s drag some **Guides** from the **Rulers** (**View > Show Rulers**) to mark out where the **Page Numbers** should sit on the page.
From the **Top Ruler**, click and drag a **Guide** downwards towards the bottom of the left-hand page. At the top-left of the screen you’ll notice an **X** or **Y** counter appears as you drag the guide. This indicates the position of the guide on the page. You can manually enter a position in the text box here to create a precisely placed guide. Drag the first guide to **Y position** **267 mm** on the left-hand page of the spread. Repeat for the right-hand page.
[](http://www.indesignskills.com/wp-content/uploads/2014/09/2.1.2.jpg)
Drag a second guide from the top ruler to **Y position 9 mm** on the left-hand page. **Repeat** for the right-hand page.
Drag another guide, this time from the left-hand ruler, to **X position 9 mm**. Drag a second to **X-position 397.4 mm**, so it sits on the far-side of the right-hand page.
### [](http://www.indesignskills.com/wp-content/uploads/2014/09/2.1.3.jpg)
---
### **Step 2**
---
Let’s add some **Page Numbers** to our Master, to keep the reader orientated in your magazine.
Select the **Type Tool (T)** from the **Tools Panel** (**Window > Tools**, if not already visible), and drag to create a small text frame. Position this in the bottom left corner of the left-hand page and type ***page (space)***. Go to **Type > Insert Special Character > Markers > Current Page Number**. InDesign will drop in a page number marker, which is marked out as an ***A*** on your ***A-Master***.
[](http://www.indesignskills.com/wp-content/uploads/2014/09/2.2.1.jpg)
Highlight the text and set the **Font** to [**ITC Century Std**](http://store1.adobe.com/cfusion/store/html/index.cfm?event=displayFontPackage&code=1770), **Light**, **Size 9 pt**.
Open the **Swatches Panel** (**Window > Color > Swatches**) and create a **New Color Swatch**from the drop-down menu. Set it to **CMYK, C=0, M=10, Y=11, K=34**, click **Add** and **OK**. Set the **Font Color** to this new **Swatch**.
[](http://www.indesignskills.com/wp-content/uploads/2014/09/2.2.2.png)
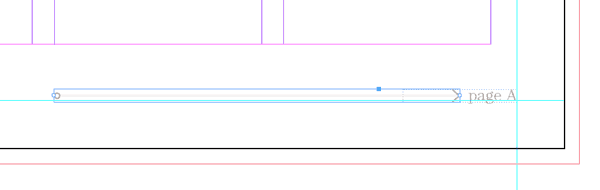
From the **Tools Panel**, select the **Line Tool ()** and, holding **Shift**, drag horizontally to create a line that extends from the left of the page number to the edge of the second column. With the line selected, open the **Stroke Panel** (**Window > Stroke**), set the **Weight** to **0.25 mm**, **Type** to **Thin – Thin**, **Start** to **Circle**, and **End** to **Simple Wide** (or flip the latter two settings depending on how you created the line). Set the **Stroke Color** to **C=0, M=10, Y=11, K=34**, as before.
[](http://www.indesignskills.com/wp-content/uploads/2014/09/2.2.3.png)
Select the text frame containing the page number and **Edit > Copy**, and **Edit > Paste**. Move the frame into a mirrored position on the right-hand page, switching the **Orientation** to **Align Right** (in the top panel, **Character Formatting Controls**). Return to the left page and select and **Edit > Copy** the arrowed line. **Edit > Paste,** and **Right-Click (PC) or Ctrl-Click (Mac OS)** **> Transform > Flip Horizontal**. Manoeuvre into position onto the right-hand page to mirror the left.
[](http://www.indesignskills.com/wp-content/uploads/2014/09/2.2.4.png)
Select both the text frame and line on the right-hand page and **Edit > Copy, Edit > Paste**. Position at the top left corner of the page, resting the text frame within the guides you created earlier. Edit the text to read ***FOODIE NEWS***, adjusting the length of the line a little if you need to. **Copy** the Line, **Paste** and **Right-Click (PC) or Ctrl-Click (Mac OS)** **> Transform > Flip Horizontal** again, and extend it along the top left of the right-hand page.
[](http://www.indesignskills.com/wp-content/uploads/2014/09/2.2.5.png)
Let’s also **Paste** another line, and **Right-Click (PC) or Ctrl-Click (Mac OS)** **> Transform > Rotate 90 degrees CCW**, positioning this shape below the text frame at the top left corner of the page.
### [](http://www.indesignskills.com/wp-content/uploads/2014/09/2.2.6.png)
---
### **Step 3**
---
This Master will be the template for the opening page of a feature in our magazine. Let’s give it a name so we know what it is.
Go to the **Pages Panel** and click to select the ***A-Master*** page icon. Click the three bars at the top-right of the panel to open a drop-down menu. Select **Master Options for “A-Master”…**and rename the Master ***Master – Feature First Spread***. Click **OK**.
### [](http://www.indesignskills.com/wp-content/uploads/2014/09/2.3.1.png)[](http://www.indesignskills.com/wp-content/uploads/2014/09/2.3.2.png)
---
### **Step 4**
---
Return to your newly-renamed Master on screen. For this feature, we will need a decorative background – a wood panel image to give the article an earthy, autumnal feel.
Select the **Rectangle Frame Tool (F)** from the **Tools Panel** and drag to create a frame that extends across the whole of the right-hand page of the Master, right up to the **Bleed**. Go to **File > Place** and select an appropriate image (here I’ve used [**this wooden background**](http://www.ingimage.com/imagedetails/77049027_extInt0/ISS_11071_00962-Isignstock-Contributors-Wooden-background.html) from **Ingimage**), and click **OK**.
Select **Fill Frame Proportionally** from the top control panel to arrange the image nicely in the frame.
[](http://www.indesignskills.com/wp-content/uploads/2014/09/2.4.1.jpg)
From the **Tools Panel**, select the **Rectangle Tool (M)** and drag to create a rectangle the same width and height as the frame you’ve just created. Position it over the top and set the **Stroke**to **\[None\]** and **Fill** to a new swatch (**Window > Color > Swatches > New Color Swatch**), **CMYK, C=28, M=100, Y=97, K=34**.
With the rectangle selected, go to **Object > Effects > Transparency** and set the **Mode** to **Normal** and adjust the **Opacity** to **70%**. Click **OK**.
[](http://www.indesignskills.com/wp-content/uploads/2014/09/2.4.2.jpg)
With the shape still selected, adjust the **Tint** of the swatch to **30%** from the **Swatches Panel**or top control panel, as shown.
[](http://www.indesignskills.com/wp-content/uploads/2014/09/2.4.3.jpg)
Select both the image-filled frame and the rectangle shape by dragging your mouse, and **Right-Click (PC) or Ctrl-Click (Mac OS)** **> Arrange > Send to Back**. Your page numbers and lines are not easily seen. Change the **Font Color** of the text and the **Stroke Color** of the lines to **\[Paper\]** to make them pop a little more. **That’s your first Master done!**
[](http://www.indesignskills.com/wp-content/uploads/2014/09/2.4.4.png)
---
### **Step 5**
---
Let’s create a second Master that’s more pared back and simple, which would suit the inside pages of a feature or article.
In the **Pages Panel**, open the drop-down menu from the top-right corner. Select **New Master…** and maintain the default **B** prefix. Rename the Master **Master – Feature Spread** and click **OK**.
[](http://www.indesignskills.com/wp-content/uploads/2014/09/2.5.1.jpg)
Return for a moment to the ***A-Master*** on screen, and drag your mouse across to select all the text frames and lines on the page (you can hold down **Shift** and deselect the rectangle shape and the image frame), and go to **Edit > Copy**.
Return to your new ***B-Master*** on screen by double-clicking the page icon in the **Pages Panel**and go to **Edit > Paste in Place**. Adjust the **Font Color** of the text and the **Stroke Color** of the lines to **C=0, M=10, Y=11, K=34**.
[](http://www.indesignskills.com/wp-content/uploads/2014/09/2.5.2.jpg)
**Delete** a couple of the lines, as shown, to give this Master a much more simple, minimal look.
[](http://www.indesignskills.com/wp-content/uploads/2014/09/2.5.3.jpg)
---
### **Step 6**
---
You’ll notice that InDesign has automatically applied the ***A-Master*** to all pages in your document. For now though, we just want it applied to a single spread.
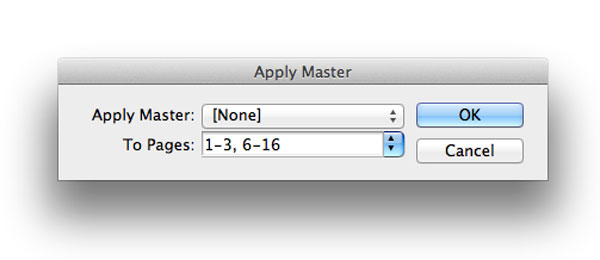
Click on the **\[None\]** Master icon at the very top of the **Pages Panel**. Go to the drop-down menu in the panel and select **Apply Master to Pages…** In the window, type **1-3, 6-17** to apply the **\[None\]** Master to all pages in your document except a single spread, **pages 4-5**.
[](http://www.indesignskills.com/wp-content/uploads/2014/09/2.6.1.jpg)
Click and drag the ***B-Master*** icon’s left page down and drop onto the **Page 6** icon. Drag and drop the ***B-Master*** icon’s right page onto **Page 7**. **File > Save As** your InDesign document as *Foodie Magazine Inside Pages*.
[![magazine, apply master, master spreads]()](http://www.indesignskills.com/wp-content/uploads/2014/09/2.6.2.jpg)
---
### **Great work!** You’ve set up the Master pages for your magazine layout, which will provide the perfect foundation for your editorial content.
### [](http://www.indesignskills.com/wp-content/uploads/2014/09/Intro-Image_.jpg)