### Opening up Adobe InDesign for the first time? As a complete beginner the interface can seem a little intimidating, but you can get started creating amazing designs straight-away using just these five versatile tools.
### You’ll find all of these beginner-friendly tools in the Tools panel, which is docked to the left-hand side of the InDesign workspace.
*Image used throughout: [Shutterstock](https://www.shutterstock.com/image-vector/flat-design-vector-illustration-modern-creative-232711183)*
---
### **1.** The Selection Tools
---
Top beginner tool number one – the **Selection Tool (Shortcut: V, Escape)**, which is the tool activated by default when you first open up InDesign. You can find it at the very top of the **Tools** panel. Use this tool to, you guessed it, select things! This is your go-to tool for when you want to move or scale items. Grab text frames, image frames and shapes with this tool to move them elsewhere, or click and drag corners of objects to adjust size.
**Top tip:** Hold down **Shift** while using this tool to keep the proportions of an element fixed.![indesign tools for beginners get started selection tool type tool page tool shape tools image frame tools]()
Next is the **Direct Selection Tool (Shortcut: A)**, which is the white arrow sitting below the **Selection Tool** on the panel, is better suited to adjusting the position of individual points. I tend to use this when editing the anchor-points of shapes or vector elements. Click on the object with the **Direct Selection Tool** and you’ll notice that small white squares appear around the edges. Click again on one of these white squares to select the anchor-point directly, and drag or use the arrow keys on your keyboard to adjust.![indesign tools for beginners get started selection tool type tool page tool shape tools image frame tools]()
---
### **2.** The Type Tool
---
As a beginner to InDesign, you’ll want to get to grips with creating text. InDesign is a publishing program, and as a result is perfectly designed for creating pro-standard typography. The **Type Tool (T)** is your gateway tool to putting together your very own text-based designs. Select the **Type Tool** and drag onto the page to create a new text frame, or click into an existing text frame to activate editing. You can also transform any shape into a text frame by simply double-clicking your type cursor onto the shape.![indesign tools for beginners get started selection tool type tool page tool shape tools image frame tools]()
You can also turn any shape or line into a text path by activating the **Type on a Path Tool**, which you can find inside the **Type Tool**’s drop-down menu.![indesign tools for beginners get started selection tool type tool page tool shape tools image frame tools]()
Once you have the **Type Tool** selected InDesign will switch to the **Character Formatting Controls** panel at the top of the workspace, allowing you to adjust **Font, Size, Leading, Tracking, Kerning** and other typography settings. By clicking on the paragraph symbol below the ‘A’ at the far-left of the panel, you can also access the **Paragraph Formatting Controls** panel, which gives you access to options for formatting larger sections of text, including **Hyphenation, Alignment** and **Indentation**.![indesign tools for beginners get started selection tool type tool page tool shape tools image frame tools]()
#### Get to grips with [typography basics in InDesign in this quick tutorial](http://www.indesignskills.com/tutorials/how-to-format-text-1/).
---
### **3.** The Frame Tools
---
The **Frame Tools** are all marked out by the ‘X’ across their symbol in the **Tools** panel. These tools are essential if you’re a beginner looking to create image-based designs. Frames are used to insert photos, illustrations or backgrounds into InDesign (which can be done using **File > Place**). The **Rectangle Frame Tool (F)** is the most commonly used frame creator, but you can also choose from an **Ellipse Frame Tool** and **Polygon Frame Tool**, both accessible from the **Rectangle Tool**’s drop-down menu.![indesign tools for beginners get started selection tool type tool page tool shape tools image frame tools]()
Simply choose your tool, then click and drag onto the page to create an image frame. Hold down **Shift** while you drag to create a perfect square, circle or polygon.
Raster images in InDesign are always placed inside frames, allowing you to apply effects to either the containing frame or the image itself, or both. To select the image directly, double-click inside the frame. The edges of the image will be made visible and you can adjust position or scale if you wish. To apply effects to your image frame, head up to **Object > Effects**on the top menu.
#### Learn more about [working with images in InDesign here](http://www.indesignskills.com/skills/place-and-link-images-indesign/).
---
### **4.** The Shape Tools
---
Although vector software like Adobe Illustrator and Inkscape are perfectly tuned for designing vector illustrations, you can do a lot of vector work directly in InDesign too. The simplest way to create vector shapes is to use the **Shape Tools**. These can be found at the bottom of the second section of the **Tools** panel, just below the **Frame Tools**. As with the Frame Tools, you can choose from a **Rectangle Tool (M)**, **Ellipse Tool (L)** or **Polygon Tool**. Click and drag onto the page to create a shape, holding **Shift** to create perfect proportions. You can also create simple lines using the **Line Tool ()**. Using **Shift** alongside the **Line Tool**creates perfectly straight horizontal or vertical lines.![indesign tools for beginners get started selection tool type tool page tool shape tools image frame tools]()
Once your shape is created you can edit color using the **Swatches** panel **(Window > Color > Swatches)** and adjust the width and style of the stroke of your shape using the **Stroke** panel **(Window > Stroke)**.![indesign tools for beginners get started selection tool type tool page tool shape tools image frame tools]()
As with image frames you can also apply effects like transparency, gradients and drop shadows using the **Effects** window**(Object > Effects)**.![indesign tools for beginners get started selection tool type tool page tool shape tools image frame tools]()
You can create more advanced vector designs by using the **Drawing Tools**, which make a great team alongside the **Shape Tools**. Use the **Pen Tool (P)** to create custom anchor-points or the **Pencil Tool (N)** to create more fluid designs. To have more control over these tools, a graphics tablet is always more helpful than a mouse. Our old friend the **Direct Selection Tool (A)** can be used to select and move individual anchor-points, so don’t worry if your drawing didn’t turn out quite as well as you hoped on the first go.
---
### **5.** The Page Tool
---
Our final essential beginner tool is the **Page Tool**…it’s hands-down one of the most useful tools, and has been a lifesaver of mine many a time. Ever wanted to switch a document to landscape? Or quickly change an A3 page to Letter size? The **Page Tool** allows you to quickly change the orientation and/or size of pages. Select the **Page Tool (Shift+P)** and click onto the page you want to change.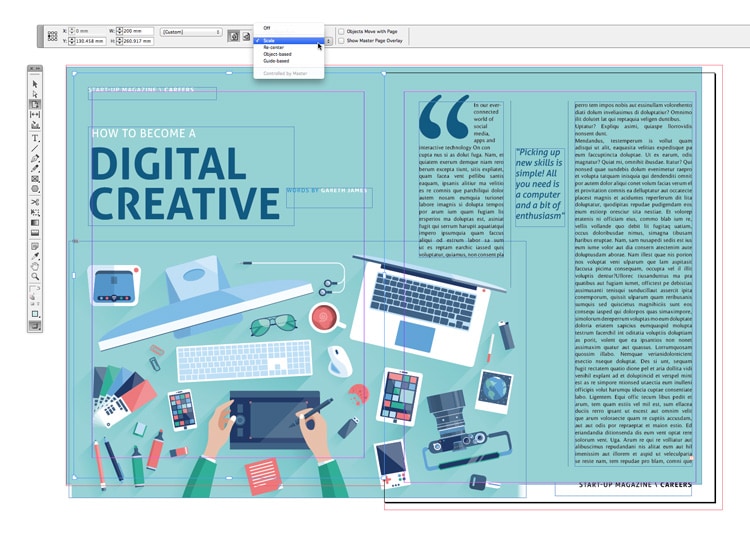
The **Controls** panel at the top of the workspace will adjust, showing you options for size, orientation and how you would like the content on the page to be repositioned. I think one of the handiest options in InDesign must be the **Scale** option from the **Liquid Page Rule** menu. This allows you to keep the proportions of your content intact, and scales it up or down to suit the new page size. All elements, including images and text, will be resized to fit. When you’re short on time and somebody wants the document at a different size, this can save hours of work.