How to Create a Glitter Effect Photoshop Action

Posted on:  


![Final product image](https://image-control-storage.s3.amazonaws.com/2023/02/13163815/glitter-effect-final-4.jpg)
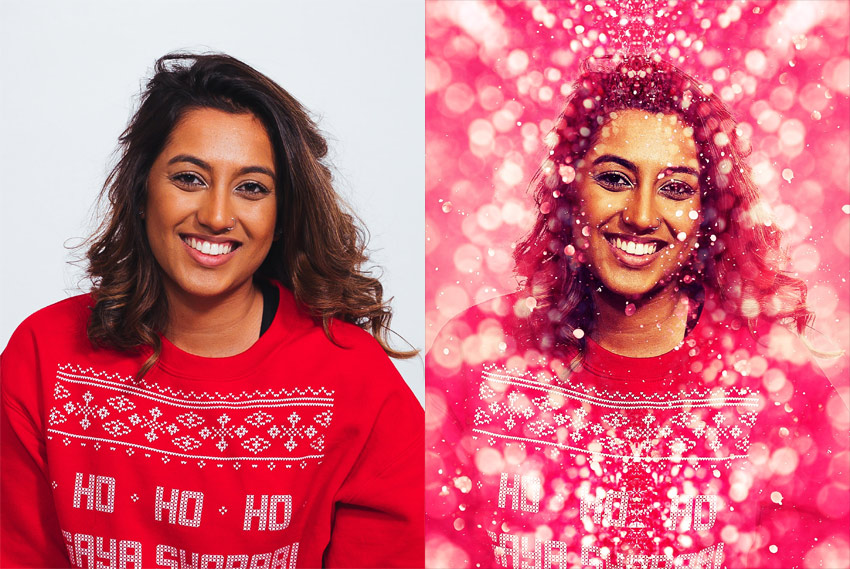
What You’ll Be Creating

If you want to add glitter to photo, in this tutorial I’ll show you how to make glitter in Photoshop and how to add it your photos. Once you create this glitter effect Photoshop action, you’ll be able to add glitter to photos with a single click!

[![LensDust Photoshop Action](https://image-control-storage.s3.amazonaws.com/2023/02/13163817/glitter-effect-promo-1-4.jpg "Image: https://cms-assets.tutsplus.com/uploads/users/108/posts/35249/image/glitter-effect-promo-1.jpg")](https://elements.envato.com/lensdust-photoshop-action-AK7PA52)

How to Create a Glitter Effect Photoshop

What You’ll Need

To recreate the design above, you will need the following resources:

1. How to Start Creating an Action

Step 1

First, open the photo that you want to work with. To open your photo, go to File > Open, choose your photo, and click Open. Now, before we get started, just check a couple of things:

  1. Your photo should be in RGB Color mode, 8 Bits/Channel. To check this, go to Image > Mode.
  2. For best results, your photo size should be 2000–4000 px wide/high. To check this, go to Image > Image Size.
  3. Your photo should be the Background layer. If it is not, go to Layer > New > Background from Layer.
![checking image size and mode](https://image-control-storage.s3.amazonaws.com/2023/02/13163819/checking-image-size-and-mode-4.jpg "Image: https://cms-assets.tutsplus.com/uploads/users/1437/posts/33671/image/checking-image-size-and-mode.jpg")

Step 2

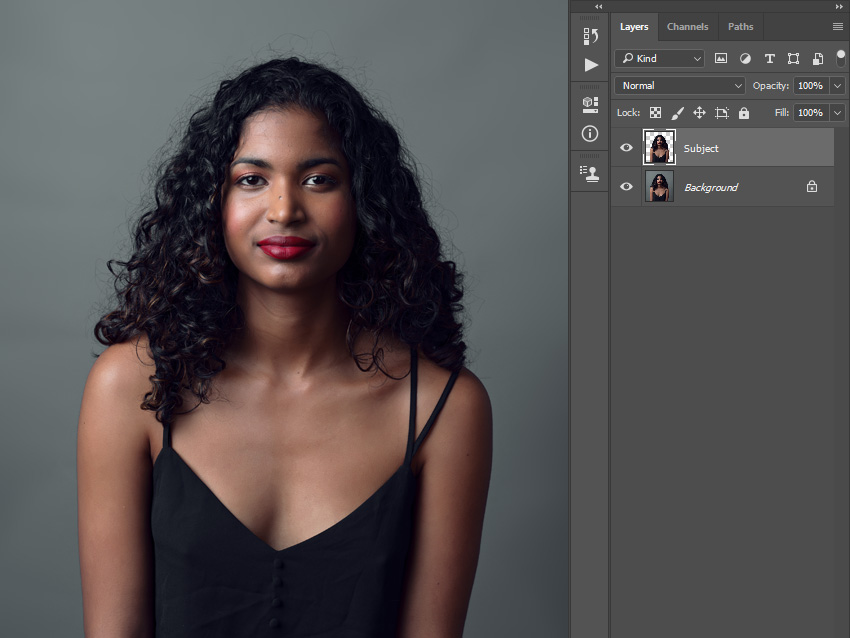
2. How to Select the Subject

Step 1

Before I show you how to add glitter to pictures, first we need to prepare the subject. Choose the Quick Selection Tool (W) and select the background of the photo. Use the Shift-Alt buttons on your keyboard to add or subtract areas from the selection. After you’ve made a perfect selection, press Control-Shift-I on your keyboard to invert the selection.

![making selection](https://image-control-storage.s3.amazonaws.com/2023/02/13163822/making-selection-2-4.jpg "Image: https://cms-assets.tutsplus.com/uploads/users/1437/posts/33671/image/making-selection-2.jpg")

Step 2

Now go to Select > Modify > Smooth and set the Sample Radius to 5 px. Next, go to Select > Modify > Contract and set Contract By to 2 px. Finally, go to Select > Modify > Feather and set the Feather Radius to 2 px.

![modifying selection](https://image-control-storage.s3.amazonaws.com/2023/02/13163824/modifying-selection-2-4.jpg "Image: https://cms-assets.tutsplus.com/uploads/users/1437/posts/33671/image/modifying-selection-2.jpg")

Step 3

Press Control-J on your keyboard to create a new layer using the selection, and name this new layer Subject.

![creating new layer using selection](https://image-control-storage.s3.amazonaws.com/2023/02/13163825/creating-new-layer-using-selection-4.jpg)

3. How to Create the Background

Step 1

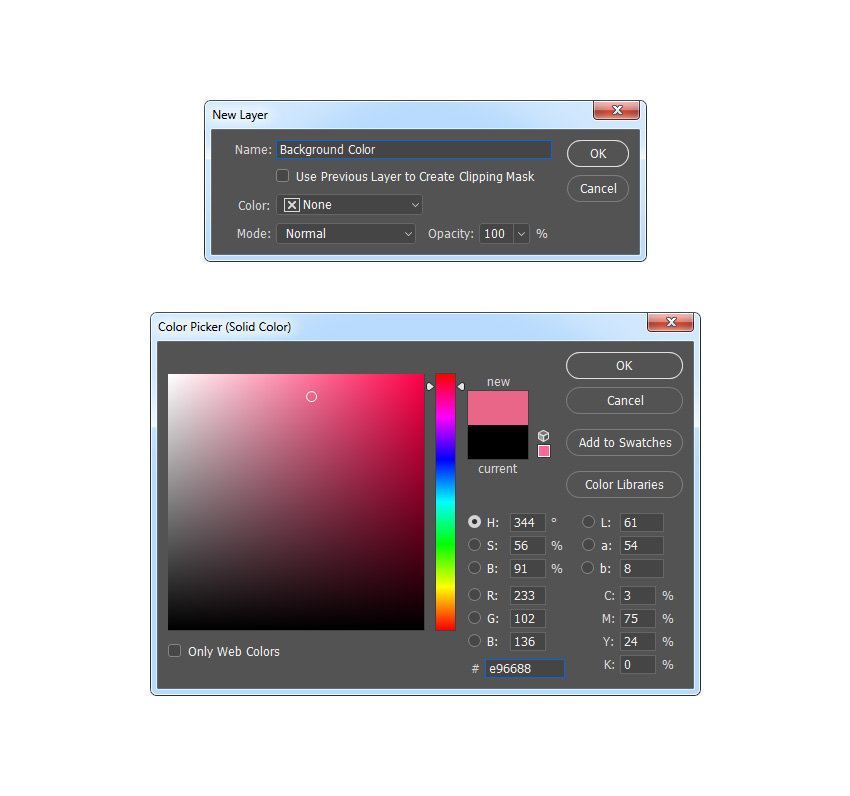
In this section, we are going to create the background. Select the Background layer, go to Layer > New Fill Layer > Solid Color to create a new solid color fill layer, name it Background Color, and choose the color #e96688.

![creating new solid color fill layer](https://image-control-storage.s3.amazonaws.com/2023/02/13163827/creating-new-solid-color-fill-layer-6.jpg)

Step 2

Now Right-click on this layer, choose Blending Options, check Gradient Overlay, and use the settings below:

![adding layer style](https://image-control-storage.s3.amazonaws.com/2023/02/13163829/adding-layer-style-4.jpg)

4. How to Add Glitter Textures

Step 1

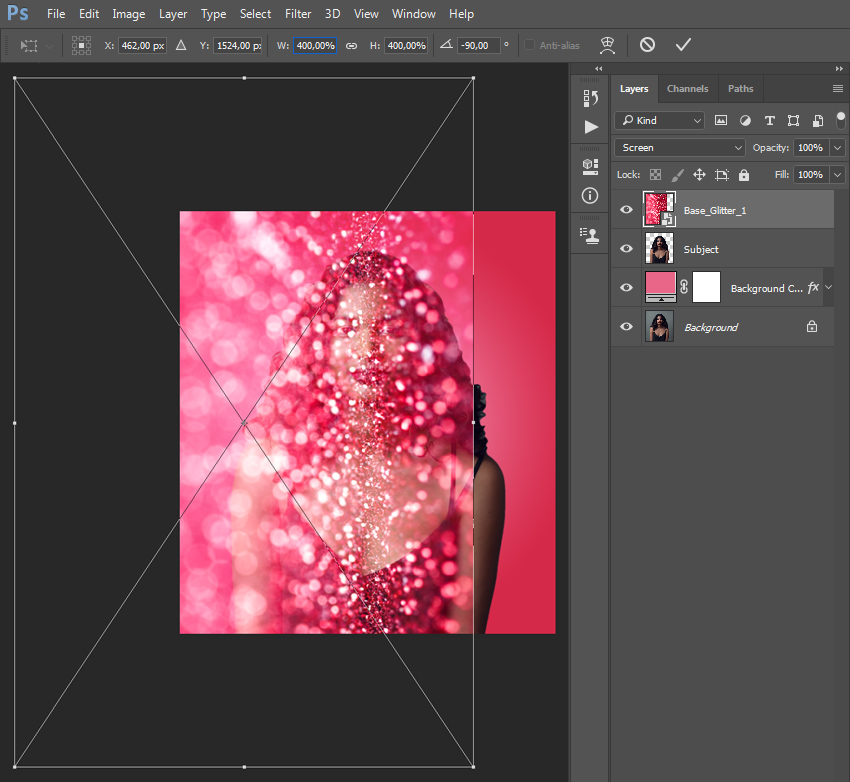
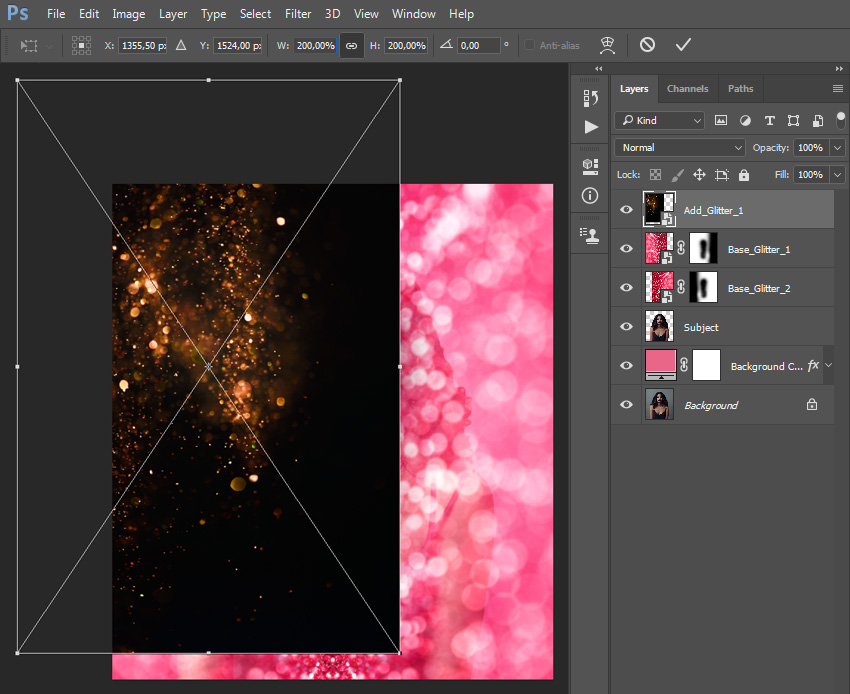
In this section we are going to add glitter to photo. Select the Subject layer, go to File > Place Embedded, select the texture from the first texture link, and click Place. Then, set the Width and Height of the texture to 400% and the Angle to -90°, and name this layer Base_Glitter_1.

![how to add glitter in photoshop](https://image-control-storage.s3.amazonaws.com/2023/02/13163831/placing-texture-5.jpg)

Step 2

Now change the Blending Mode of this layer to Screen.

![changing blending mode](https://image-control-storage.s3.amazonaws.com/2023/02/13163833/changing-blending-mode-7.jpg)

Step 3

Go to Layer > Layer Mask > Reveal All to add a layer mask that reveals the whole layer. Then, set the foreground color to #000000, choose the Brush Tool (B), pick a soft brush, and brush as shown below. Feel free to use different settings for the Opacity of the brush.

![brushing onto layer mask](https://image-control-storage.s3.amazonaws.com/2023/02/13163835/brushing-onto-layer-mask-4.jpg)

Step 4

Now press Control-J on your keyboard to duplicate this layer. Then, go to Edit > Transform > Flip Horizontal to flip this layer horizontally. After that, using the Move Tool (V), click and drag anywhere inside the canvas to position the layer as shown below.

![duplicating layer](https://image-control-storage.s3.amazonaws.com/2023/02/13163837/duplicating-layer-5.jpg)

Step 5

Name this layer Base_Glitter_2 and drag it just below the Base_Glitter_1 layer in the Layers panel.

![naming layer](https://image-control-storage.s3.amazonaws.com/2023/02/13163839/naming-layer-5.jpg)

Step 6

Now select the Base_Glitter_1 layer, go to File > Place Embedded, select the texture from the second texture link, and click Place. Then, set the Width and Height of the texture to 200% as shown below, and name this layer Add_Glitter_1.

![add glitter to photo](https://image-control-storage.s3.amazonaws.com/2023/02/13163840/placing-texture-2-4.jpg)

Step 7

Change the Blending Mode of this layer to Lighten.

![changing blending mode](https://image-control-storage.s3.amazonaws.com/2023/02/13163842/changing-blending-mode-2-4.jpg)

Step 8

Now go to Layer > New Fill Layer > Solid Color to create a new solid color fill layer, name it A_G_1_Color, and choose the color #e96688.

![creating new solid color fill layer](https://image-control-storage.s3.amazonaws.com/2023/02/13163844/creating-new-solid-color-fill-layer-2-5.jpg)

Step 9

Press Control-Alt-G on your keyboard to create a clipping mask. Then, change the Blending Mode of this layer to Color.

![creating clipping mask](https://image-control-storage.s3.amazonaws.com/2023/02/13163846/creating-clipping-mask-4.jpg)

Step 10

Now Control-click on the Add_Glitter_1 layer to select both layers at the same time. Then, press Control-J on your keyboard to duplicate these layers.

![duplicating layers](https://image-control-storage.s3.amazonaws.com/2023/02/13163847/duplicating-layers-4.jpg)

Step 11

Select the Add_Glitter_1_copy layer, and using the Move Tool (V), click and drag anywhere inside the canvas to position this layer as you like.

![positioning layer](https://image-control-storage.s3.amazonaws.com/2023/02/13163849/positioning-layer-6.jpg)

Step 12

Now press Control-T on your keyboard to transform this layer, and set the Angle to -30°.

![transforming layer](https://image-control-storage.s3.amazonaws.com/2023/02/13163851/transforming-layer-4.jpg)

Step 13

Control-click on the A_G_1_Color copy layer to select both layers at the same time. Then, drag these layers just below the Add_Glitter_1 layer in the Layers panel. After that, name these two layers according to their sequence number.

![arranging layers](https://image-control-storage.s3.amazonaws.com/2023/02/13163853/arranging-layers-4.jpg)

Step 14

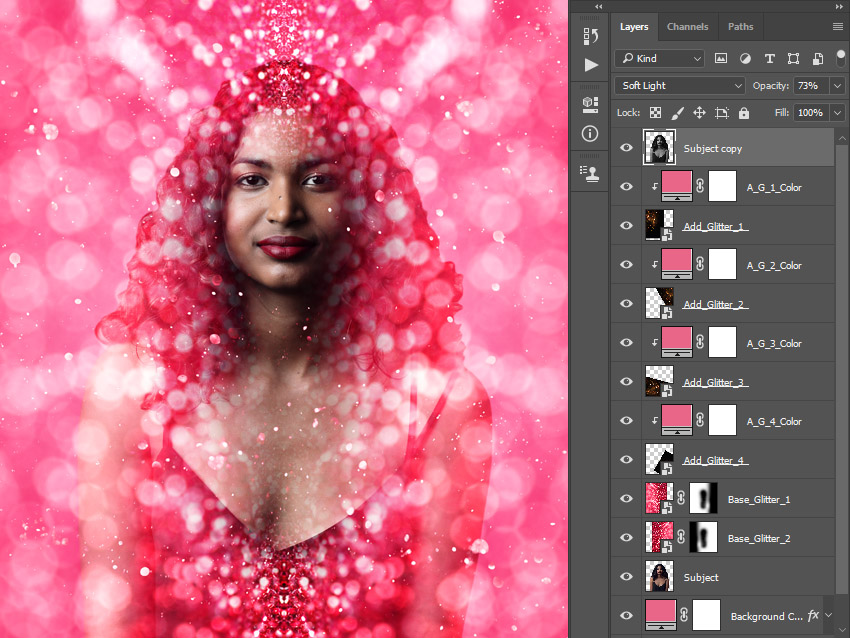
Now repeat this process to create as many glitter layers as you want. Feel free to use different transform settings for each of the texture layers. Here is my result:

![repeating process](https://image-control-storage.s3.amazonaws.com/2023/02/13163855/repeating-process-2-4.jpg)

5. How to Make the Final Adjustments

Step 1

In this section we are going to make some final adjustments to the design. Select the Subject layer and press Control-J on your keyboard to duplicate it. Then, drag this layer to the top of the layers in the Layers panel.

![duplicating layer](https://image-control-storage.s3.amazonaws.com/2023/02/13163857/duplicating-layer-2-4.jpg)

Step 2

Now press Control-Shift-U on your keyboard to desaturate this layer. Then, change the Blending Mode of this layer to Soft Light and set the Opacity to 73%.

![changing blending mode and opacity](https://image-control-storage.s3.amazonaws.com/2023/02/13163859/changing-blending-mode-and-opacity-5.jpg)

Step 3

Name this layer Subject Details.

![naming layer](https://image-control-storage.s3.amazonaws.com/2023/02/13163900/naming-layer-2-4.jpg)

Step 4

Now go to Layer > New > Gradient Map to create a new gradient map adjustment layer and name it Color Look.

![creating new gradient map adjustment layer](https://image-control-storage.s3.amazonaws.com/2023/02/13163903/creating-new-gradient-map-adjustment-layer-6.jpg)

Step 5

Double-click on this layer thumbnail, and then in the Properties panel, click on the gradient to open up the Gradient Editor panel and enter the settings below:

![adjusting gradient map](https://image-control-storage.s3.amazonaws.com/2023/02/13163904/adjusting-gradient-map-4.jpg)
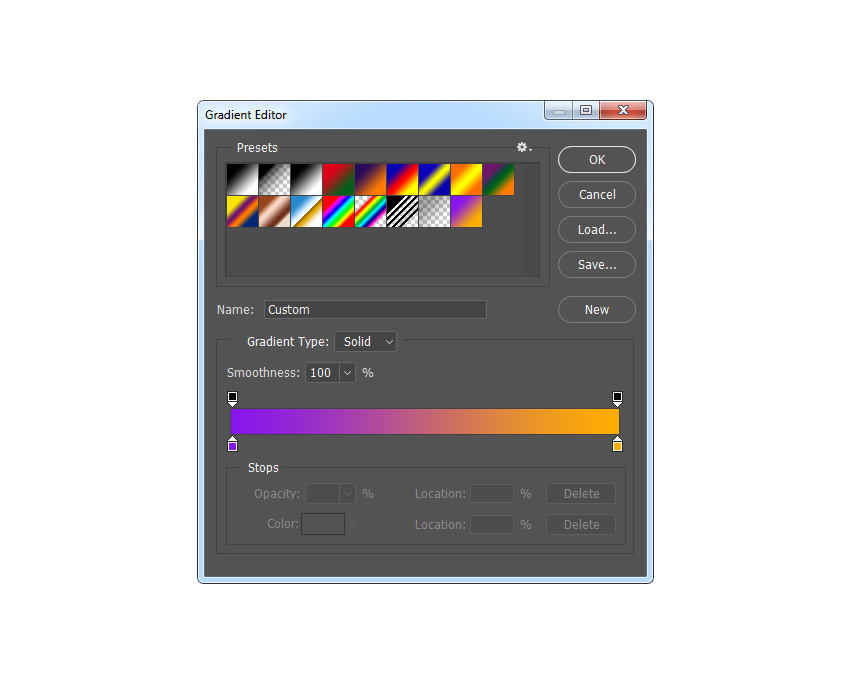
The left color stop has color #8616ee, and the right color stop has color #ffae00.

Step 6

Now change the Blending Mode of this layer to Soft Light.

![changing blending mode](https://image-control-storage.s3.amazonaws.com/2023/02/13163906/changing-blending-mode-3-4.jpg)

Step 7

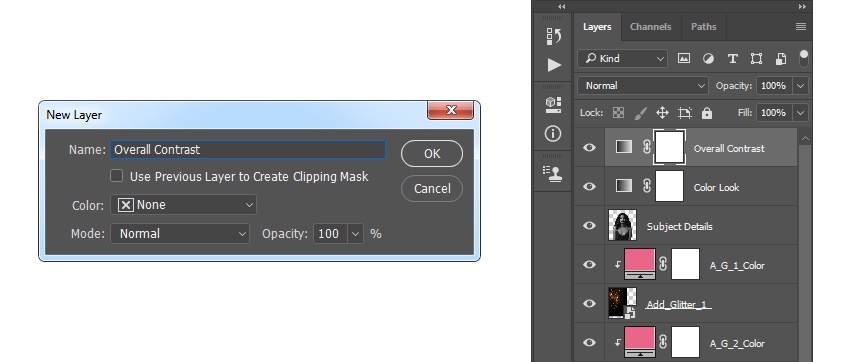
Press D on your keyboard to reset the swatches. Then, go to Layer > New Adjustment Layer > Gradient Map to create a new gradient map adjustment layer and name it Overall Contrast.

![creating new gradient map adjustment layer](https://image-control-storage.s3.amazonaws.com/2023/02/13163908/creating-new-gradient-map-adjustment-layer-2-5.jpg)

Step 8

Now change the Blending Mode of this layer to Soft Light and set the Opacity to 73%.

![changing blending mode and opacity](https://image-control-storage.s3.amazonaws.com/2023/02/13163909/changing-blending-mode-and-opacity-2-4.jpg)

Step 9

Select the Base_Glitter_1 layer and click on the link icon between the layer thumbnail and layer mask to unlink them. Then, select the layer thumbnail, and using the Move Tool (V), click and drag anywhere inside the canvas to drag the layer to the left as shown below:

![positioning layer](https://image-control-storage.s3.amazonaws.com/2023/02/13163911/positioning-layer-2-4.jpg)

Step 10

Now select the Base_Glitter_2 layer and click on the link icon between the layer thumbnail and layer mask to unlink them. Then, select the layer thumbnail, and using the Move Tool (V), click and drag anywhere inside the canvas to drag the layer to the right as shown below:

![positioning layer](https://image-control-storage.s3.amazonaws.com/2023/02/13163913/positioning-layer-3-4.jpg)

Step 11

Select the Overall Contrast layer, press Control-Alt-Shift-E on your keyboard to make a screenshot, and then press Control-Shift-U to desaturate this layer. Then, go to Filter > Other > High Pass and set the Radius to 2 px.
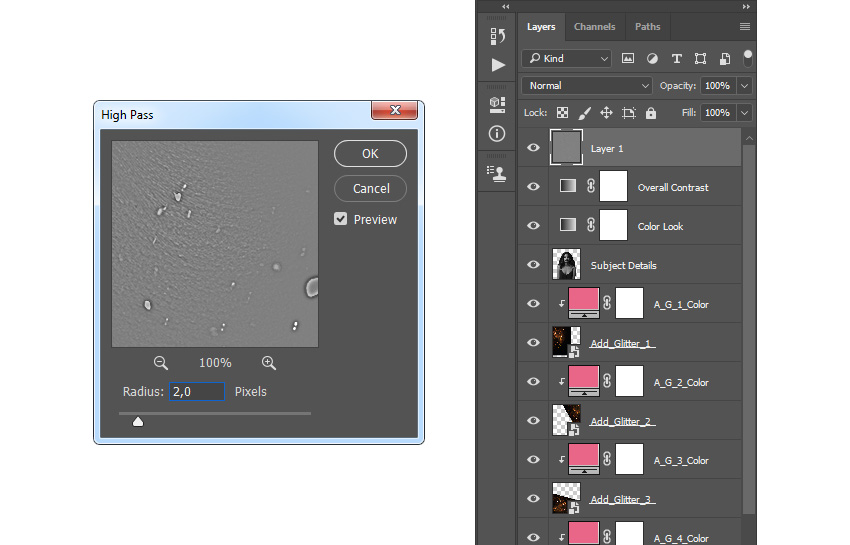
![adding high pass filter](https://image-control-storage.s3.amazonaws.com/2023/02/13163914/adding-high-pass-filter-5.jpg)

Step 12

Now change the Blending Mode of this layer to Hard Light and name it Overall Sharpening.

![changing blending mode](https://image-control-storage.s3.amazonaws.com/2023/02/13163917/changing-blending-mode-4-4.jpg)

You Made It!

Congratulations, you have succeeded! You have learned how to create a glitter effect Photoshop action to create amazing effects for pictures. Here is our final result:

![final result](https://image-control-storage.s3.amazonaws.com/2023/02/13163919/final-result-2-4.jpg "Image: https://cms-assets.tutsplus.com/uploads/users/1437/posts/33671/image/final-result-2.jpg")

Marko Kožokar Jul 27, 2020


Code


Art


Design


UI/UX


Video


Projects


Social