Perspective is considered to be one of the fundamental components of drawing. A beginner artist may think that it only has to be mastered by landscape or cityscape artists, but this is not the case at all. Understanding perspective and how to create the illusion of depth is essential in order to render believable scenes in all kinds of art, whether it’s still-life, interiors, and even animal and portraiture-based artwork.
Perspective is what gives a picture a sense of three-dimensionality and depth. Take a moment to look out your closest window. Observe how the trees/buildings/houses closest to you appear larger, while the trees/buildings/houses farther from you appear much smaller.
Even though the tree closest to you may, in reality, be the same size as a tree farther away from you, they appear to be different sizes to you due to the fact that you are standing at the specific point you are in.
Artists must master the ability to create this effect on a flat, two-dimensional surface, be it paper, canvas, or whatever substrate is used. The more complex a picture is, the more important it is for the artist to approach the piece in a methodical and careful fashion.
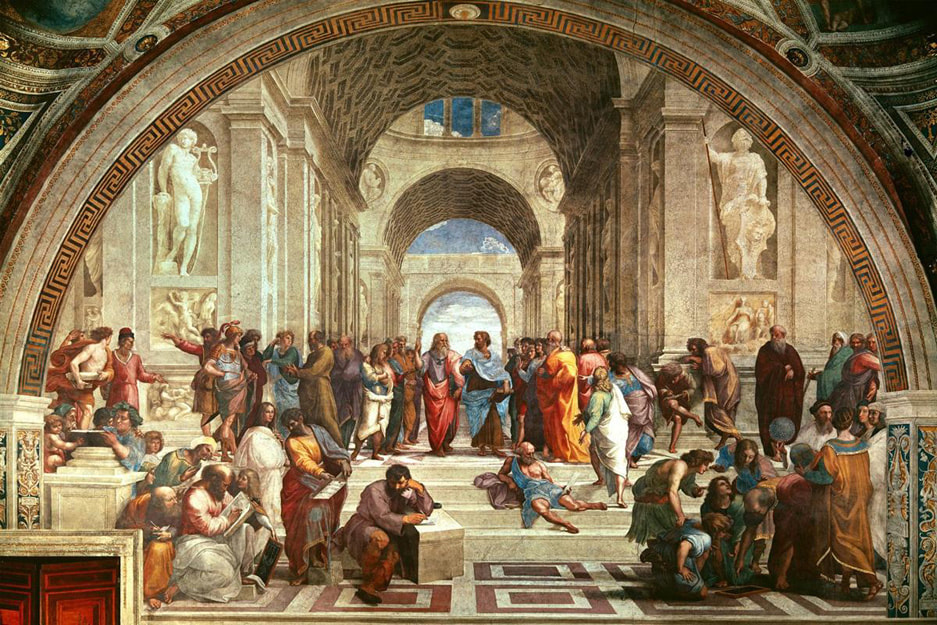 Fresco painting by Raphael created for one of the Vatican walls. The School of Athens (1510 – 1511).Take a minute to analyze the following famous masterpiece by the great artist Raphael.
In this fresco we are able to see how the arches in the ceilings get smaller and smaller as they get farther away from us in the distance. Likewise, the human figures that are closest to us in the foreground appear larger that the people located in the middleground (more about these terms later).
The combination of all of these things creates a very effective sensation of three-dimensionality, perspective and depth.**
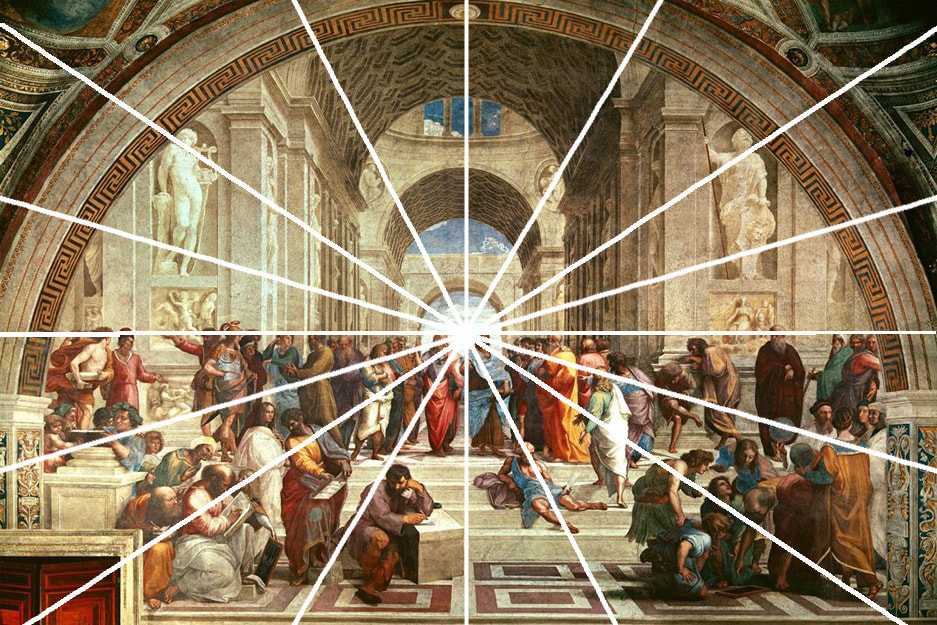 The School of Athens with a One-Point Perspective grid.This famous masterpiece is an excellent example of One Point Perspective, which we will get into in a bit. If we place the One Point Perspective grid on top of the artwork, we are able to see how the artist was able to visualize where to effectively place the elements within the painting.
Starting our work with a grid made up of straight lines, allows us to better visualize the three-dimensional space which we will place our shapes upon.**
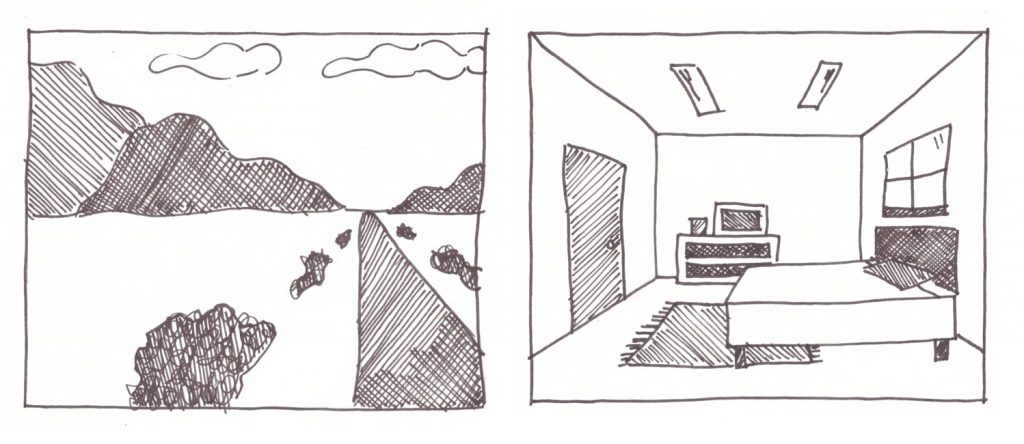
Before moving on, here’s how the grid applies in a modern picture. Notice how the point at which the lines meet is off center in this image.
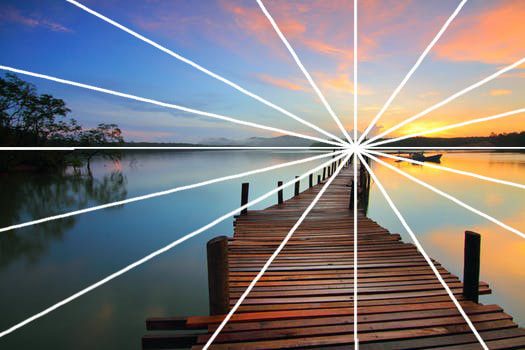 Picture of a dock going off into the distance over a large lake with One Point Perspective grid. Important Art Terms Related to Perspective
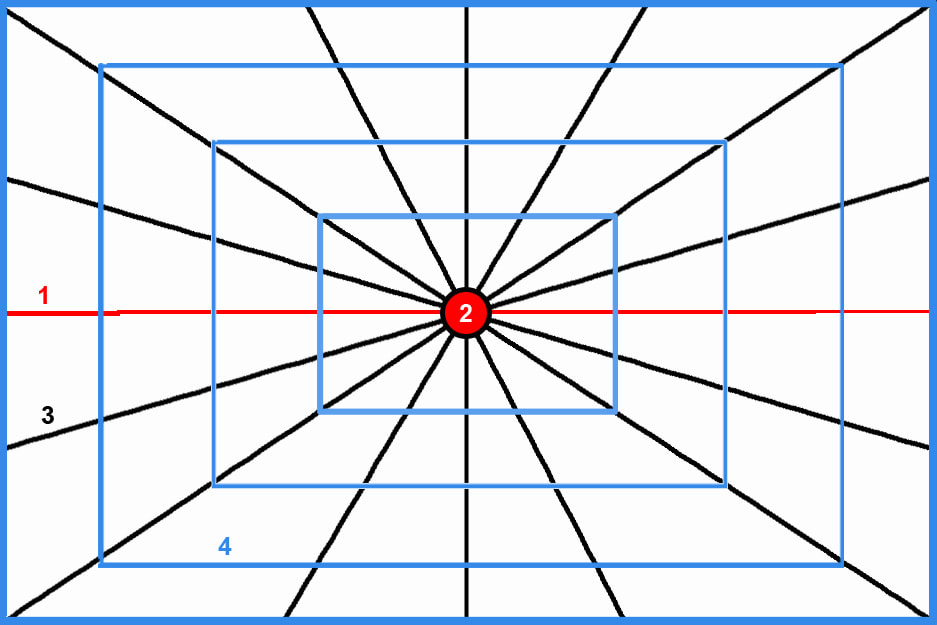
1. Horizon Line
This is the line that separates sky from land (in landscapes) or sky from water (in seascapes). It is also referred to as the “eye-level” of the viewer. The Horizon Line doesn’t necessarily have to be right in the middle of your picture. In fact, it is a lot better, compositionally speaking, if it is somewhere below or even above the halfway point of your drawing area.
2. Vanishing Point
The Vanishing Point is placed somewhere on the Horizon Line and it represents the farthest point in your picture. There can be a number Vanishing Points (One Point Perspective has one, Two Point Perspective has two and Three Point Perspective has three). When creating a grid, this point is were the Orthogonal Lines all meet.
3. Orthogonal Lines
Orthogonal Lines (also known as Convergence or Vanishing Lines) are key when drawing perspective. They are diagonal and recede back into the vanishing point(s). A perspective grid can have many Orthogonal Lines or very few of them, depending on the complexity of the picture. The more elements in the picture, the more lines you will probably have to include in your grid.
4. Transversal Lines
These are completely horizontal or vertical lines that are either parallel or perpendicular to the horizon line. They form rectangles or right angles along the grid and are especially useful when drawing interiors (I will provide you with an example in a bit).
5. Vantage Point
The Vantage Point refers to the specific place from which a scene is viewed. This point can actually be very high (referred to as bird’s-eye) or very low (referred to as worm’s-eye). It is crucial to decide where the Vantage Point is going to be in the very beginning because this will affect the placement and size of all elements within the composition.
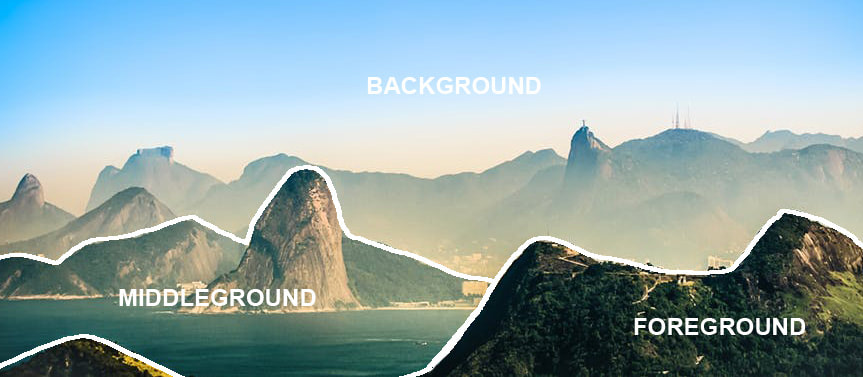
 Foreground, Middleground and Background are also helpful terms to understand because including a variety of layers within a drawing or painting really helps transmit a sensation of depth. The layer closest to the viewer is referred to as the Foreground, behind it is the Middleground and the layer furthest from the viewer (which in many cases is simply the sky) is the Background.
It varies from image to image, but the important thing is that you are able to discern which layers are closest to the viewer and which layers are farther away. This will affect the color placement within the artwork, as well as the sharpness of the elements included in each layer.**
The image below is an excellent example that illustrates how the elements in the foreground are much more sharp and saturated than the layers behind it. As you can see, elements in the middle ground and background, also get cooler and cooler in temperature as they recede.
This is related to another perspective technique called Aerial Perspective which artists can employ along with linear perspective (or by itself) in order to create a sensation of depth and space.
Foreshortening is a drawing technique that helps us create the illusion of an object/person/animal receding into the distance. The object, person or animal is drawn shorter, in a way that makes it seem as if one part of it is closest to the viewer and the other end is far from the viewer.** It is a great way to transmit a sense of depth, even when the only subject included in an artwork is an object or a person.
When used in extremes, it creates very interesting artwork. Andrea Mantegna’s famous Lamentation of Christ (1480) is an excellent example of foreshortening.
 Tempera painting on canvas by Andrea Mantegna. Lamentation of Christ (1480).The picture below also shows foreshortening. If you notice, the man’s forearm appears wider than the width of his open hand. This is because his forearm is so much closer to us than his hand!
Drawing 3-Dimensional Geometric Shapes
Knowing how to draw three-dimensional geometric shapes is absolutely necessary before moving on to using the One or Two Point Perspective drawing techniques. Why? Because, here in reality, EVERYTHING around us has volume (length, width and height). First, practice drawing simple three- dimensional shapes (use the PDFs at the end of the post titled Geometric_Shapes1 and Geometric_Shapes2 for step-by-step instructions). Once you feel more confident, try placing them within the One and Two Point Perspective grids (I have also included both grids at the end for you to use). If you are already great at this, ignore this step.
When attempting to draw any geometric shape, straight lines are important. This is even more important when creating three-dimensional shapes because they involve parallel lines and angles. Due to this, I recommend using a ruler in the beginning. If you want to get even more technical, bring out your protractor! Keep in mind that, once you have enough practice, you will be able to create 3D shapes without using any straight-edged tools. Unless you are going for a super clean and precise drawing, slight imperfections will not affect the picture if the perspective is successful overall.
![]()
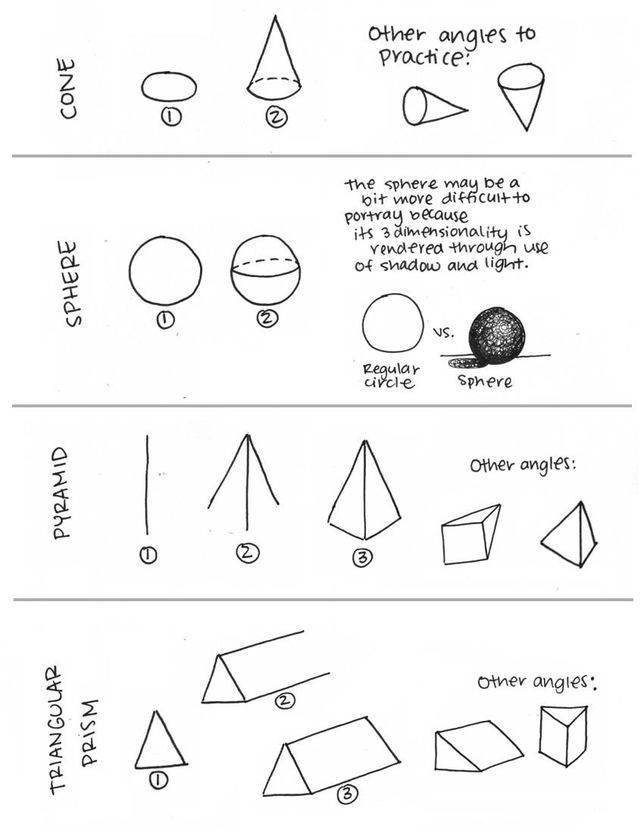 How to draw 3D Geometric shapes. Download this worksheet at the end of the post.
How to Apply the One and Two Point Perspective Techniques
One, Two and Three Point Perspectives are referred to as ¨Lineal Perspectives¨, which means that they rely on the use of straight lines to depict a three-dimensional space and the forms within it. In other words, to apply these techniques we will need to prepare for our drawings by creating grids using a ruler. It is important to note that this grid should be created LIGHTLY. Though it will be heavily used throughout the drawing phase, they will be erased later on.
One-Point Perspective
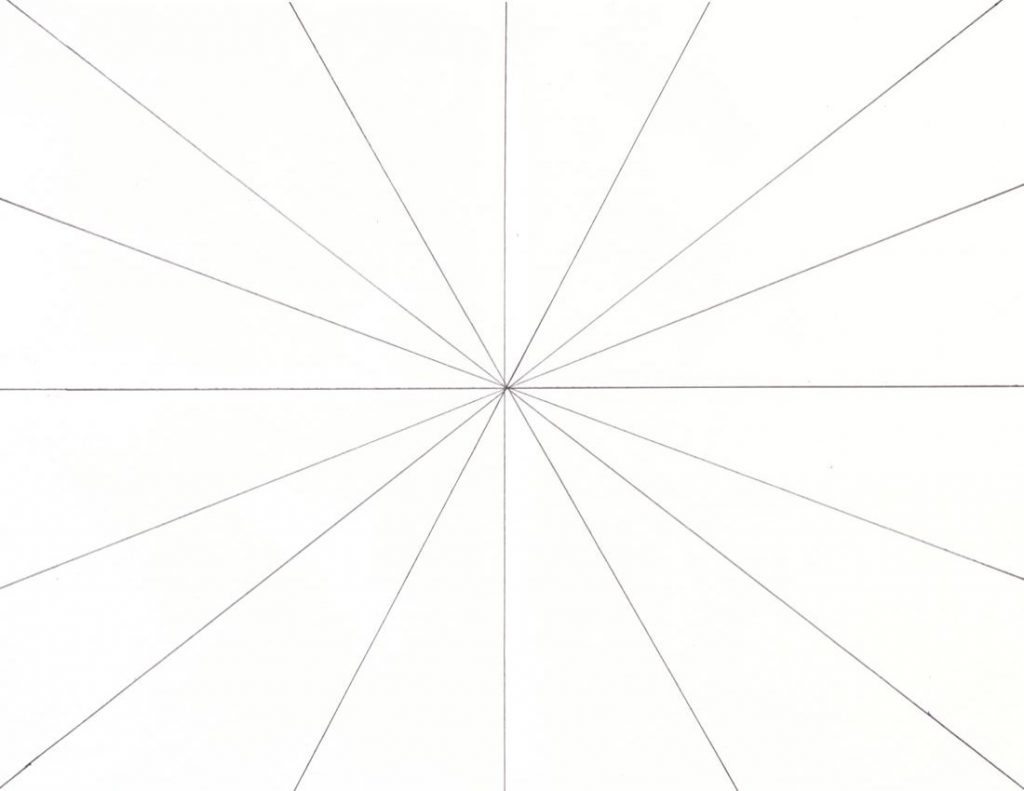 ](https://image-control-storage.s3.amazonaws.com/1_point_grid.pdf)One-Point)
Perspective Grid The One-Point Perspective grid is made up of straight lines that converge at the Vanishing Point. Firstly, decide where your Horizon Line will be placed within your drawing area. Secondly, place your Vanishing Point somewhere on your Horizon Line (remember it does not have to be placed right in the center). Then, carefully draw straight lines from one edge of your paper to the other using a ruler, making sure that they all cross at your Vanishing Point. This kind of perspective is excellent to draw simple cityscapes, landscapes and interiors.**
My suggestion would be to begin using this technique to draw simple landscapes and focus on adding in different organic elements with believable proportions. Then, master placing three-dimensional geometric shapes within the One-Point Perspective grid to effectively transmit a sensation of depth (see picture below). Afterwards, one can move on to buildings and interiors.
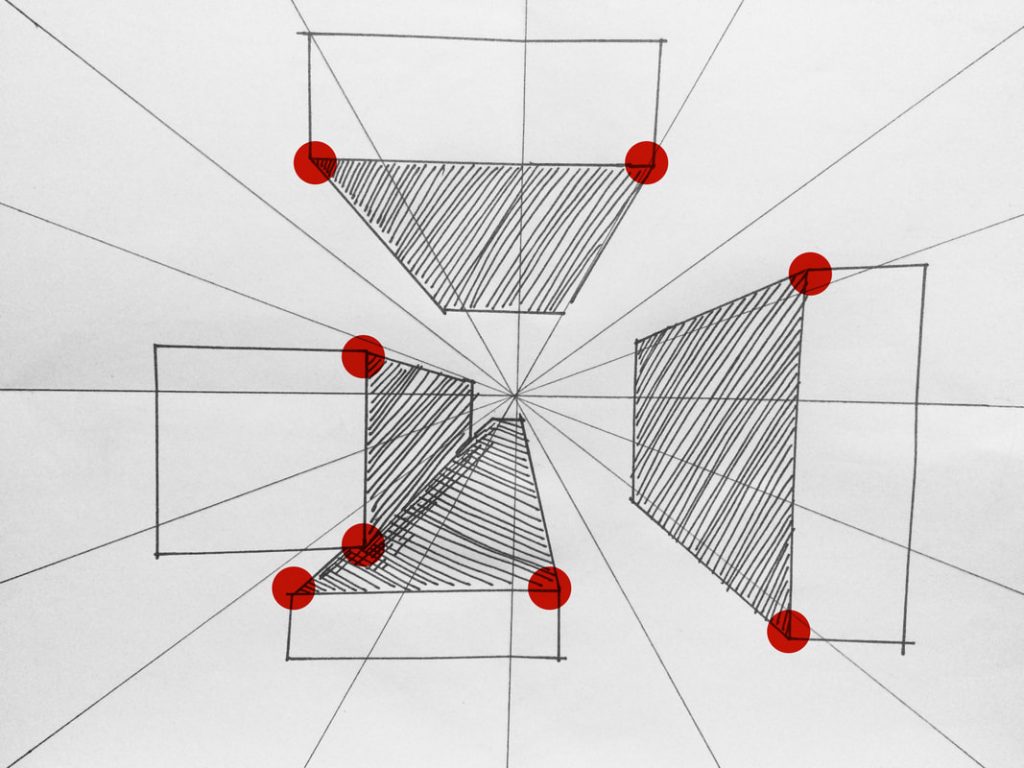 3D Geometric Shapes in One-Point Perspective Grid.
How to do this exercise:
1. Prepare your One-Point Perspective grid (you can download the PDF at the end or draw it for yourself).
2. Draw a few flat (two dimensional) rectangles or squares anywhere on your grid.
3. Pinpoint the corners/angles of your shapes that are closest to the Vanishing Point (see red highlights in the image).
4. Using your ruler, draw straight lines from the corners of your shapes down to the Vanishing Point. Take into account here that there may be two to three lines, depending on where you placed your shape.
5. Finally, close your shapes with vertical or horizontal lines. Remember to make these lines parallel to the lines you used in your initial two dimensional shape.
 Take a moment to analyze this important artwork by Van Gogh. Judging by the lines you can see in the image, where would you say the Vanishing Point is located?
The Two-Point Perspective grid is also made up of straight lines that converge at the Vanishing Point, only this time there are two! This grid is going to help us create the effect of viewing objects (think boxes or buildings) as if we are standing on a corner. It is slightly more complex and is often used when drawing buildings in a cityscape or objects at more extreme angles. Let’s start practicing! You can decide if you’d like to use the Two-Point Perspective grid I have included at the end of the post, or if you’d like to create it for yourself. Here are the steps you need to follow to make it yourself!
To prepare a Two-Point Perspective grid, I usually start by folding my paper in half both lengthwise and widthwise. The horizontal fold will be my Horizon Line in this case.
Then, decide where your two Vanishing Points will be on this Horizon Line (I recommend placing them at a good distance from each other). You can see in the image below how I placed my two Vanishing Points close to the edges of my paper. I often like to place them at equal distances from the edges and use a ruler to help me do this.
The vertical lines you can see here will be erased and are not really a necessary part of the grid. You can also see that I have folded my paper two more times. Sometimes I like to do this because the folds help me visualize straight lines as I am creating my grids, but they are not necessary either.
Next, create small marks using a ruler right on the central vertical fold on your paper. You can decide how close or far apart you want these marks to be (I recommend somewhere between 1.5 to 2 centimeters to start out).
To finish the grid, carefully draw lines starting at your Vanishing Points and ending at the marks you previously created on the central vertical line. The lines you draw coming from your left and right Vanishing Points should meet, creating a symmetrical/mirrored effect.
By this point your Two-Point Perspective grid should be finished. If you have never used this technique before, I recommend starting out by drawing simple three-dimensional geometric shapes on it. This will help you understand how it works and will set you up for success in your later drawings.
Next, use the grid to create a cityscape! Remember, these buildings are nothing more than rectangular prisms with a few details added in. Nothing to be scared about.
After enough practice, you will be able to easily conclude what kind of drawing technique you need to apply in each project. The sketch below is something I created a while back. Where would you say that the Vanishing Point is located in this case? Remember that even though certain elements are not always visible within a final piece, the artist must always have them in mind when working so that the sense of perspective is achieved at the end.
If you still feel a bit unsure about taking it outside, I recommend searching for pictures of buildings or houses online and apply what you have learned. Draw one single house or building three-dimensionally and move on to groups of houses, then street views, etc. I assure you, you WILL get more and more comfortable.