In the previous lesson, you learned how to write the HTML that determines how a web page is structured. The next step is to make that structure look good with some style, which is exactly what CSS is for. In this lesson, we’re going to focus on what we believe are some foundational CSS concepts, things that everyone should know from the beginning — whether they are just starting out or simply need a refresher.
This section contains a general overview of topics that you will learn in this lesson.
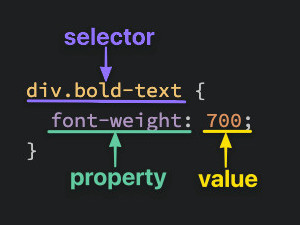
At the most basic level, CSS is made up of various rules. These rules are made up of a selector (more on this in a bit) and a semi-colon separated list of declarations, with each of those declarations being made up of a property:value pair.
A <div> is one of the basic HTML elements. It is simply an empty container. In general, it is best to use other tags such as <h1> or <p> for content in your projects, but as we learn more about CSS you’ll find that there are many cases where the thing you need is just a container for other elements. Many of our exercises use plain <div>s for simplicity. Later lessons will go into much more depth about when it is appropriate to use the various HTML elements.
Selectors simply refer to the HTML elements to which CSS rules apply; they’re what is actually being “selected” for each rule. The following subsections don’t cover every selector available, but they’re by far the most common and the ones you should get comfortable using first.
The universal selector will select elements of any type, hence the name “universal”, and the syntax for it is a simple asterisk. In the example below, every element would have the color: purple; style applied to it.
1
2
3
  * {
    color: purple;
}
A type selector (or element selector) will select all elements of the given element type, and the syntax is just the name of the element:
1
2
3
4
5
6
<!-- index.html -->

<div>Hello, World!</div>
<div>Hello again!</div>
<p>Hi...</p>
<div>Okay, bye.</div>
1
2
3
div {
  color: white;
}
Here, all three <div> elements would be selected, while the <p> element wouldn’t be.
Class selectors will select all elements with the given class, which is just an attribute you place on an HTML element. Here’s how you add a class to an HTML tag and select it in CSS:
1
2
3
4
5
<!-- index.html -->

<div class="alert-text">
  Please agree to our terms of service.
</div>
1
2
3
.alert-text {
  color: red;
}
Note the syntax for class selectors: a period immediately followed by the case-sensitive value of the class attribute. Classes aren’t required to be unique, so you can use the same class on as many elements as you want.
Another thing you can do with the class attribute is to add multiple classes to a single element as a space-separated list, such as class="alert-text severe-alert". Since whitespace is used to separate class names like this, you should never use spaces for multi-worded names and should use a hyphen instead.
ID selectors are similar to class selectors. They select an element with the given ID, which is another attribute you place on an HTML element:
1
2
3
<!-- index.html -->

<div id="title">My Awesome 90's Page</div>
1
2
3
#title {
  background-color: red;
}
Instead of a period, we use a hashtag immediately followed by the case-sensitive value of the ID attribute. A common pitfall is people overusing the ID attribute when they don’t necessarily need to, and when classes will suffice. While there are cases where using an ID makes sense or is needed, such as taking advantage of specificity or having links redirect to a section on the current page, you should use IDs sparingly (if at all).
The major difference between classes and IDs is that an element can only have one ID. An ID cannot be repeated on a single page, and the ID attribute should not contain any whitespace at all.
What if we have two groups of elements that share some of their style declarations?
.read {
  color: white;
  background-color: black;
  /* several unique declarations */
}

.unread {
  color: white;
  background-color: black;
  /* several unique declarations */
}
Both our .read and .unread selectors share the color: white; and background-color: black; declarations, but otherwise have several of their own unique declarations. To cut down on the repetition, we can group these two selectors together as a comma-separated list:
.read,
.unread {
  color: white;
  background-color: black;
}

.read {
  /* several unique declarations */
}

.unread {
  /* several unique declarations */
}
Both of the examples above (with and without grouping) will have the same result, but the second example reduces the repetition of declarations and makes it easier to edit either the color or background-color for both classes at once.
Another way to use selectors is to chain them as a list without any separation. Let’s say we had the following HTML:
1
2
3
4
<div>
  <div class="subsection header">Latest Posts</div>
  <p class="subsection preview">This is where a preview for a post might go.</p>
</div>
We have two elements with the subsection class that have some sort of unique styles, but what if we only want to apply a separate rule to the element that also has header as a second class? Well, we could chain both the class selectors together in our CSS like so:
1
2
3
.subsection.header {
  color: red;
}
What .subsection.header does is it selects any element that has both the subsection and header classes. Notice how there isn’t any space between the .subsection and .header class selectors. This syntax basically works for chaining any combination of selectors, except for chaining more than one type selector.
This can also be used to chain a class and an ID, as shown below:
<div>
  <div class="subsection header">Latest Posts</div>
  <p class="subsection" id="preview">This is where a preview for a post might go.</p>
</div>
You can take the two elements above and combine them with the following:
.subsection.header {
  color: red;
}

.subsection#preview {
  color: blue;
}
In general, you can’t chain more than one type selector since an element can’t be two different types at once. For example, chaining two type selectors like div and p would give us the selector divp, which wouldn’t work since the selector would try to find a literal <divp> element, which doesn’t exist.
Combinators allow us to combine multiple selectors differently than either grouping or chaining them, as they show a relationship between the selectors. There are four types of combinators in total, but for right now we’re going to only show you the descendant combinator, which is represented in CSS by a single space between selectors. A descendant combinator will only cause elements that match the last selector to be selected if they also have an ancestor (parent, grandparent, etc) that matches the previous selector.
So something like .ancestor .child would select an element with the class child if it has an ancestor with the class ancestor. Another way to think of it is child will only be selected if it is nested inside of ancestor, no matter how deep. Take a quick look at the example below and see if you can tell which elements would be selected based on the CSS rule provided:
<!-- index.html -->

<div class="ancestor"> <!-- A -->
  <div class="contents"> <!-- B -->
    <div class="contents"> <!-- C -->
    </div>
  </div>
</div>

<div class="contents"></div> <!-- D -->
/* styles.css */

.ancestor .contents {
  /* some declarations */
}
In the above example, the first two elements with the contents class (B and C) would be selected, but that last element (D) won’t be. Was your guess correct?
There’s really no limit to how many combinators you can add to a rule, so .one .two .three .four would be totally valid. This would just select an element that has a class of four if it has an ancestor with a class of three, and if that ancestor has its own ancestor with a class of two, and so on. You generally want to avoid trying to select elements that need this level of nesting, though, as it can get pretty confusing and long, and it can cause issues when it comes to specificity.
There are some CSS properties that you’re going to be using all the time, or at the very least more often than not. We’re going to introduce you to several of these properties, though this is by no means a complete list. Learning the following properties will simply be enough to help get you started.
The color property sets an element’s text color, while background-color sets, well, the background color of an element. I guess we’re done here?
Almost. Both of these properties can accept one of several kinds of values. A common one is a keyword, such as an actual color name like red or the transparent keyword. They also accept HEX, RGB, and HSL values, which you may be familiar with if you’ve ever used a photoshop program or a site where you could customize your profile colors.
p {
  /* hex example: */
  color: #1100ff;
  /* rgb example: */
  color: rgb(100, 0, 127);
  /* hsl example: */
  color: hsl(15, 82%, 56%);
}
Take a quick look at CSS Legal Color Values to see how you can adjust the opacity of these colors by adding an alpha value.
font-family can be a single value or a comma-separated list of values that determine what font an element uses. Each font will fall into one of two categories, either a “font family name” like "Times New Roman" (we use quotes due to the whitespace between words) or a “generic family name” like sans-serif (generic family names never use quotes).
If a browser cannot find or does not support the first font in a list, it will use the next one, then the next one and so on until it finds a supported and valid font. This is why it’s best practice to include a list of values for this property, starting with the font you want to be used most and ending with a generic font family as a fallback, e.g. font-family: "Times New Roman", sans-serif;
font-size will, as the property name suggests, set the size of the font. When giving a value to this property, the value should not contain any whitespace, e.g. font-size: 22px has no space between “22” and “px”.
font-weight affects the boldness of text, assuming the font supports the specified weight. This value can be a keyword, e.g. font-weight: bold, or a number between 1 and 1000, e.g. font-weight: 700 (the equivalent of bold). Usually, the numeric values will be in increments of 100 up to 900, though this will depend on the font.
text-align will align text horizontally within an element, and you can use the common keywords you may have come across in word processors as the value for this property, e.g. text-align: center.
Images aren’t the only elements that we can adjust the height and width on, but we want to focus on them specifically in this case.
By default, an <img> element’s height and width values will be the same as the actual image file’s height and width. If you wanted to adjust the size of the image without causing it to lose its proportions, you would use a value of “auto” for the height property and adjust the width value:
img {
  height: auto;
  width: 500px;
}
For example, if an image’s original size was 500px height and 1000px width, using the above CSS would result in a height of 250px.
It’s best to include both of these properties for <img> elements, even if you don’t plan on adjusting the values from the image file’s original ones. When these values aren’t included, if an image takes longer to load than the rest of the page contents, the image won’t take up any space on the page at first, but will suddenly cause a drastic shift of the other page contents once it does load in. Explicitly stating a height and width prevents this from happening, as space will be “reserved” on the page and will just appear as a blank space until the image loads.
Sometimes we may have rules that conflict with one another, and we end up with some unexpected results. “But I wanted these paragraphs to be blue, why are they red like these other paragraphs?!” As frustrating as this can be, it’s important to understand that CSS doesn’t just do things against our wishes. CSS only does what we tell it to do. One exception to this is the default styles that are provided by a browser. These default styles vary from browser to browser, and they are why some elements create a large “gap” between themselves and other elements, or why buttons look the way they do, despite us not writing any CSS rules to style them that way.
So if you end up with some unexpected behavior like this it’s either because of these default styles or due to not understanding how a property works or not understanding this little thing called the cascade.
The cascade is what determines which rules actually get applied to our HTML. There are different factors that the cascade uses to determine this, three of which we’ll go over to hopefully help you avoid (as many of) those frustrating “I hate CSS” moments.
A CSS declaration that is more specific will take precedence over less specific ones. Inline styles, which we will go over more in the Adding CSS to HTML section towards the end of the lesson, have the highest specificity compared to selectors, while each type of selector has its own specificity level that contributes to how specific a declaration is. Other selectors contribute to specificity, but we’re focusing only on the ones mentioned in this lesson:
Specificity will only be taken into account when an element has multiple, conflicting declarations targeting it, sort of like a tie-breaker. An ID selector will always beat any number of class selectors, a class selector will always beat any number of type selectors, and a type selector will always beat any number of anything less specific than it. When no declaration has a selector with a higher specificity, a larger amount of a single selector will beat a smaller amount of that same selector.
Let’s take a look at a few quick examples to visualize how specificity works. Consider the following HTML and CSS code:
<!-- index.html -->

<div class="main">
  <div class="list subsection"></div>
</div>
/* rule 1 */
.subsection {
  color: blue;
}

/* rule 2 */
.main .list {
  color: red;
}
In the example above, both rules are using only class selectors, but rule 2 is more specific because it is using more class selectors, so the color: red; declaration would take precedence.
Now, let’s change things a little bit:
<!-- index.html -->

<div class="main">
  <div class="list" id="subsection"></div>
</div>
/* rule 1 */
#subsection {
  color: blue;
}

/* rule 2 */
.main .list {
  color: red;
}
In the example above, despite rule 2 having more class selectors than ID selectors, rule 1 is more specific because ID beats class. In this case, the color: blue; declaration would take precedence.
/* rule 1 */
#subsection .list {
  background-color: yellow;
  color: blue;
}

/* rule 2 */
#subsection .main .list {
  color: red;
}
In this final example, both rules are using ID and class selectors, so neither rule is using a more specific selector than the other. The cascade then checks the amounts of each selector type. Both rules only have one ID selector, but rule 2 has more class selectors, so rule 2 has a higher specificity!
While the color: red declaration would take precedence, the background-color: yellow declaration would still be applied since there’s no conflicting declaration for it.
Note: When comparing selectors, you may come across special symbols for the universal selector (*) as well as combinators (+, ~, >, and an empty space). These symbols do not add any specificity in and of themselves.
/* rule 1 */
.class.second-class {
  font-size: 12px;
}

/* rule 2 */
.class .second-class {
  font-size: 24px;
}
Here both rule 1 and rule 2 have the same specificity. Rule 1 uses a chaining selector (no space) and rule 2 uses a descendant combinator (the empty space). But both rules have two classes and the combinator symbol itself does not add to the specificity.
/* rule 1 */
.class.second-class {
  font-size: 12px;
}

/* rule 2 */
.class > .second-class {
  font-size: 24px;
}
This example shows the same thing. Even though rule 2 is using a child combinator (>), this does not change the specificity value. Both rules still have two classes so they have the same specificity values.
/* rule 1 */
* {
  color: black;
}

/* rule 2 */
h1 {
  color: orange;
}
In this example, rule 2 would have higher specificity and the orange value would take precedence for this element. Rule 2 uses a type selector, which has the lowest specificity value. But rule 1 uses the universal selector (*) which has no specificity value.
Inheritance refers to certain CSS properties that, when applied to an element, are inherited by that element’s descendants, even if we don’t explicitly write a rule for those descendants. Typography based properties (color, font-size, font-family, etc.) are usually inherited, while most other properties aren’t.
The exception to this is when directly targeting an element, as this always beats inheritance:
<!-- index.html -->

<div id="parent">
  <div class="child"></div>
</div>
/* styles.css */

#parent {
  color: red;
}

.child {
  color: blue;
}
Despite the parent element having a higher specificity with an ID, the child element would have the color: blue style applied since that declaration directly targets it, while color: red from the parent is only inherited.
The final factor, the end of the line, the tie-breaker of the tie-breaker. Let’s say that after every other factor has been taken into account, there are still multiple conflicting rules targeting an element. How does the cascade determine which rule to apply?
Really simply, actually. Whichever rule was the last defined is the winner.
/* styles.css */

.alert {
  color: red;
}

.warning {
  color: yellow;
}
For an element that has both the alert and warning classes, the cascade would run through every other factor, including inheritance (none here) and specificity (neither rule is more specific than the other). Since the .warning rule was the last one defined, and no other factor was able to determine which rule to apply, it’s the one that gets applied to the element.
Okay, we went over quite a bit so far. The only thing left for now is to go over how to add all this CSS to our HTML. There are three methods to do so.
External CSS is the most common method you will come across, and it involves creating a separate file for the CSS and linking it inside of an HTML’s opening and closing <head> tags with a self-closing <link> element:
<!-- index.html -->

<head>
  <link rel="stylesheet" href="styles.css">
</head>
/* styles.css */

div {
  color: white;
  background-color: black;
}

p {
  color: red;
}
First, we add a self-closing <link> element inside of the opening and closing <head> tags of the HTML file. The href attribute is the location of the CSS file, either an absolute URL or, what you’ll be utilizing, a URL relative to the location of the HTML file. In our example above, we are assuming both files are located in the same directory. The rel attribute is required, and it specifies the relationship between the HTML file and the linked file.
Then inside of the newly created styles.css file, we have the selector (the div and p), followed by a pair of opening and closing curly braces, which create a “declaration block”. Finally, we place any declarations inside of the declaration block. color: white; is one declaration, with color being the property and white being the value, and background-color: black; is another declaration.
A note on file names: styles.css is just what we went with as the file name here. You can name the file whatever you want as long as the file type is .css, though “style” or “styles” is most commonly used.
A couple of the pros to this method are:
Internal CSS (or embedded CSS) involves adding the CSS within the HTML file itself instead of creating a completely separate file. With the internal method, you place all the rules inside of a pair of opening and closing <style> tags, which are then placed inside of the opening and closing <head> tags of your HTML file. Since the styles are being placed directly inside of the <head> tags, we no longer need a <link> element that the external method requires.
Besides these differences, the syntax is exactly the same as the external method (selector, curly braces, declarations):
<head>
  <style>
    div {
      color: white;
      background-color: black;
    }

    p {
      color: red;
    }
  </style>
</head>
<body>...</body>
This method can be useful for adding unique styles to a single page of a website, but it doesn’t keep things separate like the external method, and depending on how many rules and declarations there are it can cause the HTML file to get pretty big.
Inline CSS makes it possible to add styles directly to HTML elements, though this method isn’t as recommended:
<body>
  <div style="color: white; background-color: black;">...</div>
</body>
The first thing to note is that we don’t actually use any selectors here, since the styles are being added directly to the opening <div> tag itself. Next, we have the style= attribute, with its value within the pair of quotation marks being the declarations.
If you need to add a unique style for a single element, this method can work just fine. Generally, though, this isn’t exactly a recommended way for adding CSS to HTML for a few reasons:
foundations directory in the order they’re listed, starting with 01-css-methods and ending with 06-cascade-fix.font-family property yet, so for now take a look at CSS Fonts for a list of generic font families to use, and CSS Web Safe Fonts for a list of fonts that are web safe. Web safe means that these are fonts that are installed on basically every computer or device (but be sure to still include a generic font family as a fallback).This section contains questions for you to check your understanding of this lesson on your own. If you’re having trouble answering a question, click it and review the material it links to.
title and a class of primary, how would you use both attributes for a single rule?This section contains helpful links to related content. It isn’t required, so consider it supplemental.
color property.</body>