Another Step-by-Step Tutorial

Today I’ll share how to create a colorful cityscape in Adobe Illustrator. You’ll start from a template file I prepared, including the colors I’ve used. We’ll go step-by-step through creating the sky, grass, houses, trees, bushes, and clouds using simple techniques. Before we dive in, let me share some tips about the illustration setup.
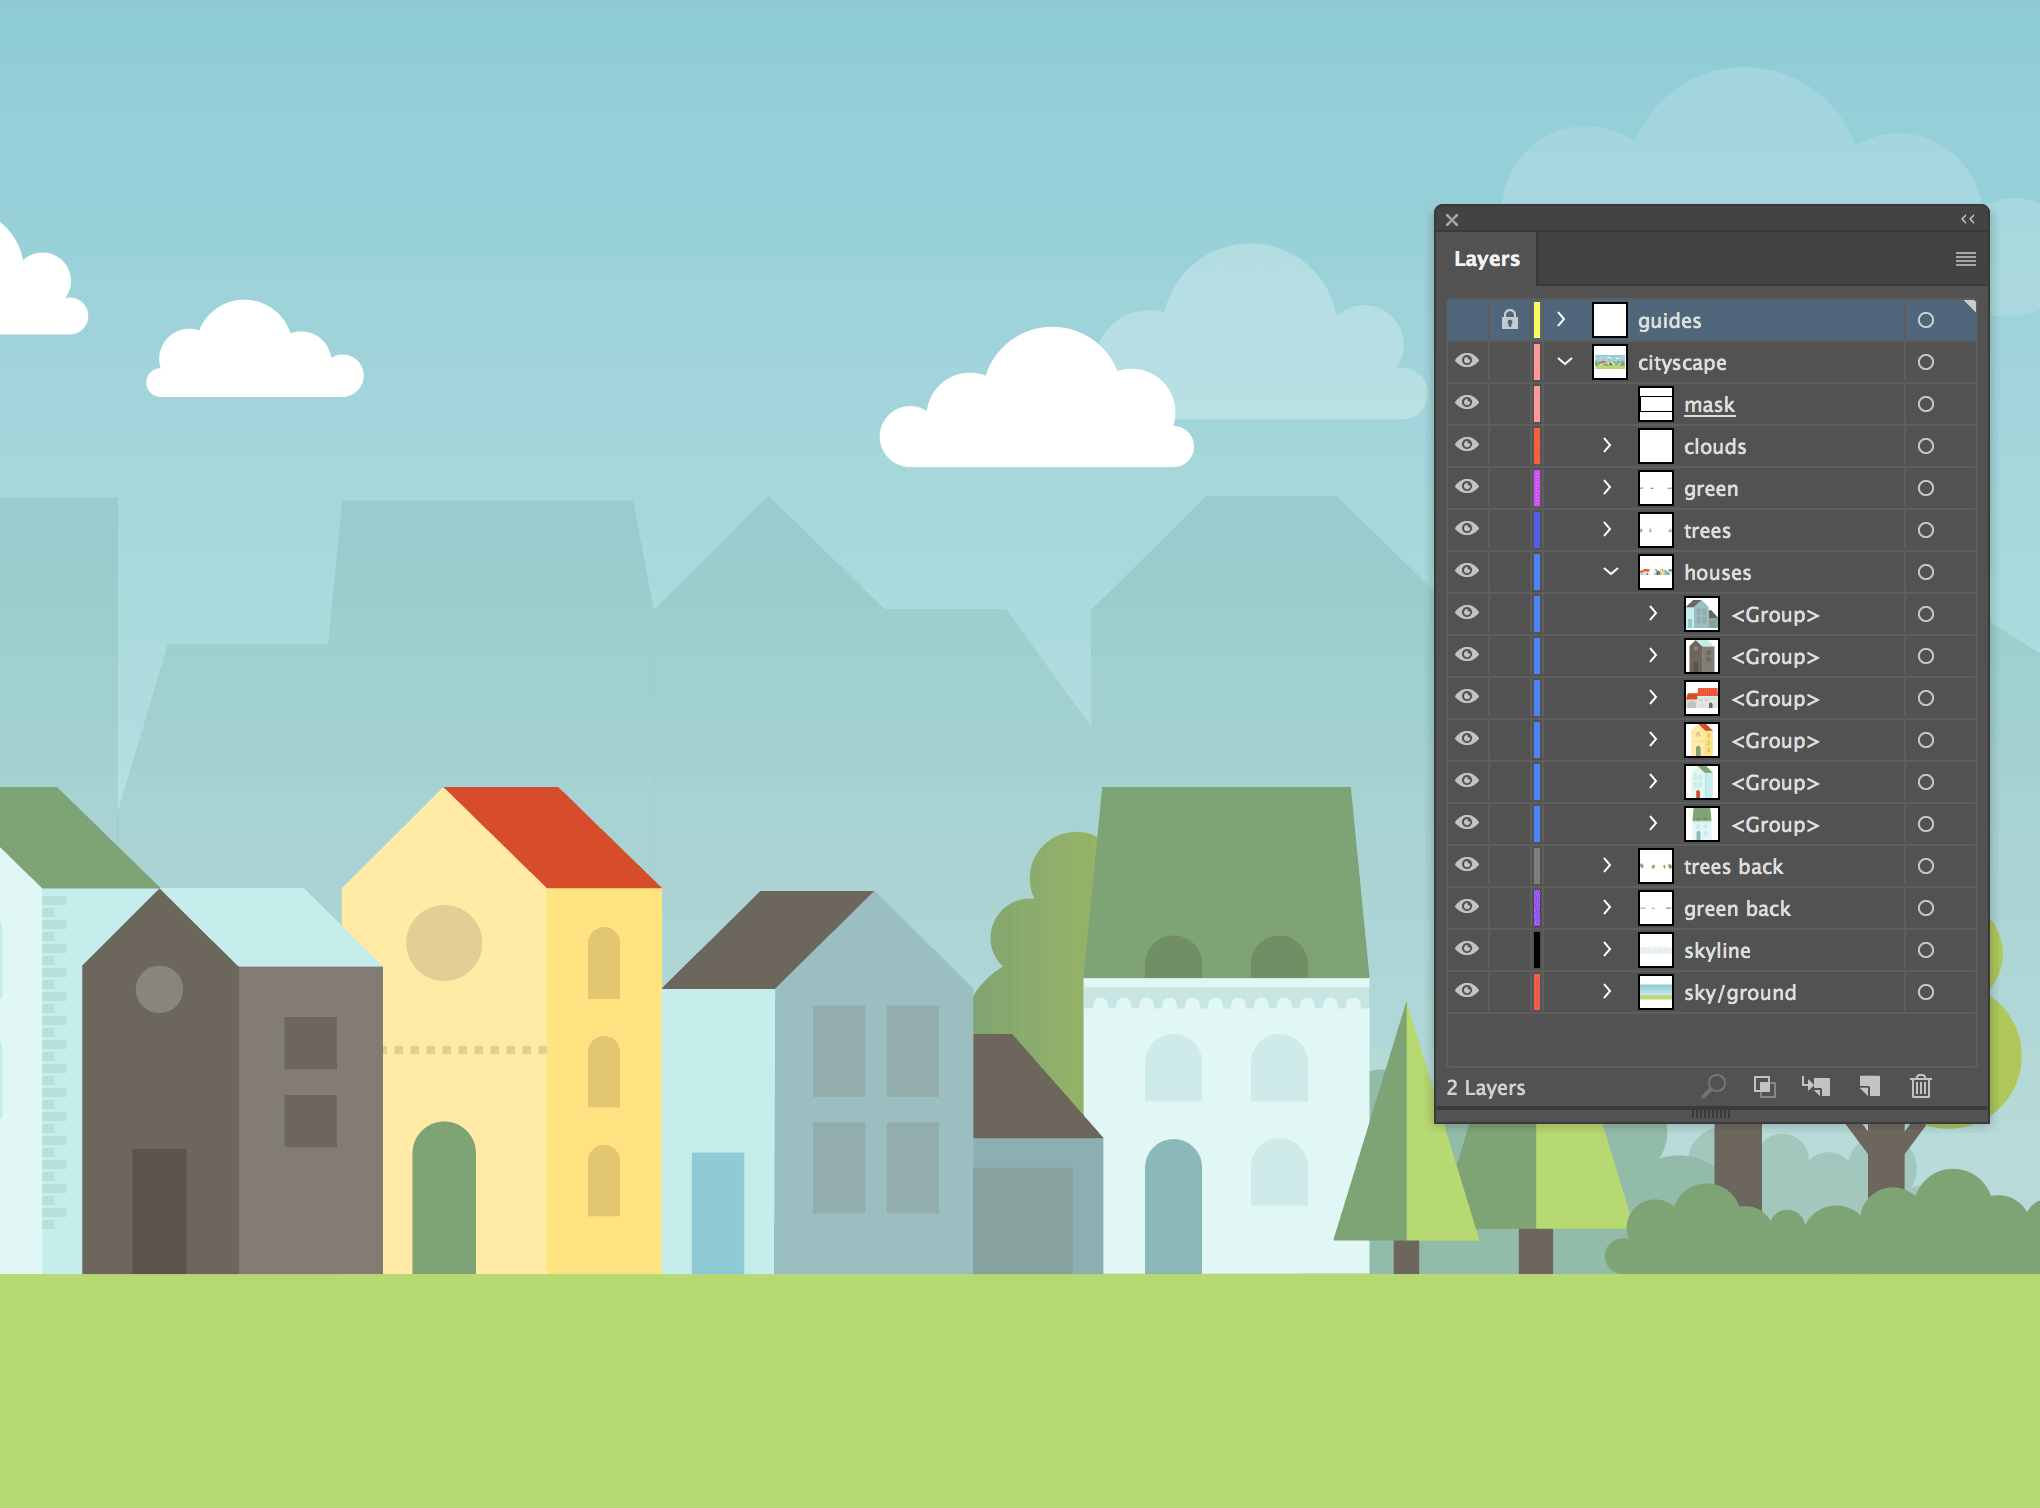
Below is the general setup of the illustration, showing the Layers panel’s structure with organized stacking order:
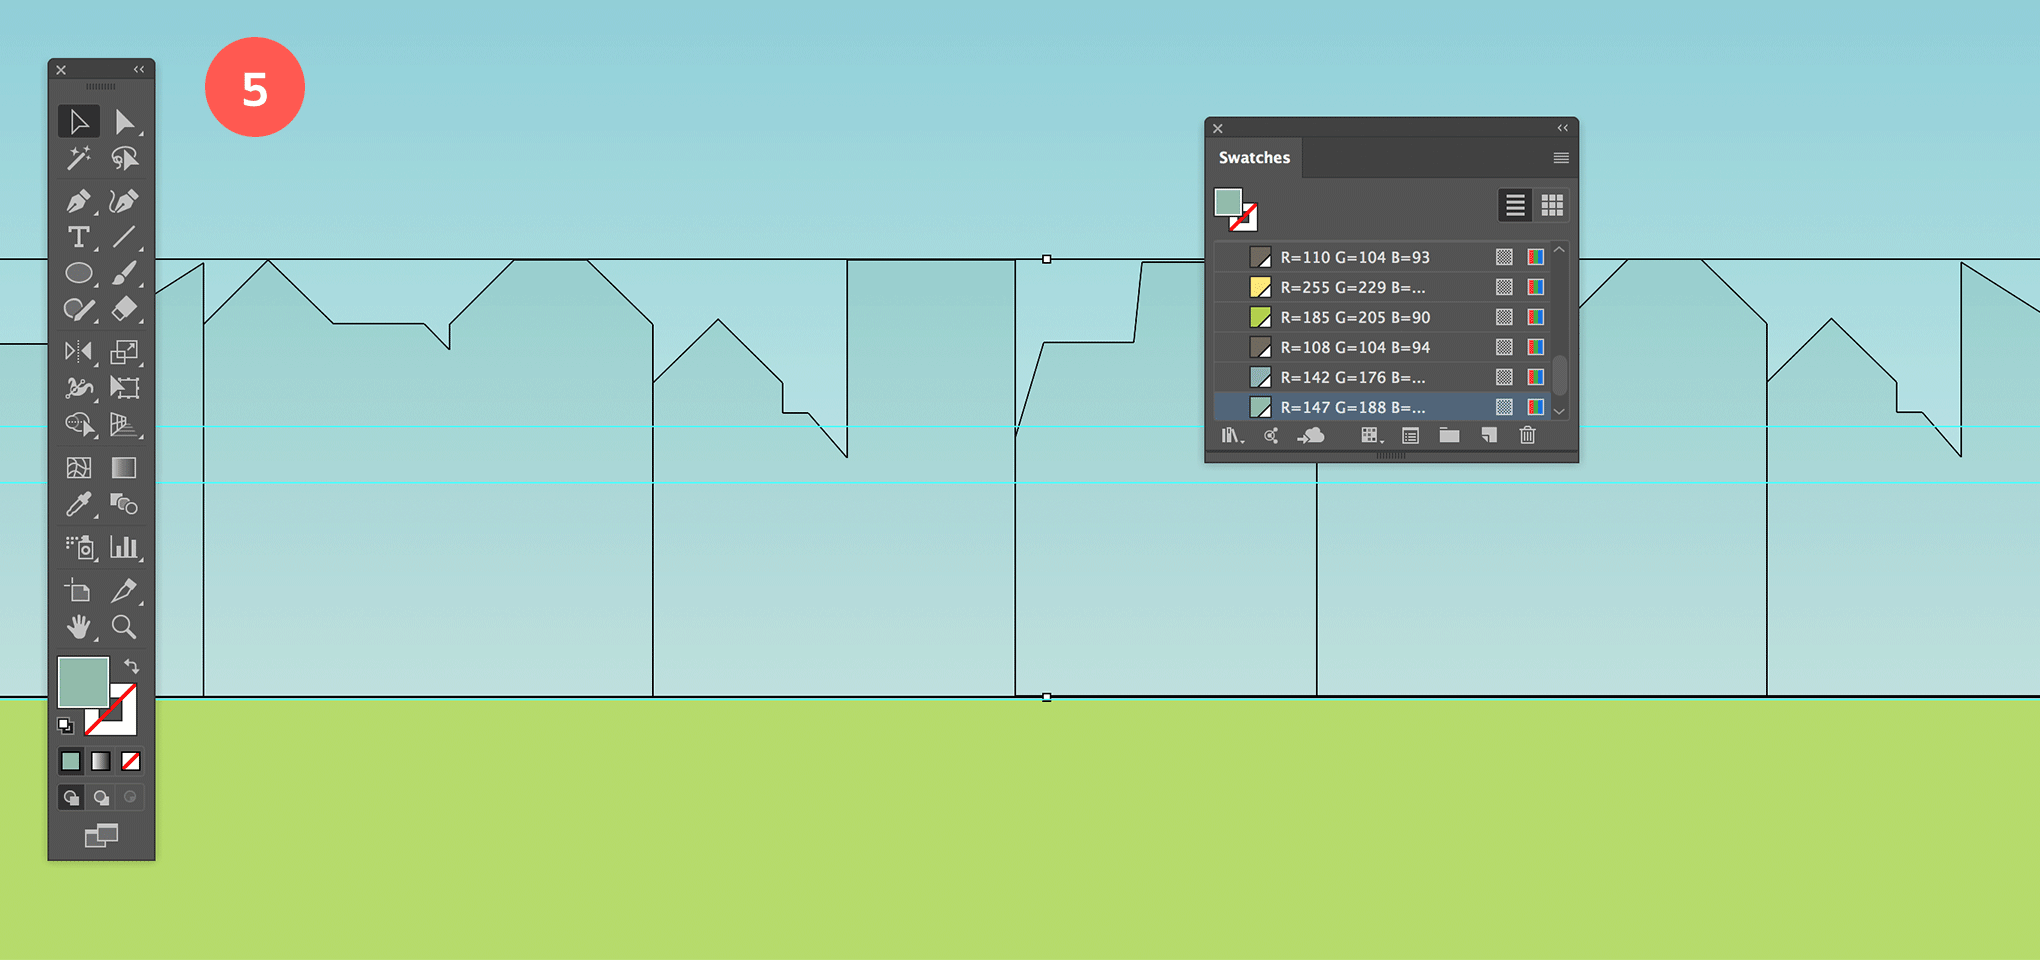
Download the templateor load the color swatches by selecting Open Swatch Library > Other Library… in the Swatches panel.
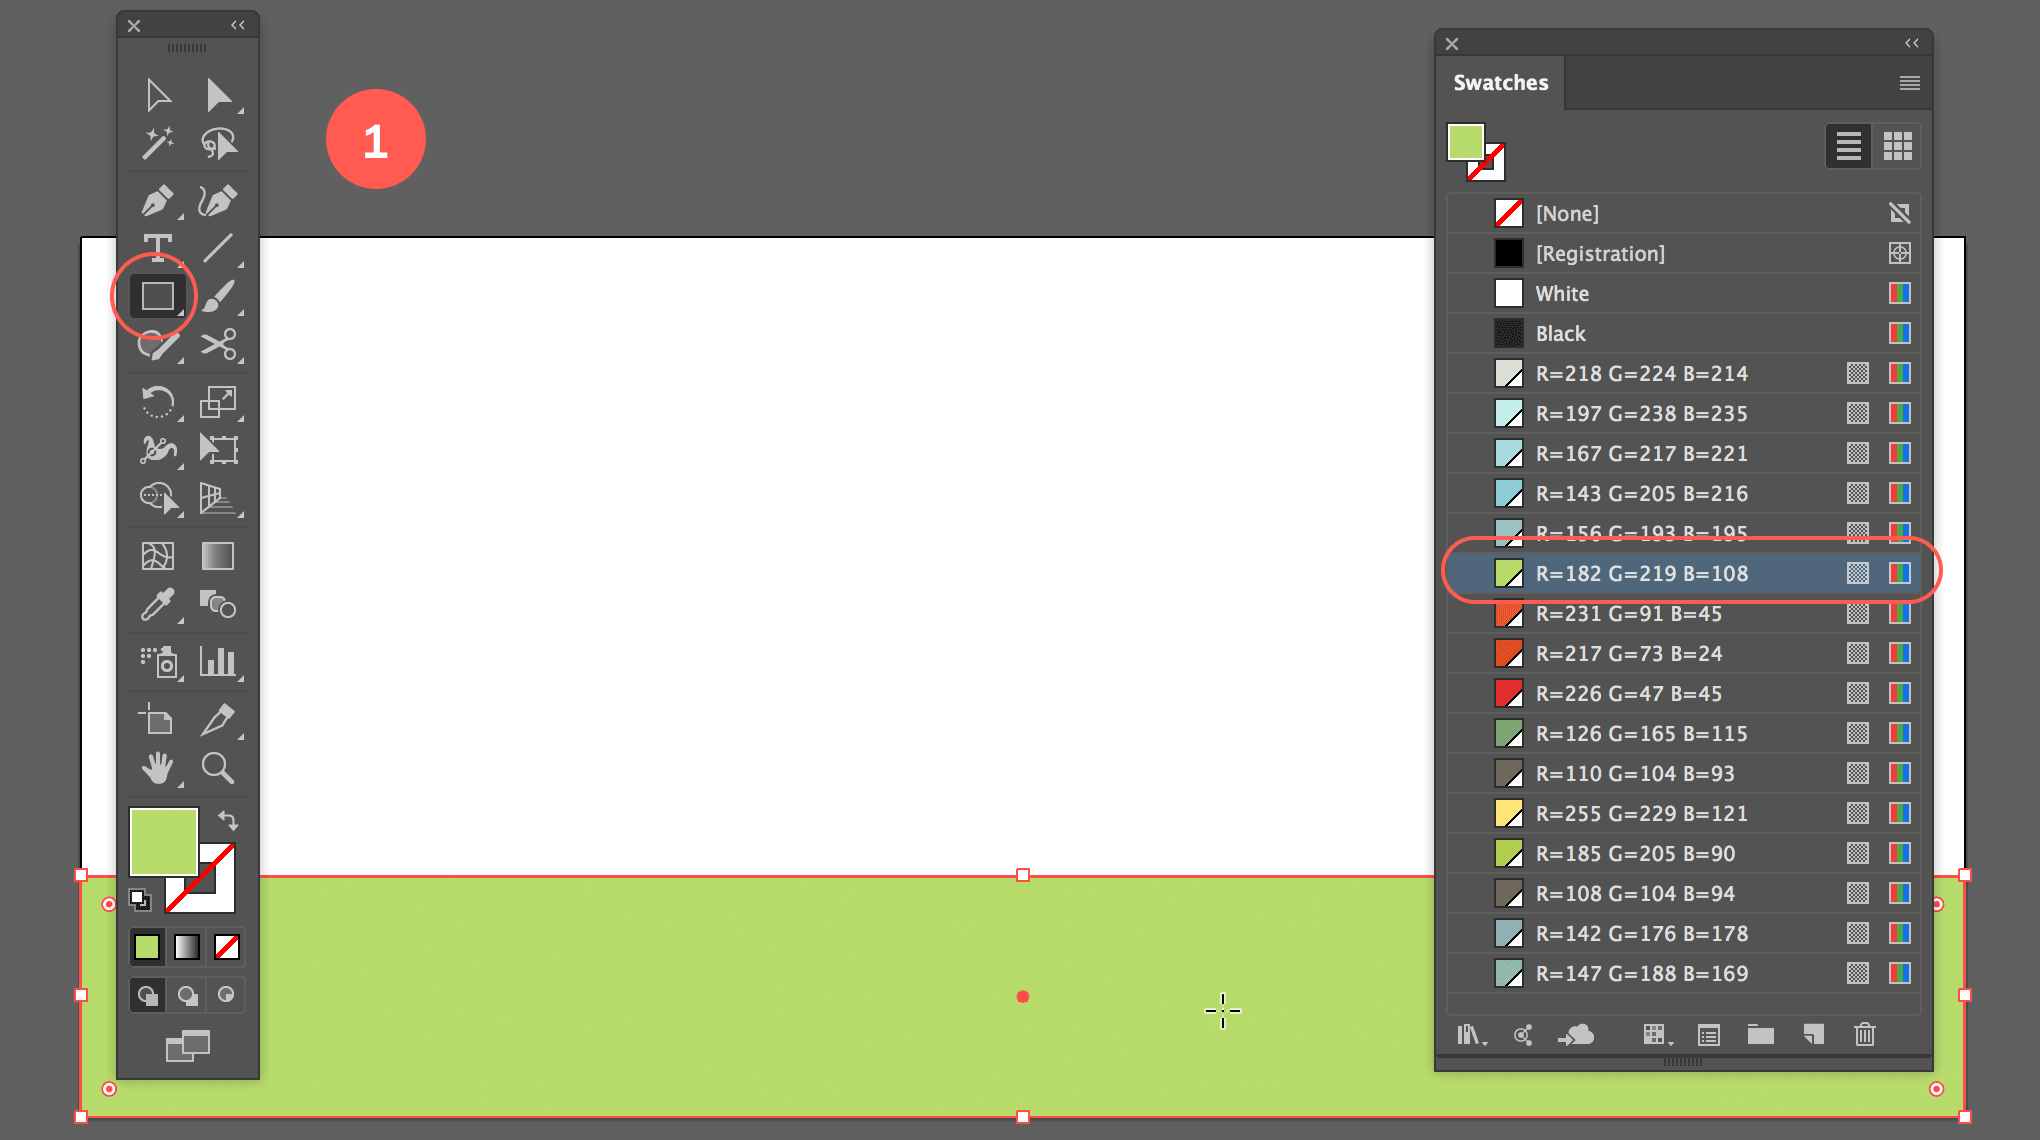
Global Swatches allow automatic updates across all objects using the swatch. To create a Global Swatch:
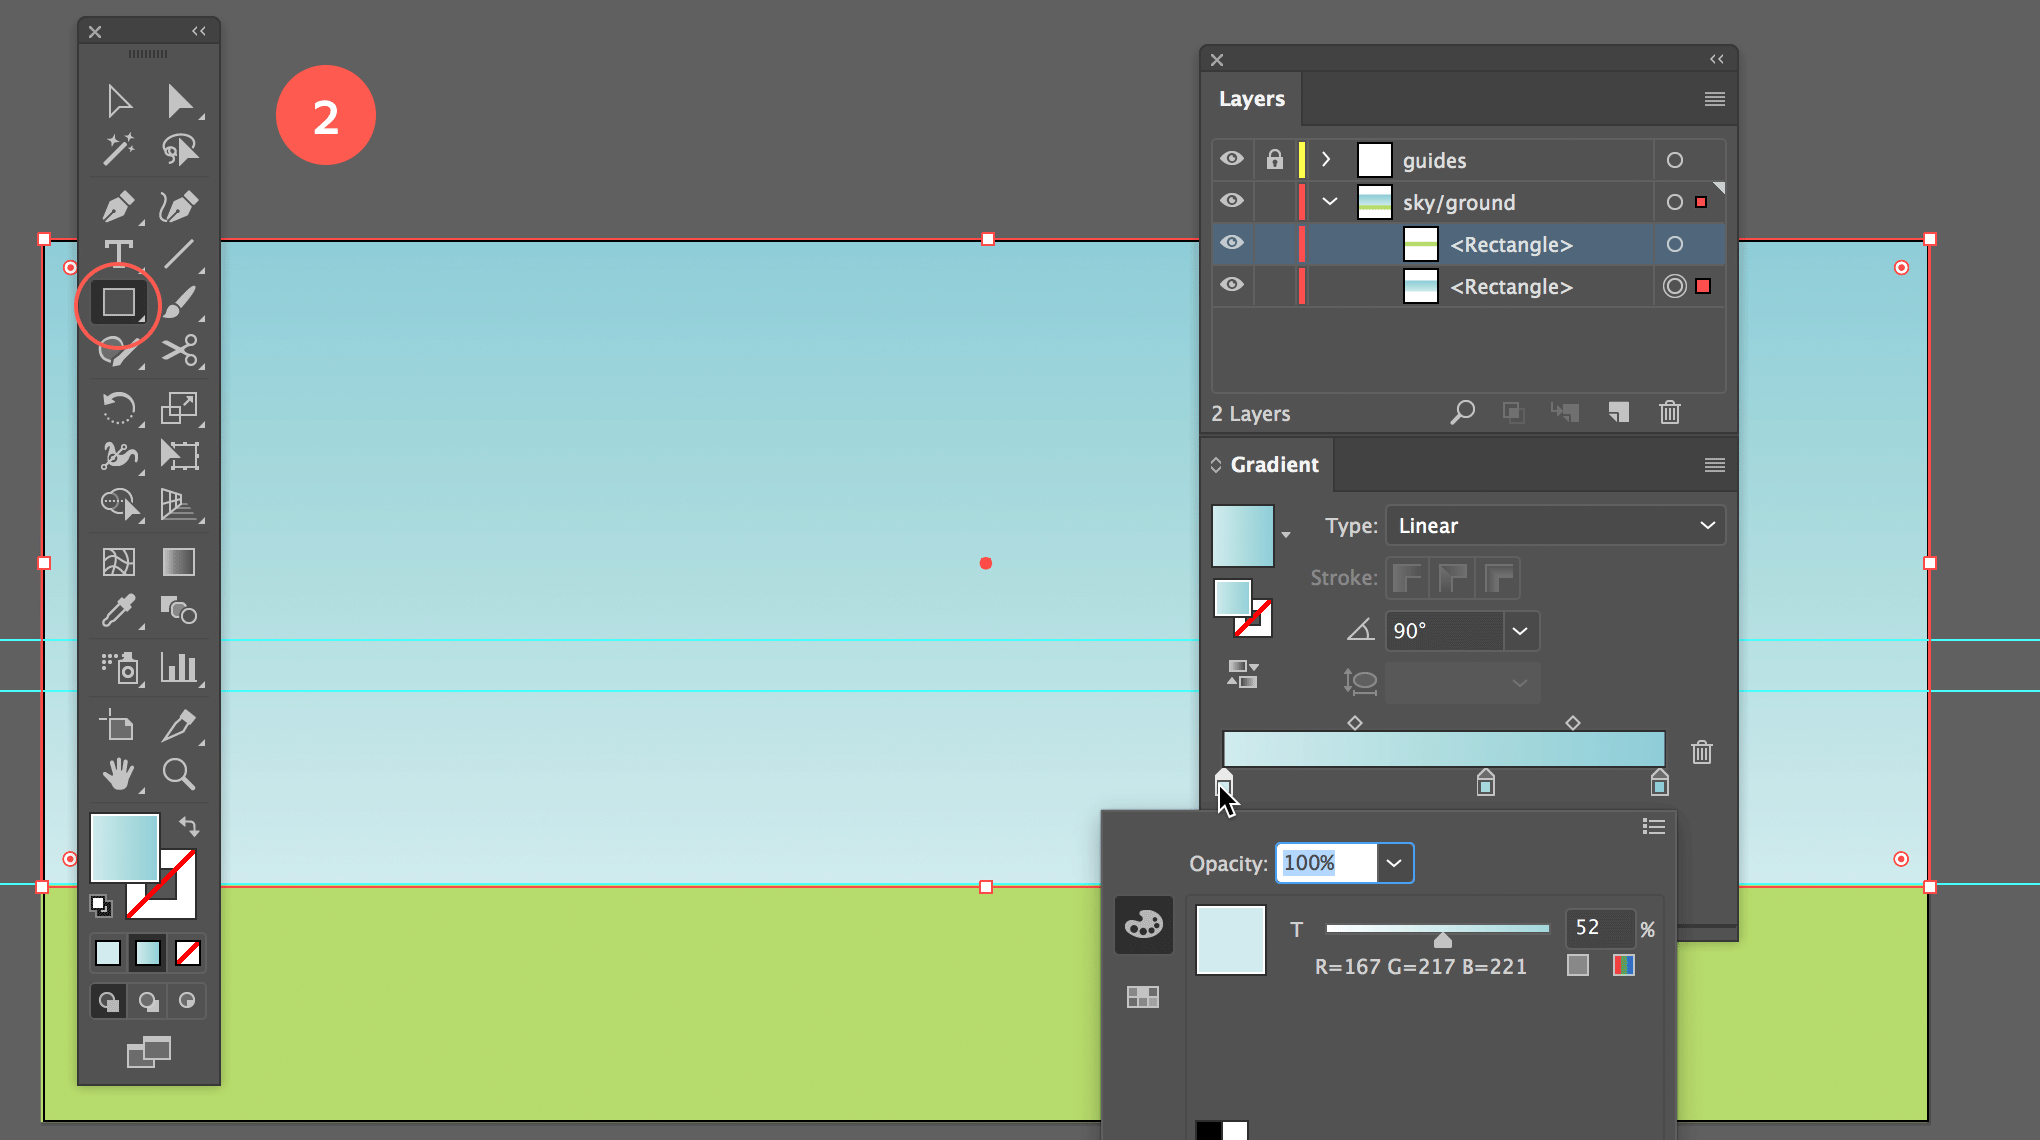
Enable Smart Guides and Snap to Point for precise alignment:
Draw the Ground:
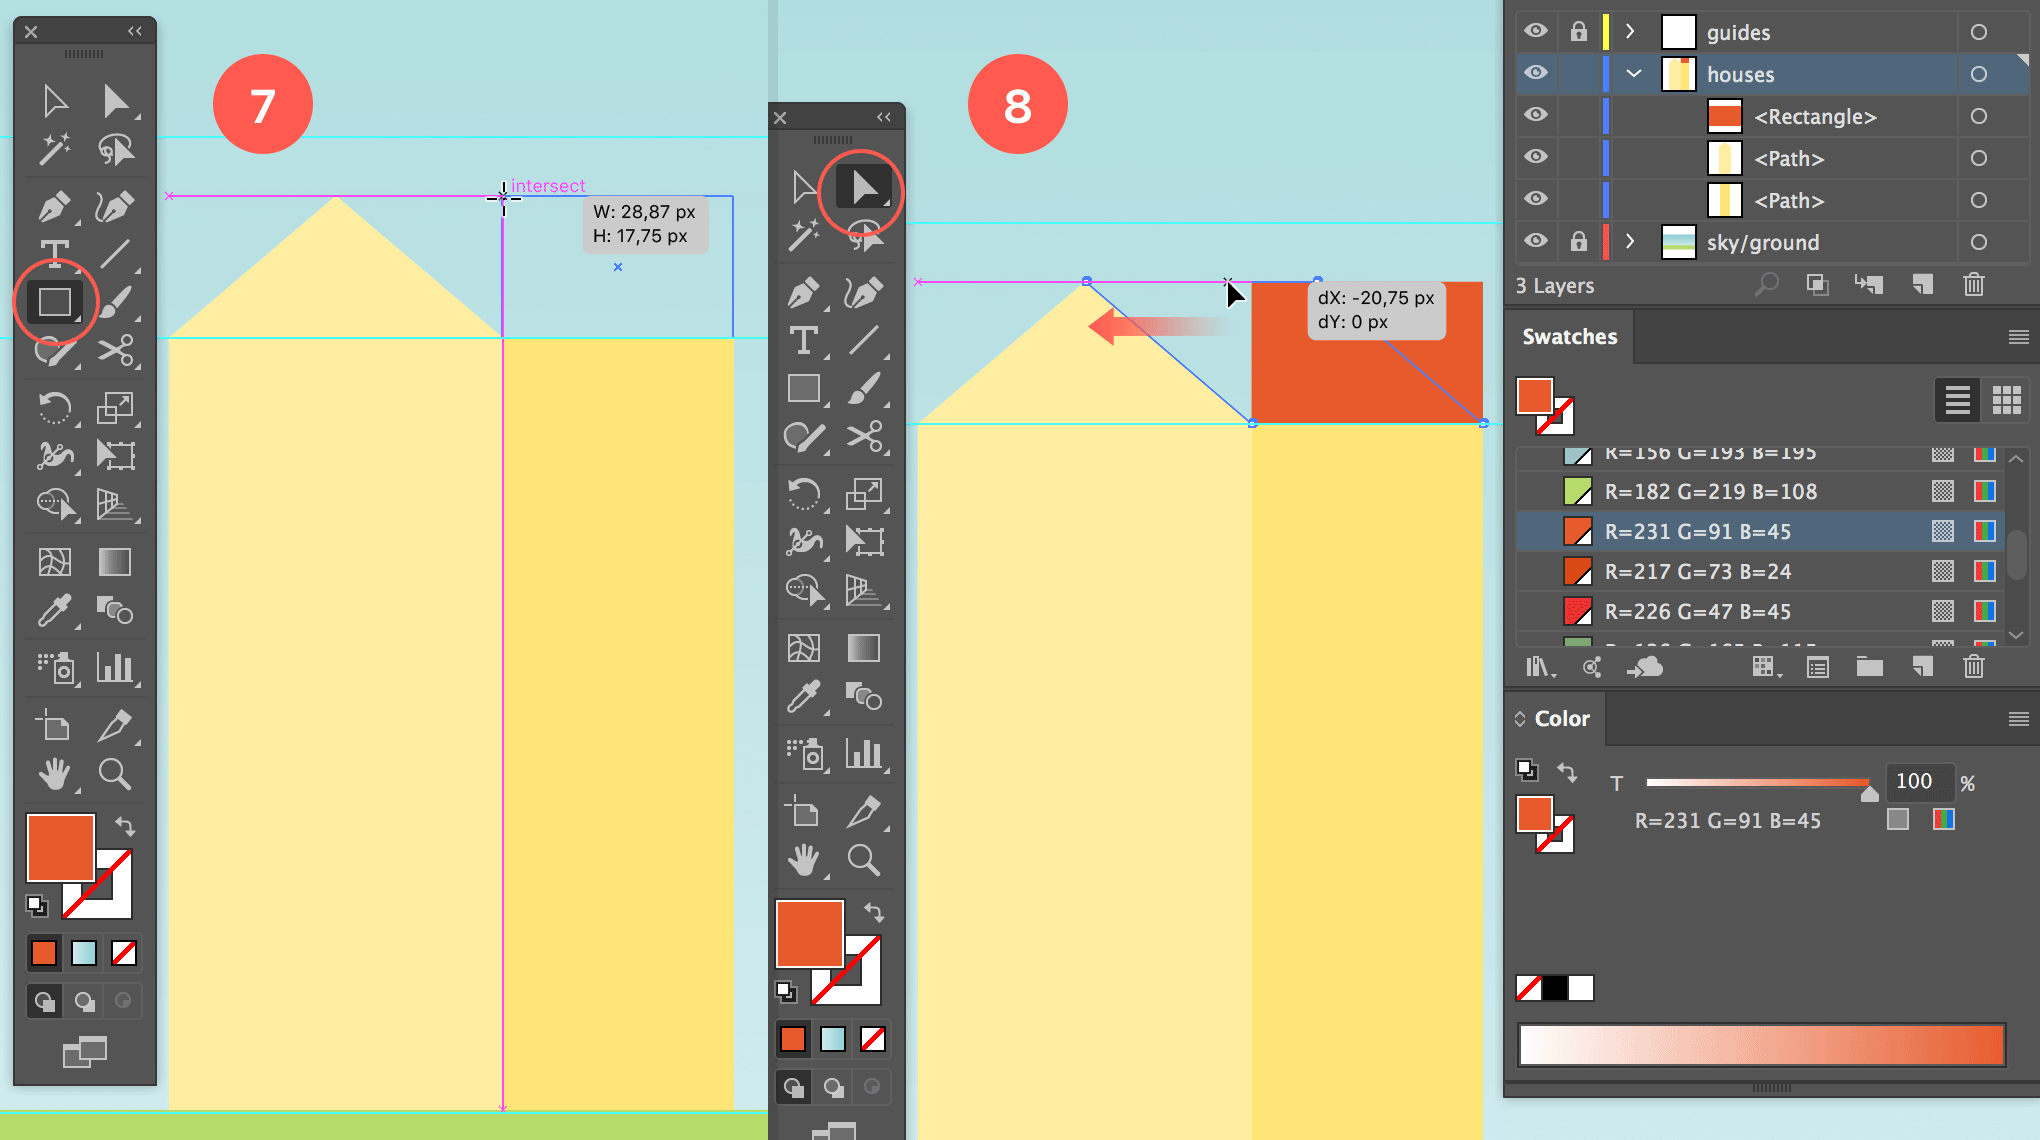
Create a green rectangle at the bottom of your document using the horizontal guide. Snap it to the document’s edges.
Draw the Sky:
Add a rectangle above for the sky. Apply a light blue gradient and use Object > Arrange > Send to Back.
Draw Walls: Create a vertical yellow rectangle.

Copy & Paste:
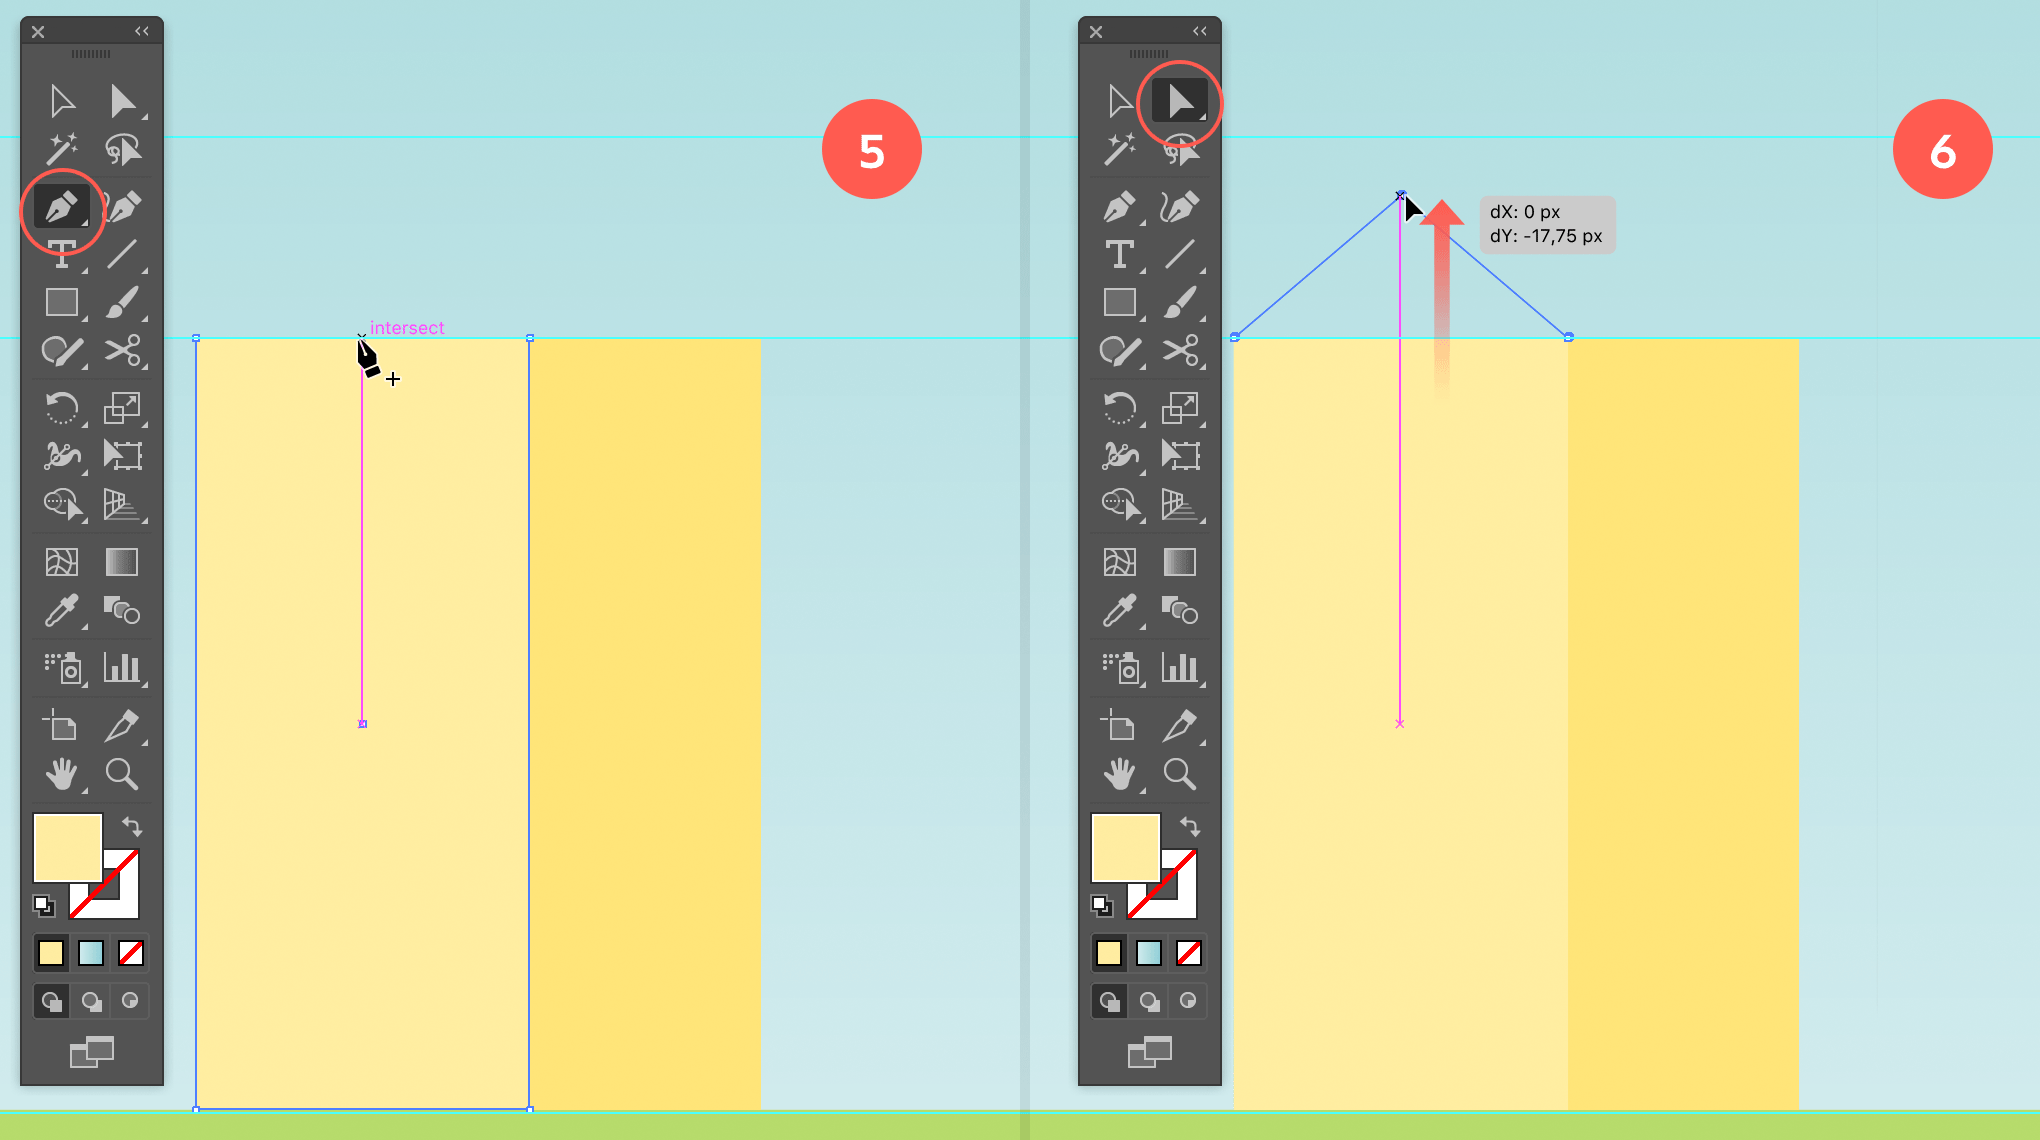
Copy the rectangle, paste it in front (Cmd/Ctrl + F), and move it left using Shift for horizontal alignment. Snap it to the side of the original rectangle and apply an 80% yellow fill.
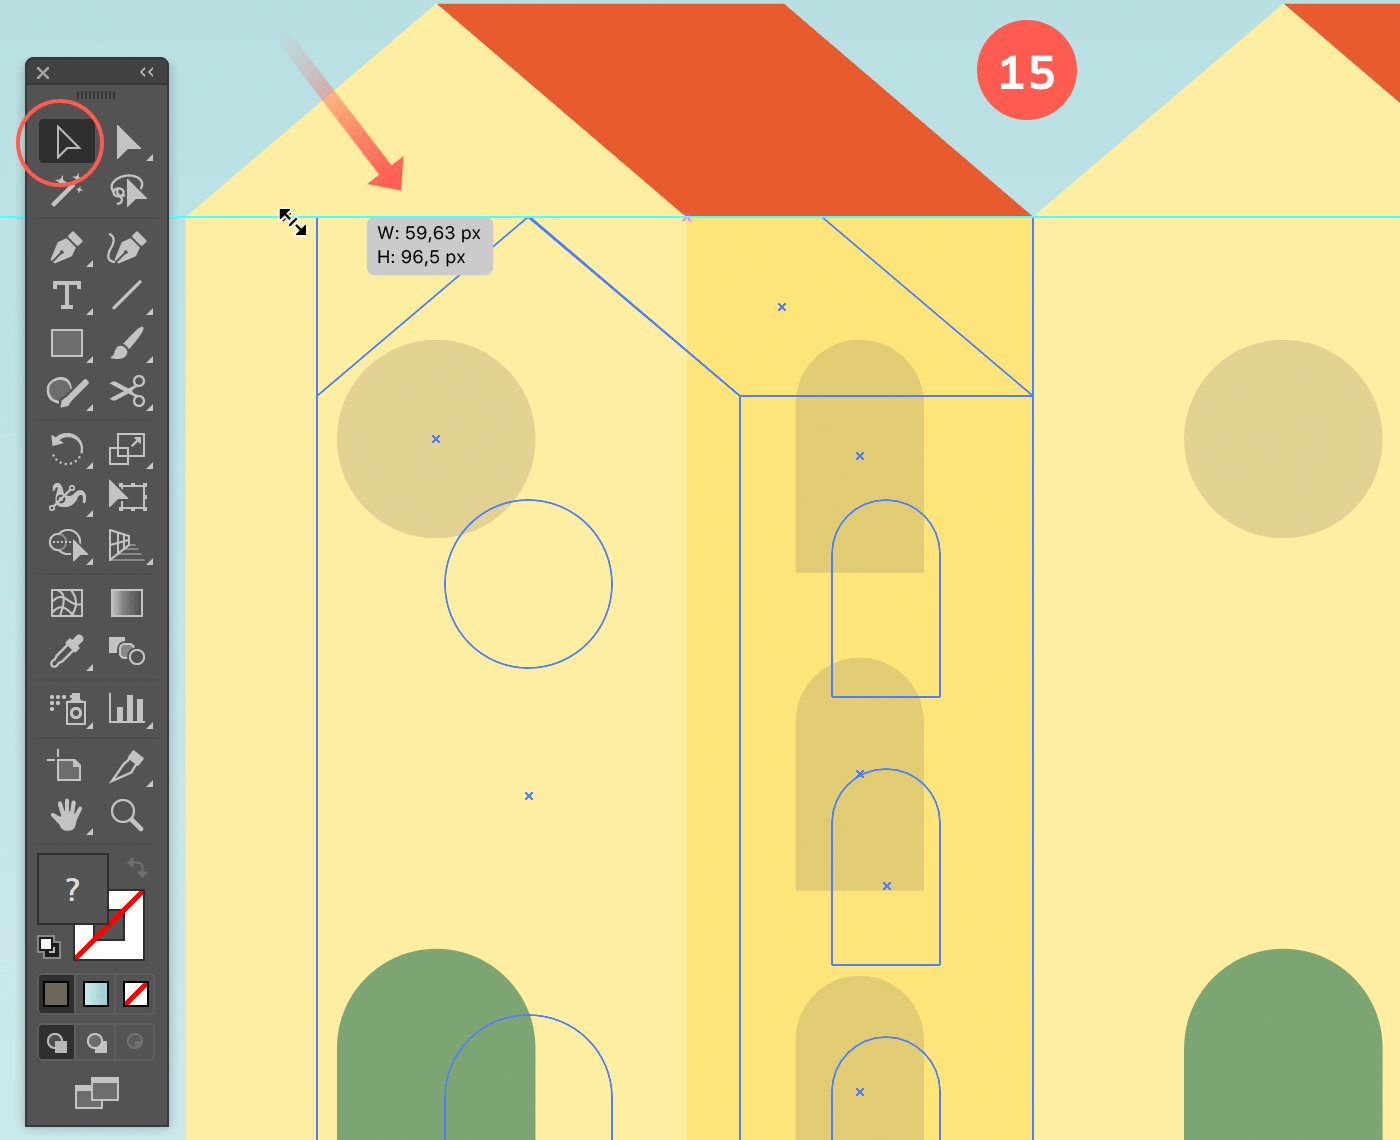
Select the Direct Selection tool (white arrow), and click the newly created anchor point. Start dragging upwards, and while dragging hold down the Shift key to move it perfectly vertically up. Stop dragging and release when you reach a perfect 90° corner.
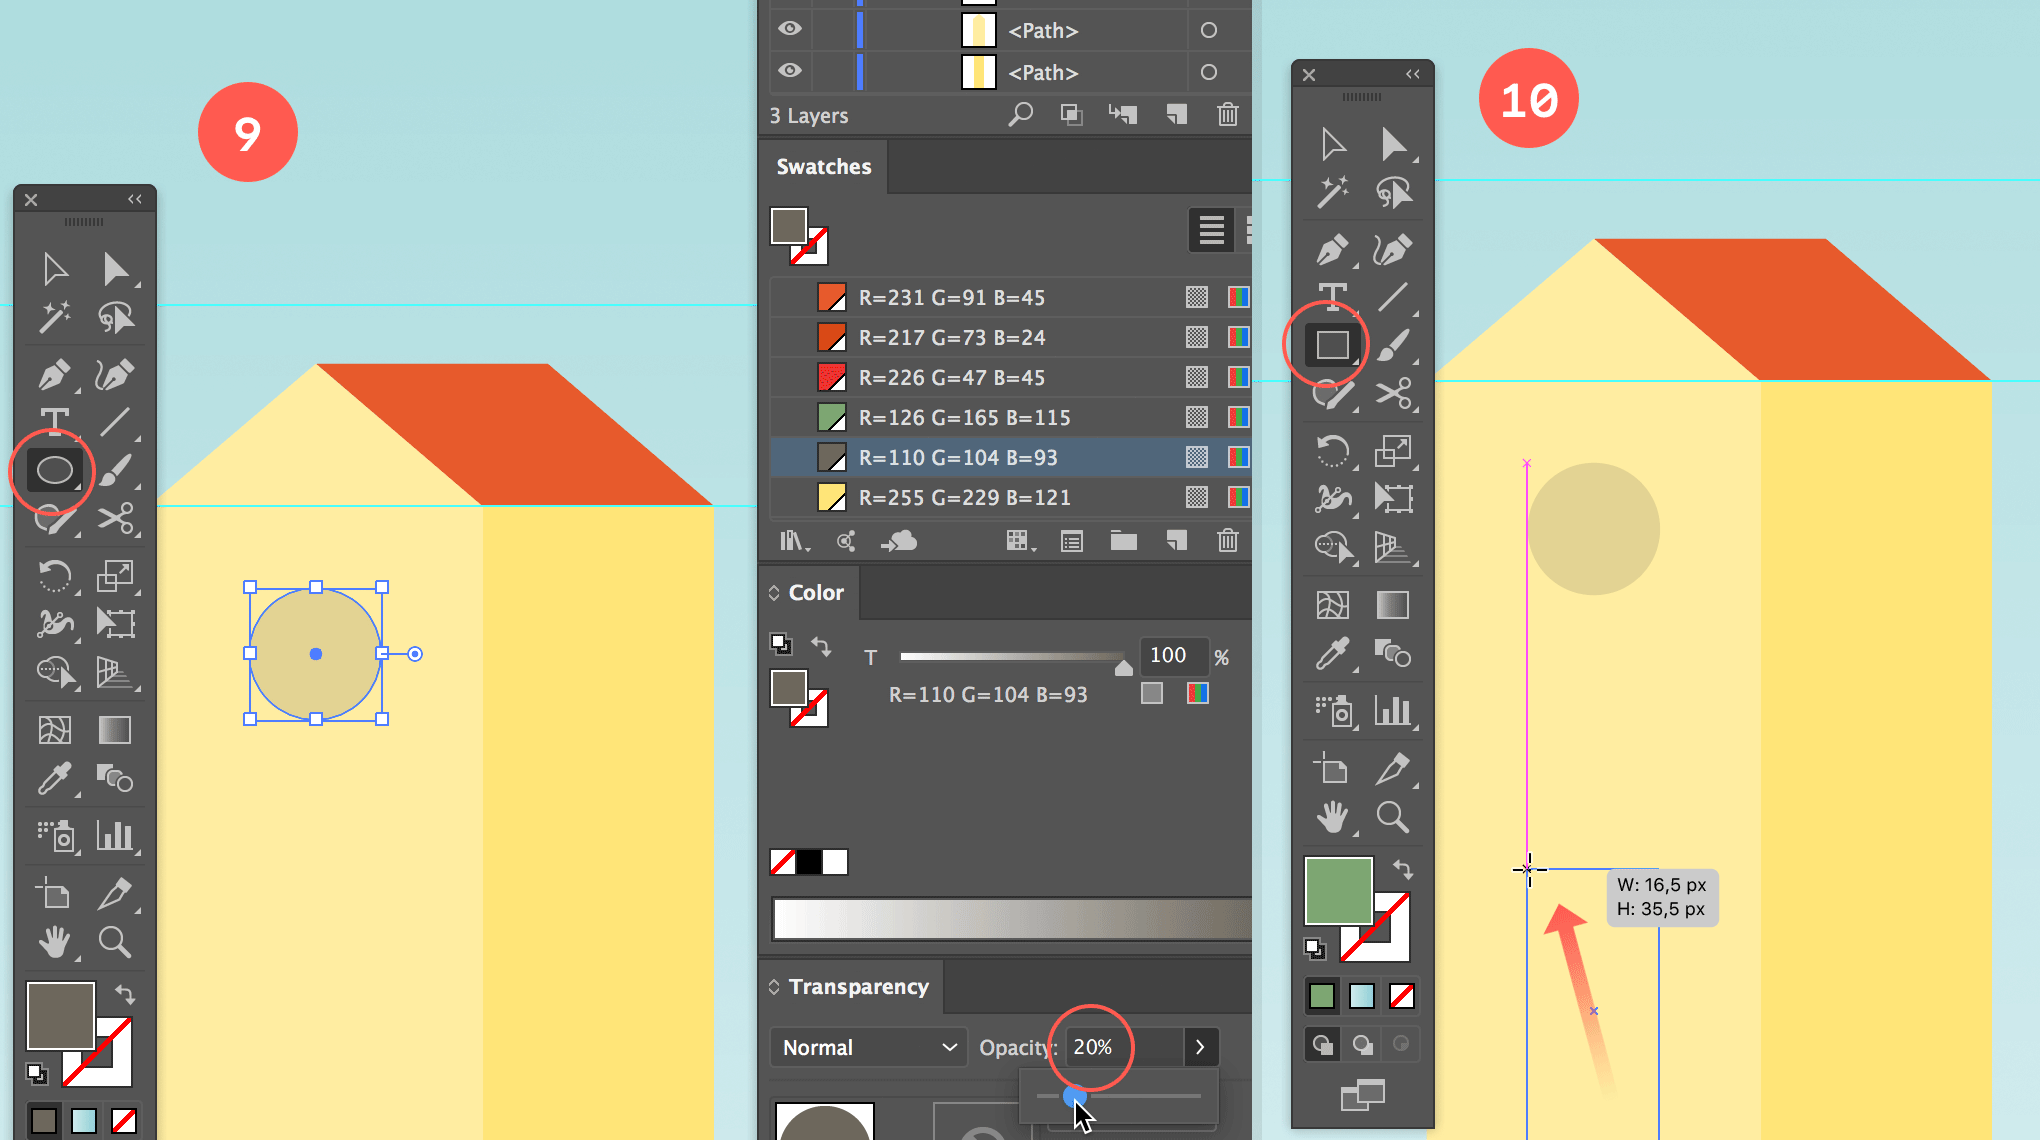
Select the Rectangle tool and draw a rectangle for the roof as shown in the image above. Start from the bottom right (or left) corner and drag diagonally upwards to the top left (or right). Use Smart Guides for accurate placement. Apply a darker orange fill to the roof.
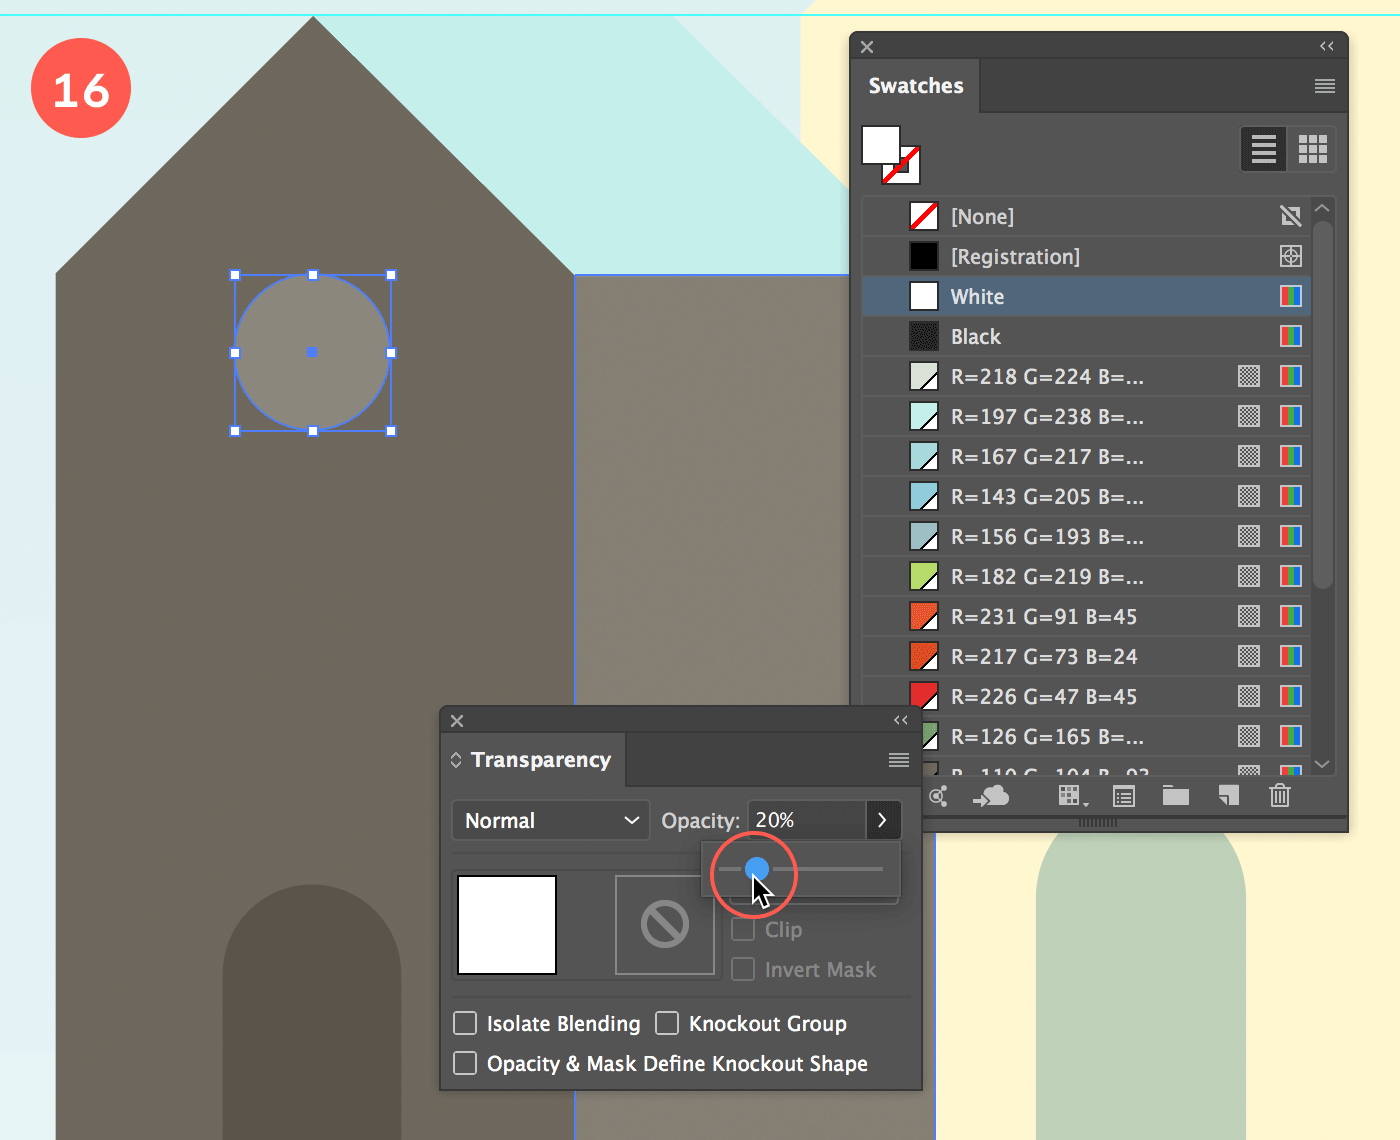
Draw a circle for the window. Apply a brown-grey fill and set its opacity to 20% using the Transparency panel.
Draw a vertical rectangle for the door. Start from the bottom right (or bottom left) and drag upwards to the top left (or top right). Fill it with dark green.
Remove rounded corners by selecting the 2 top anchor points and dragging the corner widgets outward until the corners are straight.
Create the roof by adding an anchor point at the top center, and moving it up.
Finish the roof.
Add the window and the door.
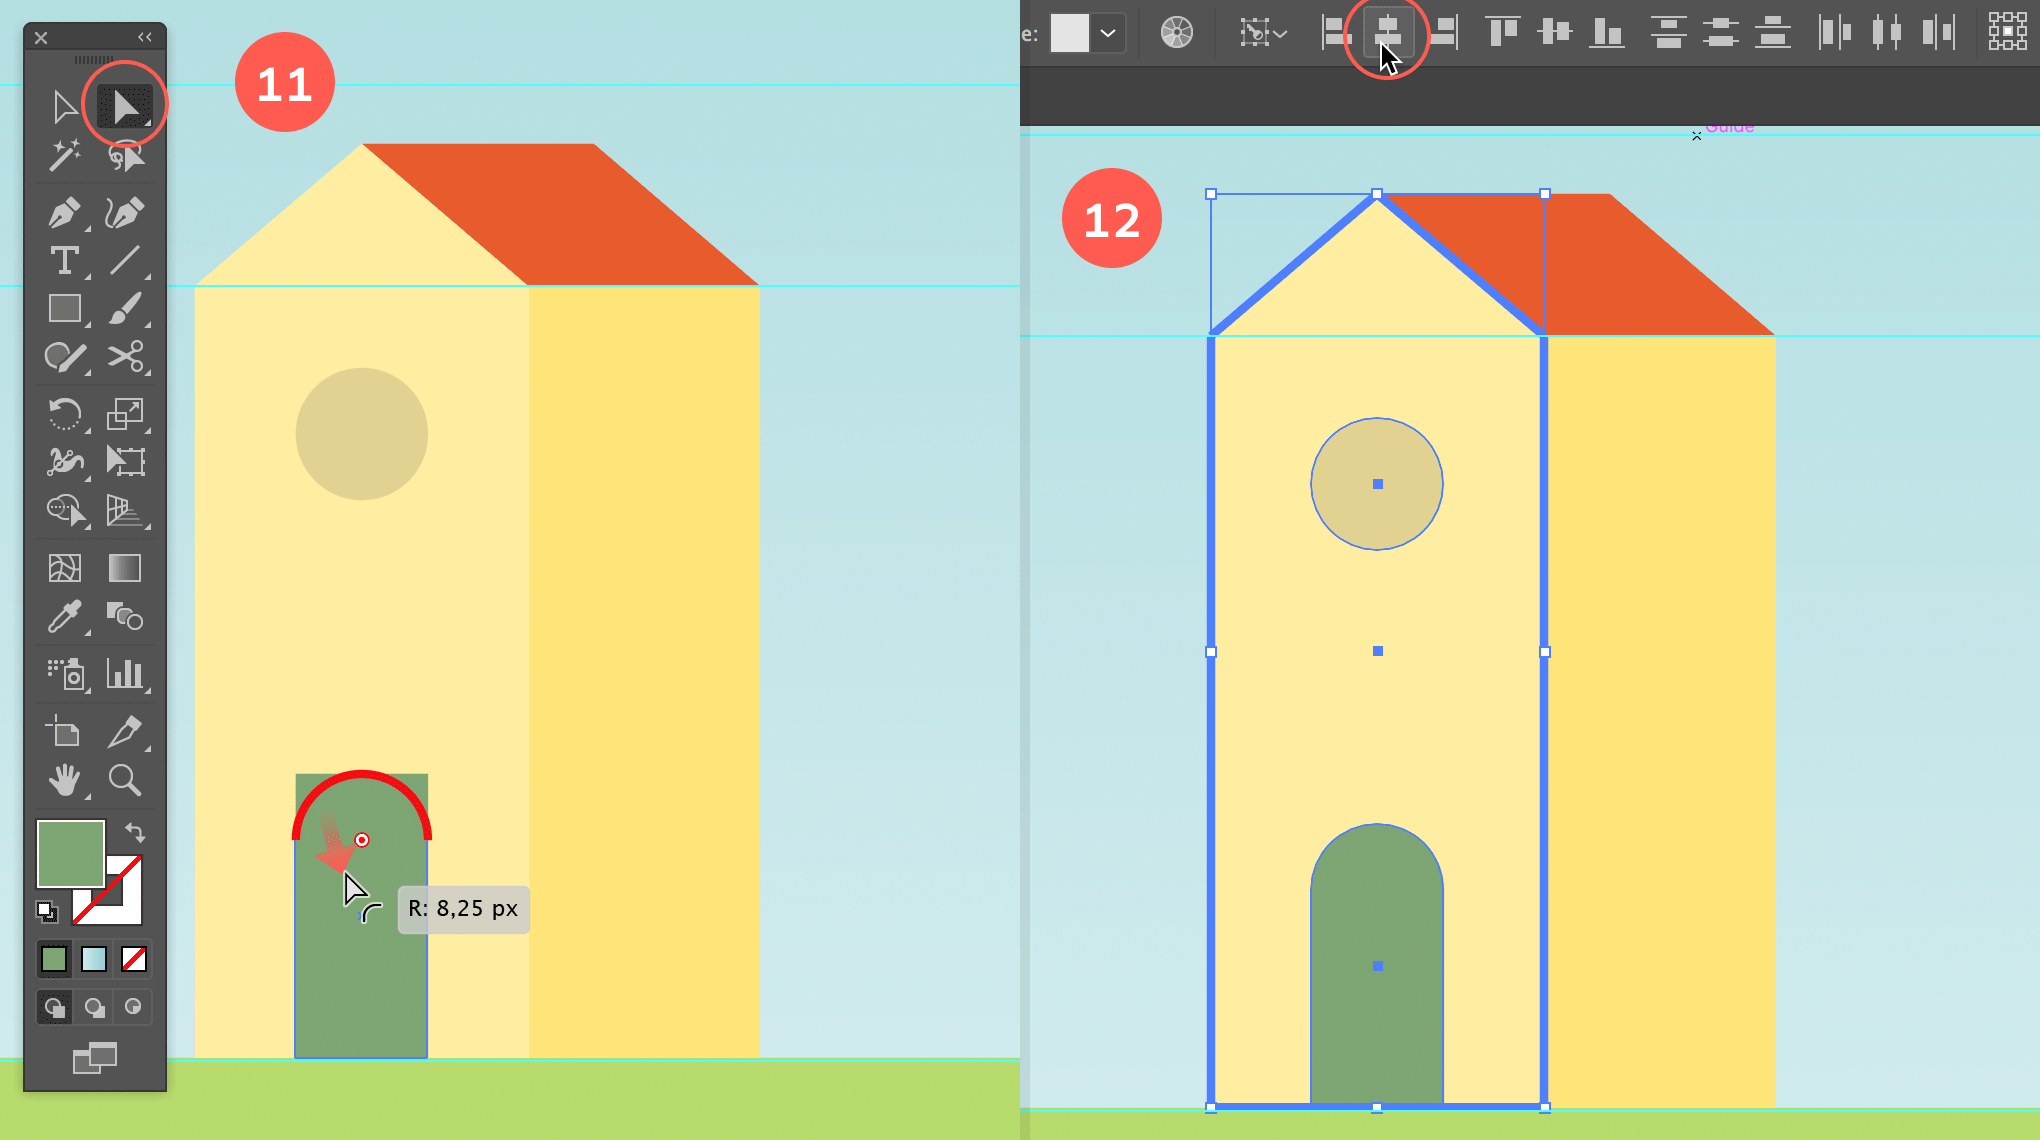
Adjust the shape of the door and center align the window and the door.
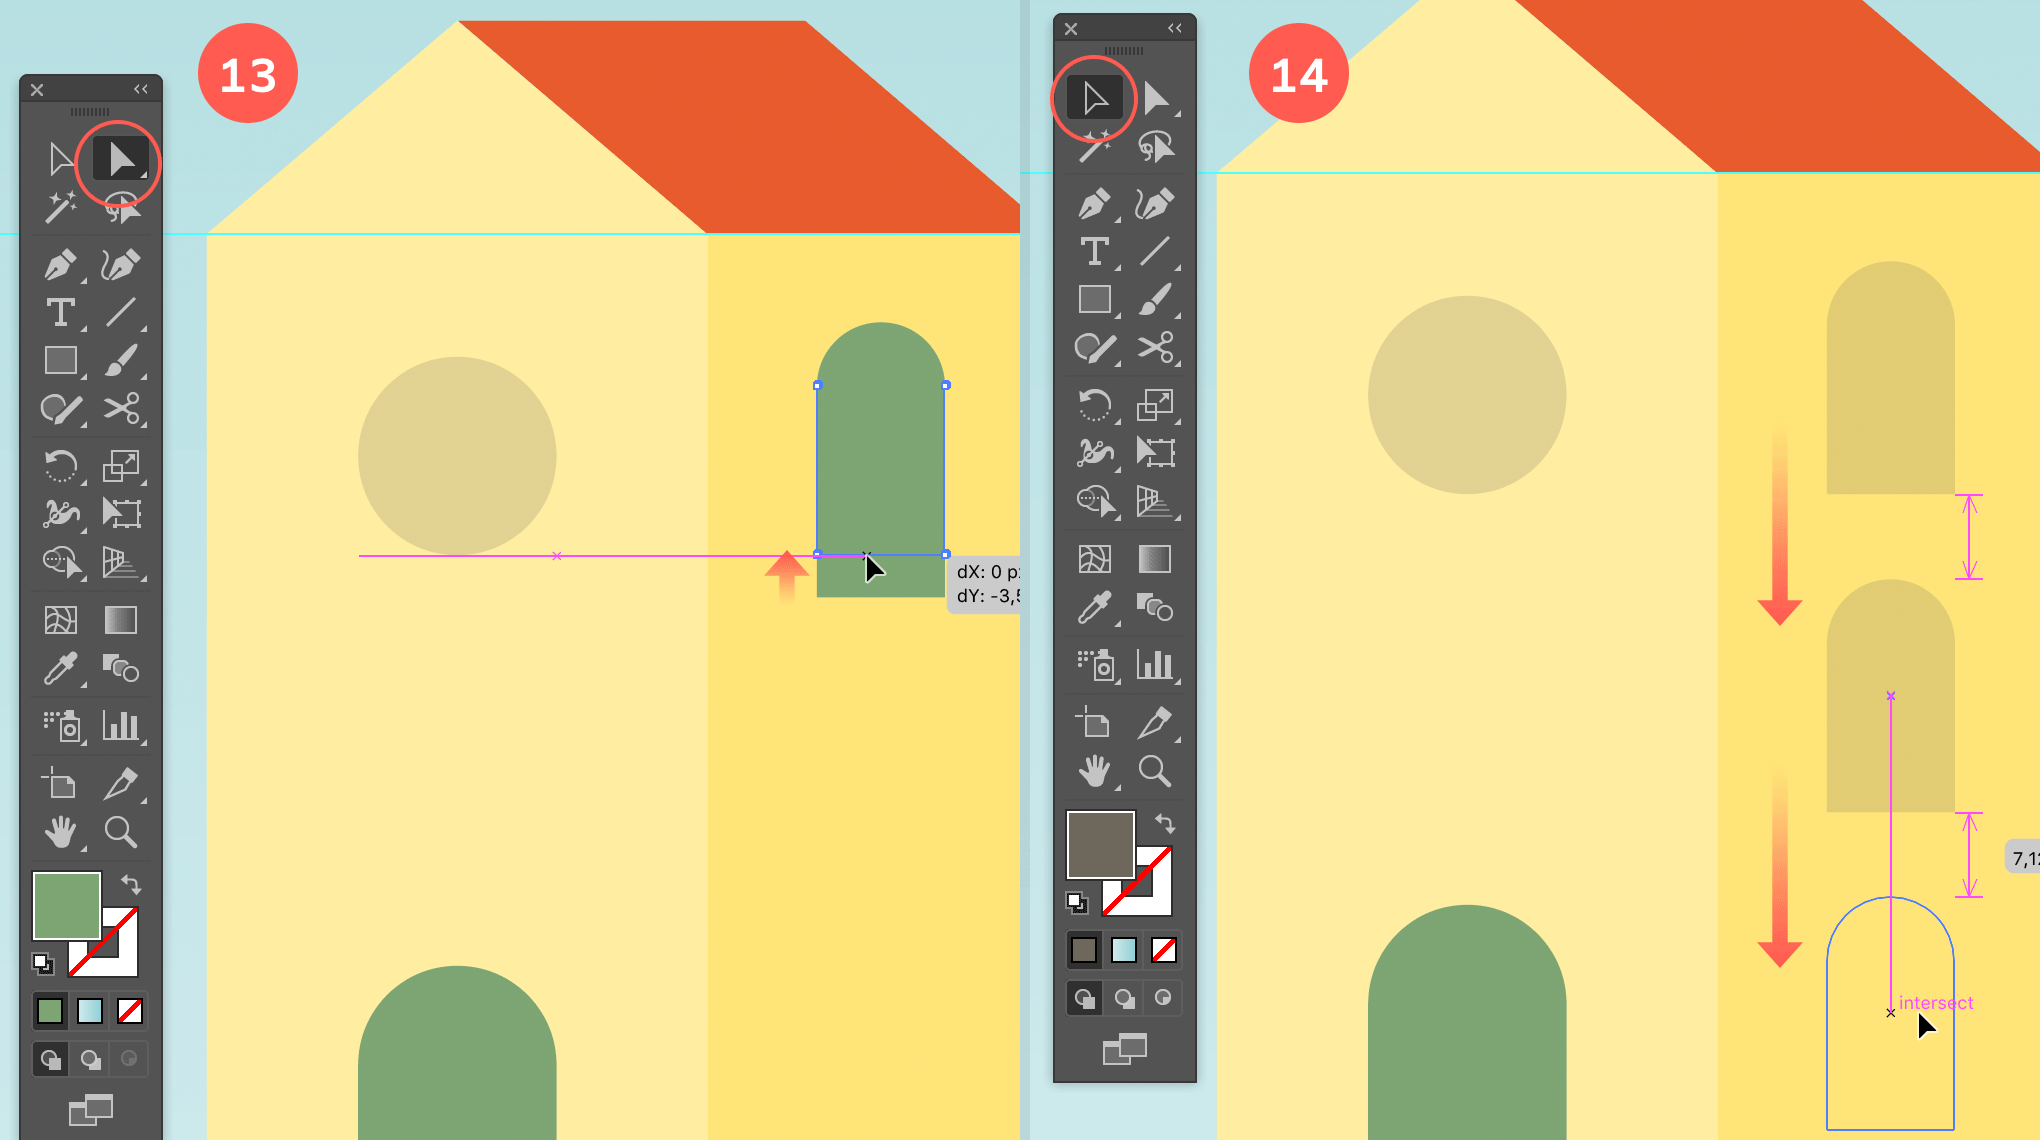
Add more windows on the right side of the house.
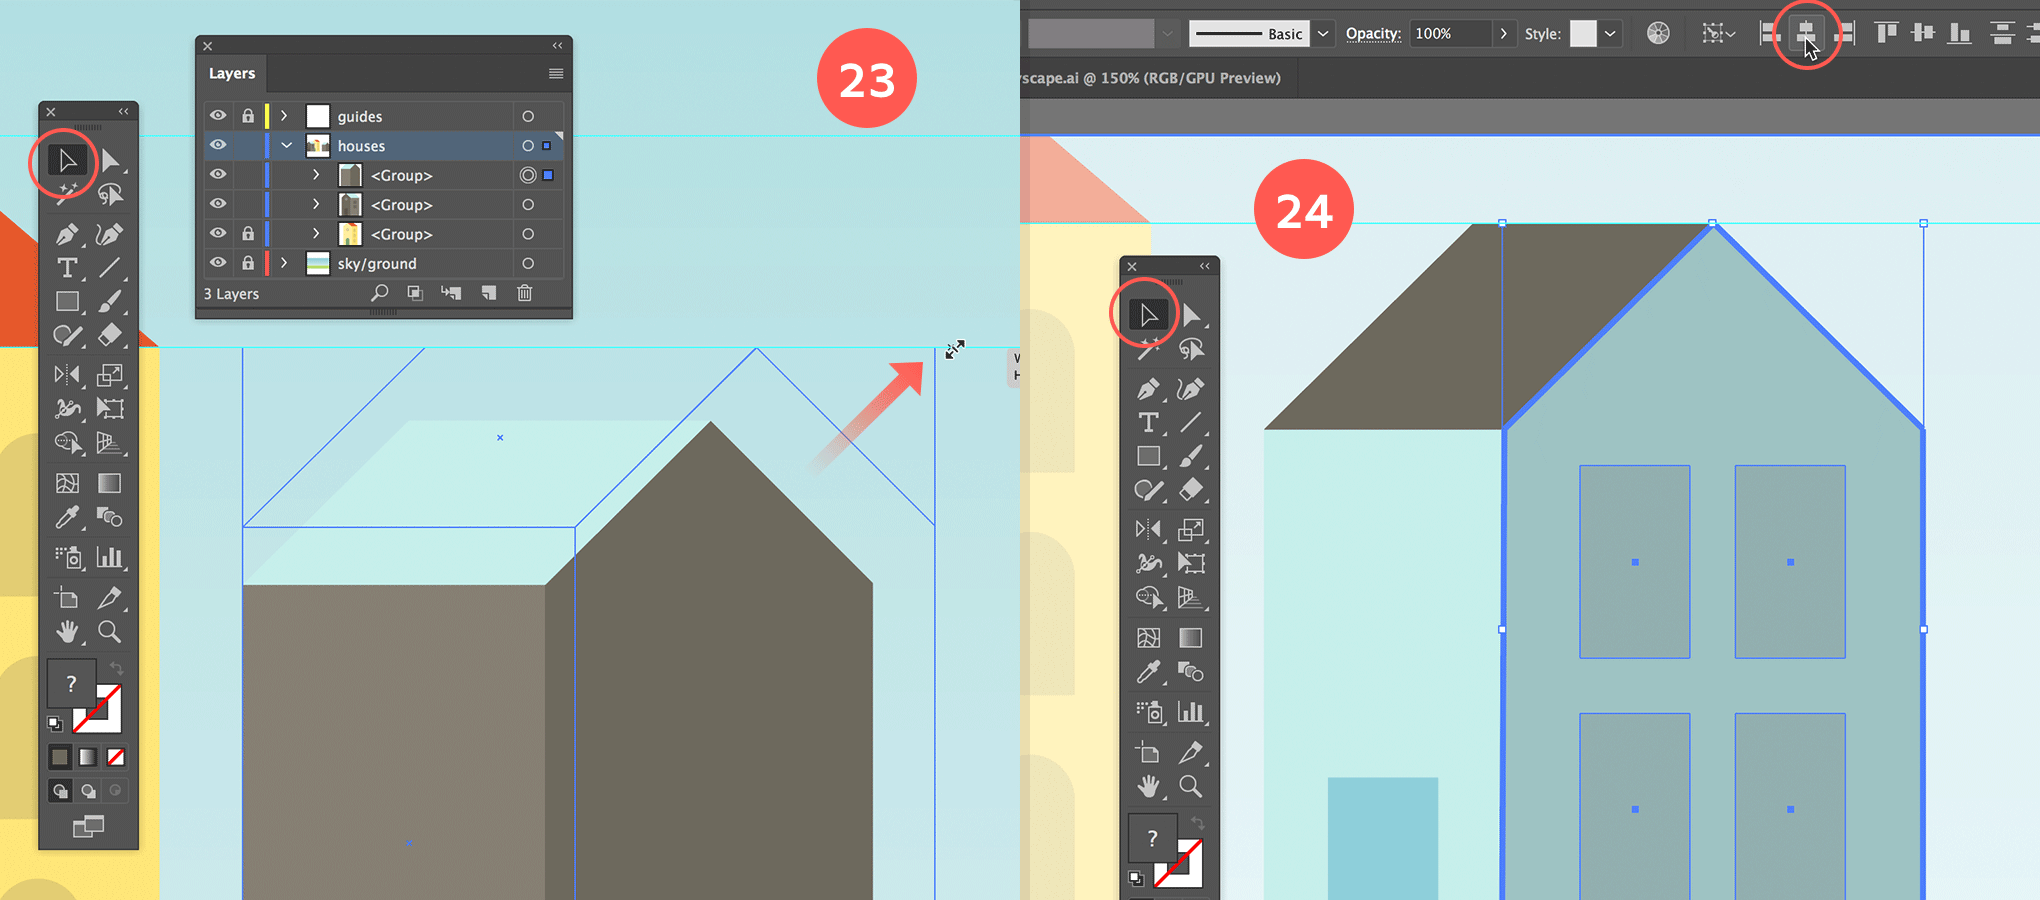
Duplicate the house to create a second one.
Adjust colors and windows of the house.
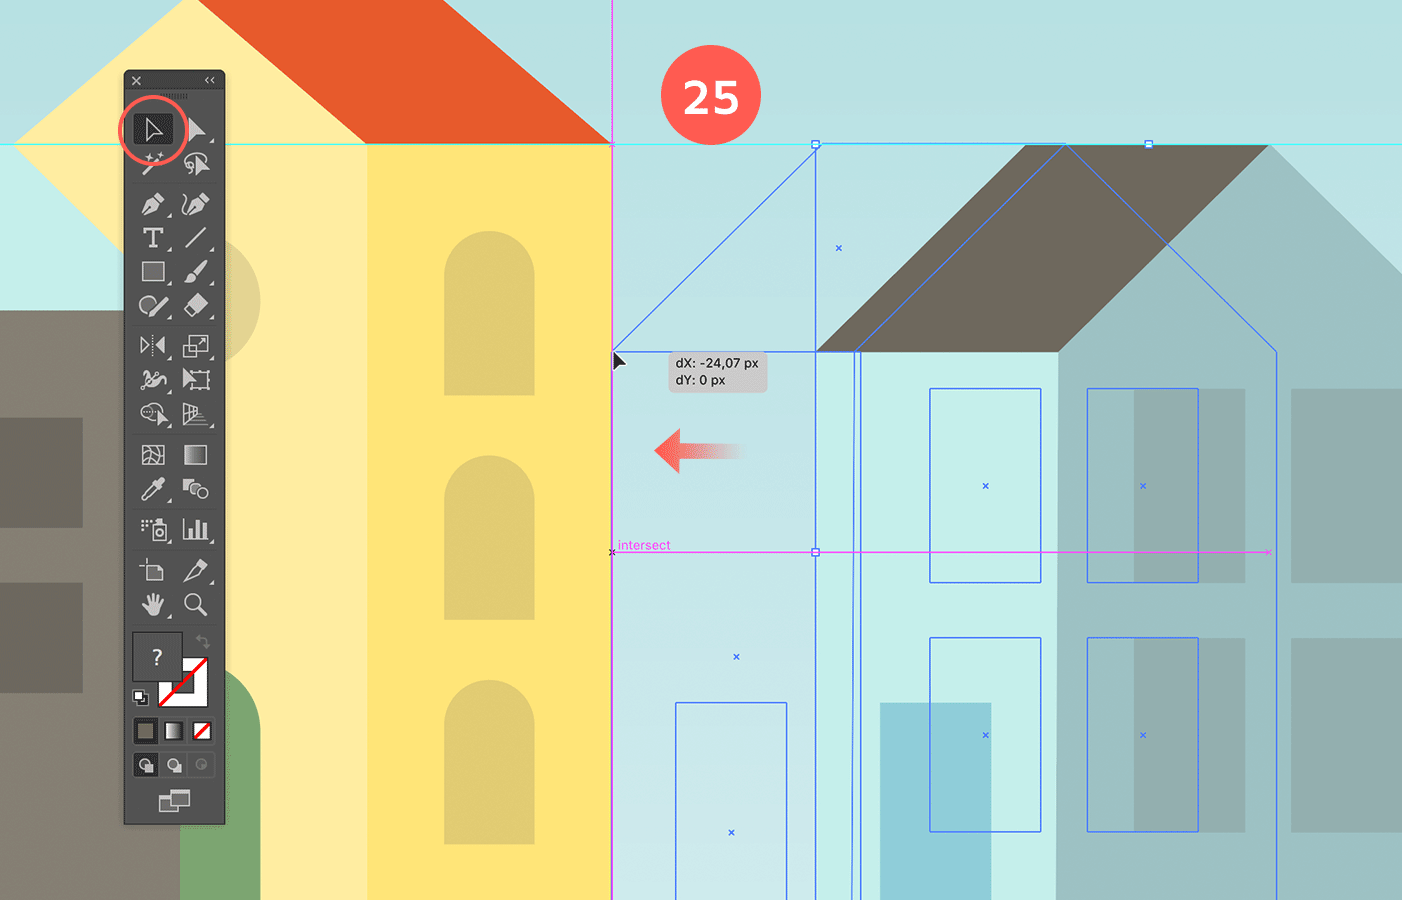
Make the right side of the house wider by selecting only the most right anchor points using the Lasso tool. Drag a selection as shown in the image above. Once selected, drag the anchor points to the right, holding down the Shift key, or you can also use the right arrow key.
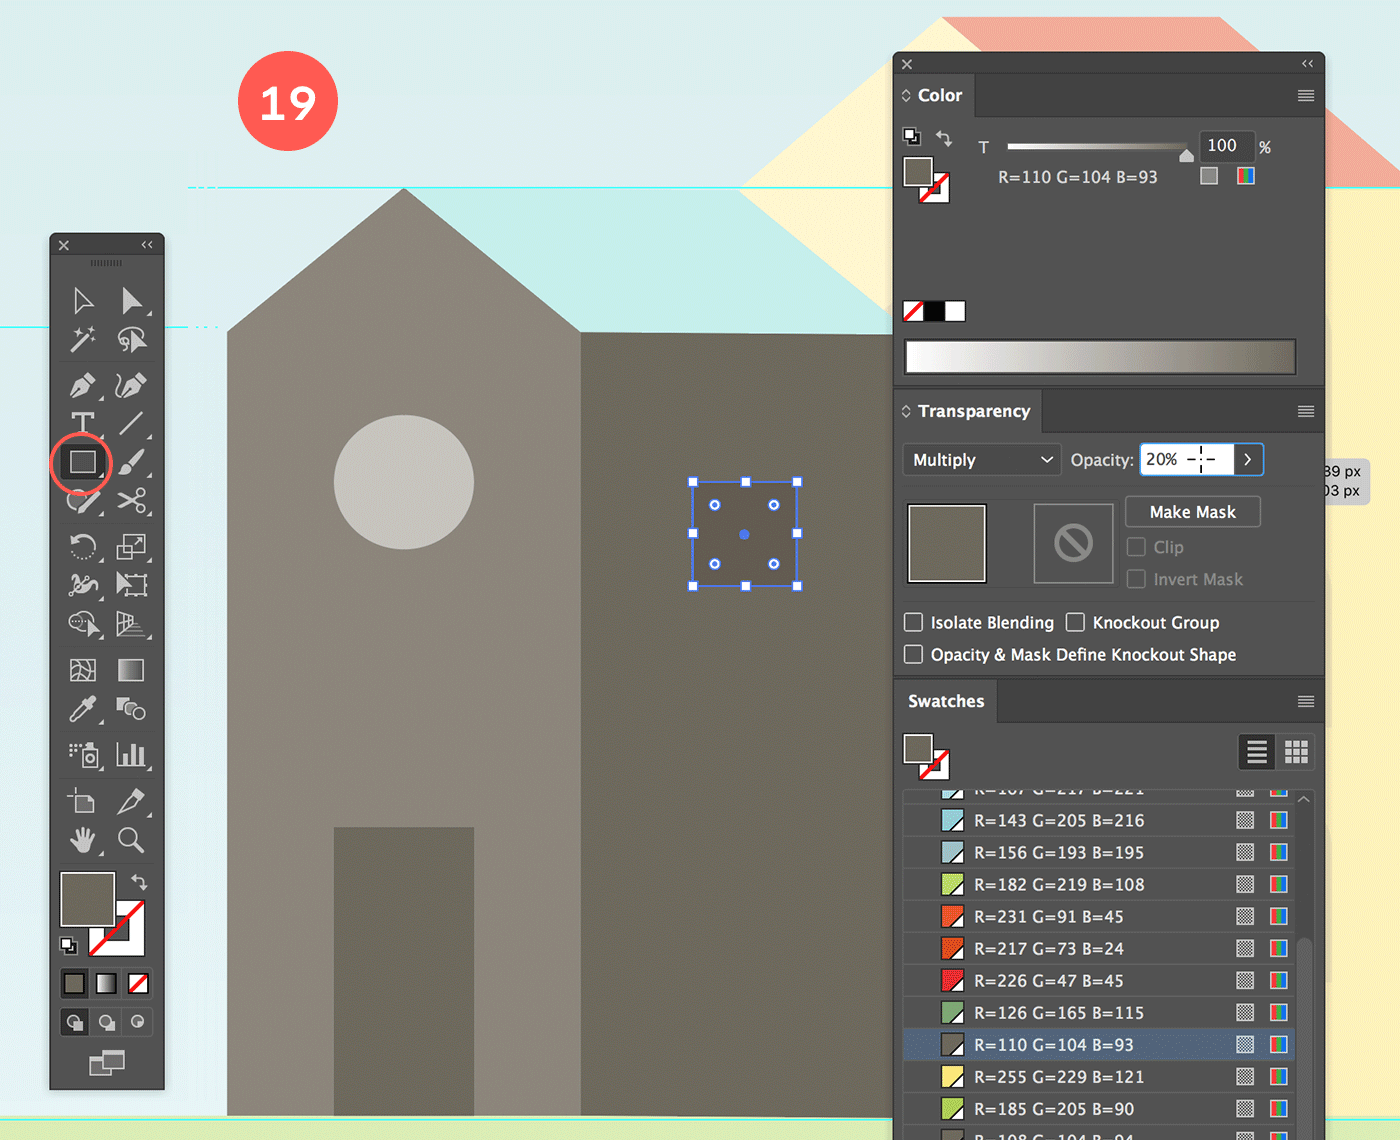
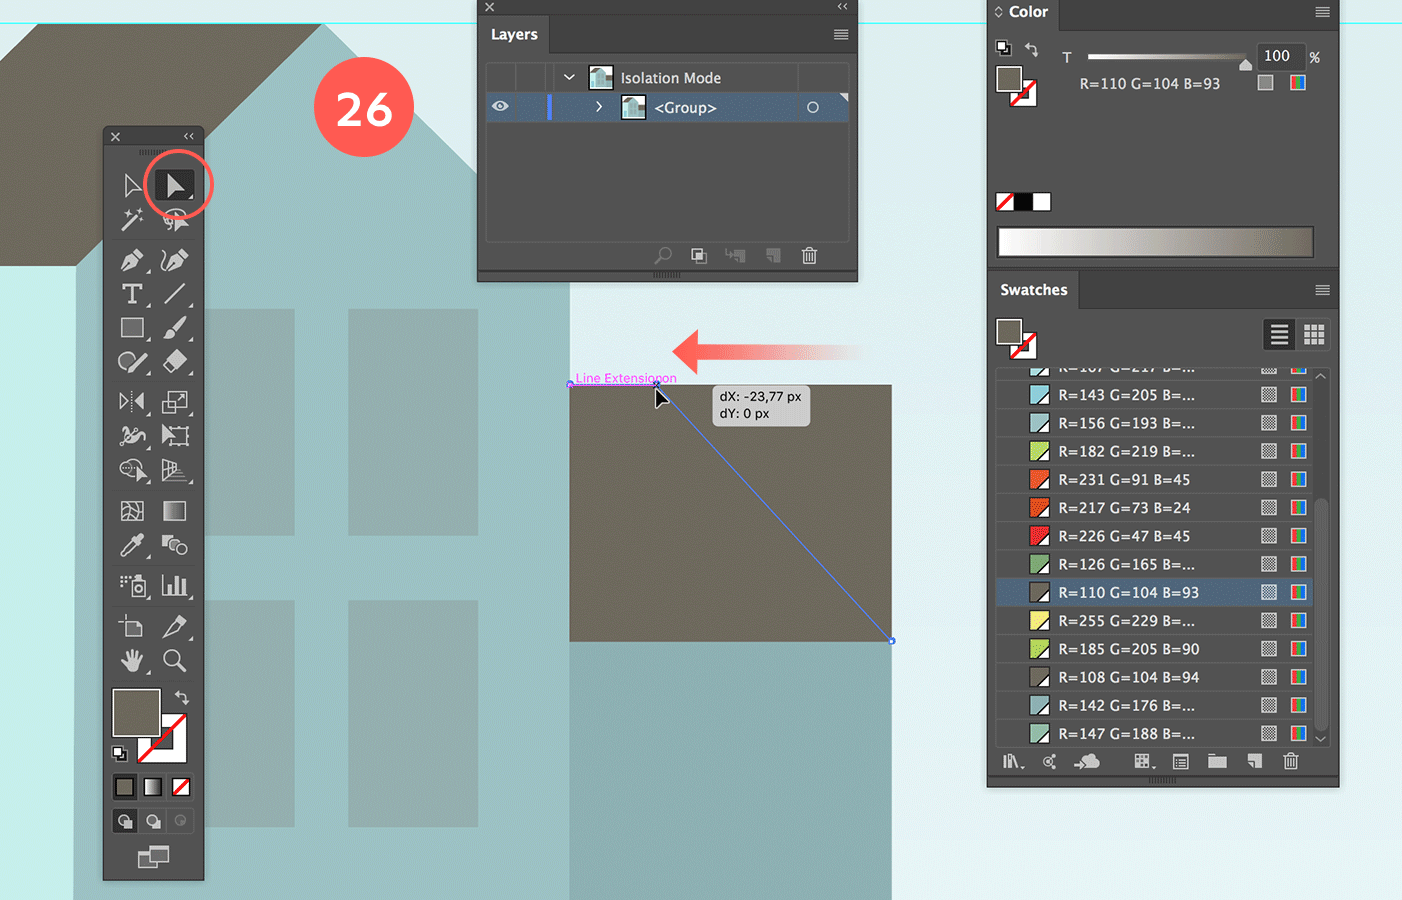
Draw 2 square windows on the side wall. Use the brown-grey as fill, and apply 20% opacity in multiply transparency mode. Duplicate the first one like you did before so you end up with 2 windows. Use the same aligning technique as before to perfectly align the windows in the center of the side wall.
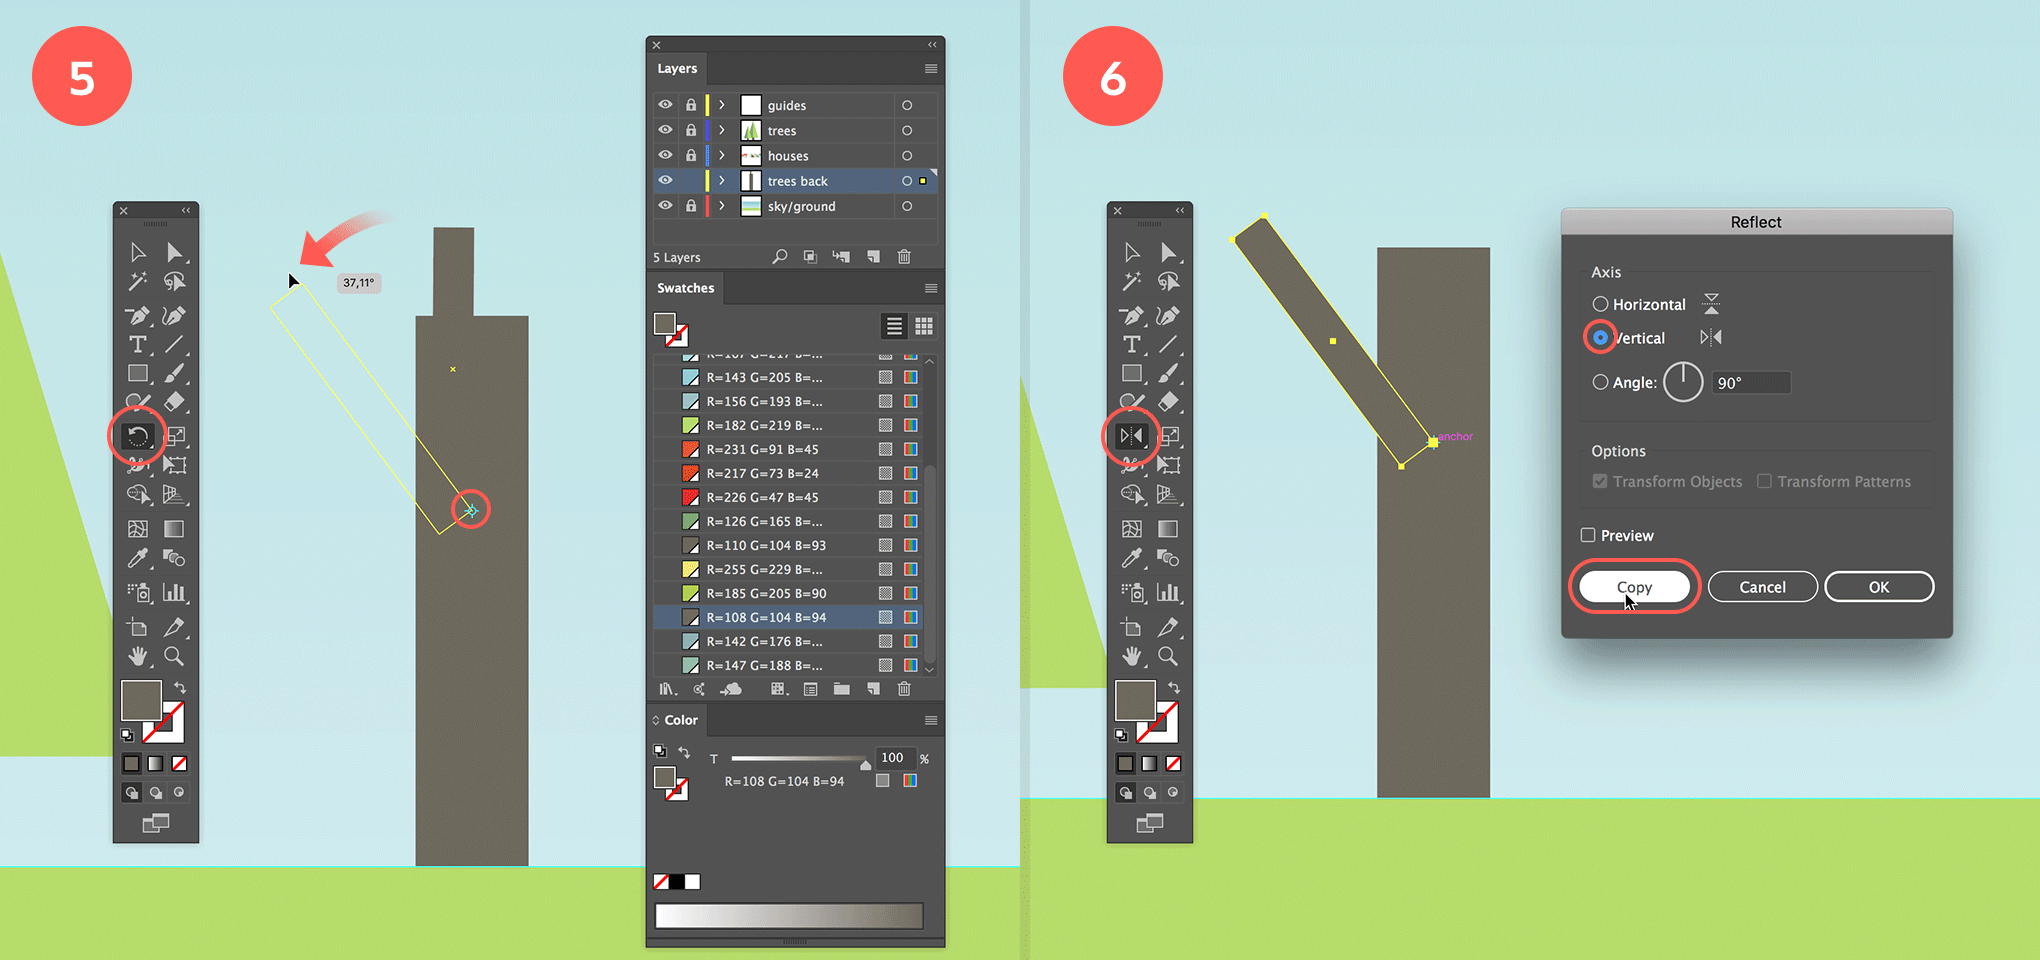
Duplicate the house again like you did before via the Layers panel, but make sure you are out of Isolation mode first. Now move the new house to the right of the original house by holding down the Shift key. Alternatively, duplicate the group on your canvas: hold down the Alt/Option + Shift key and move the duplicated object to the right of the first house.
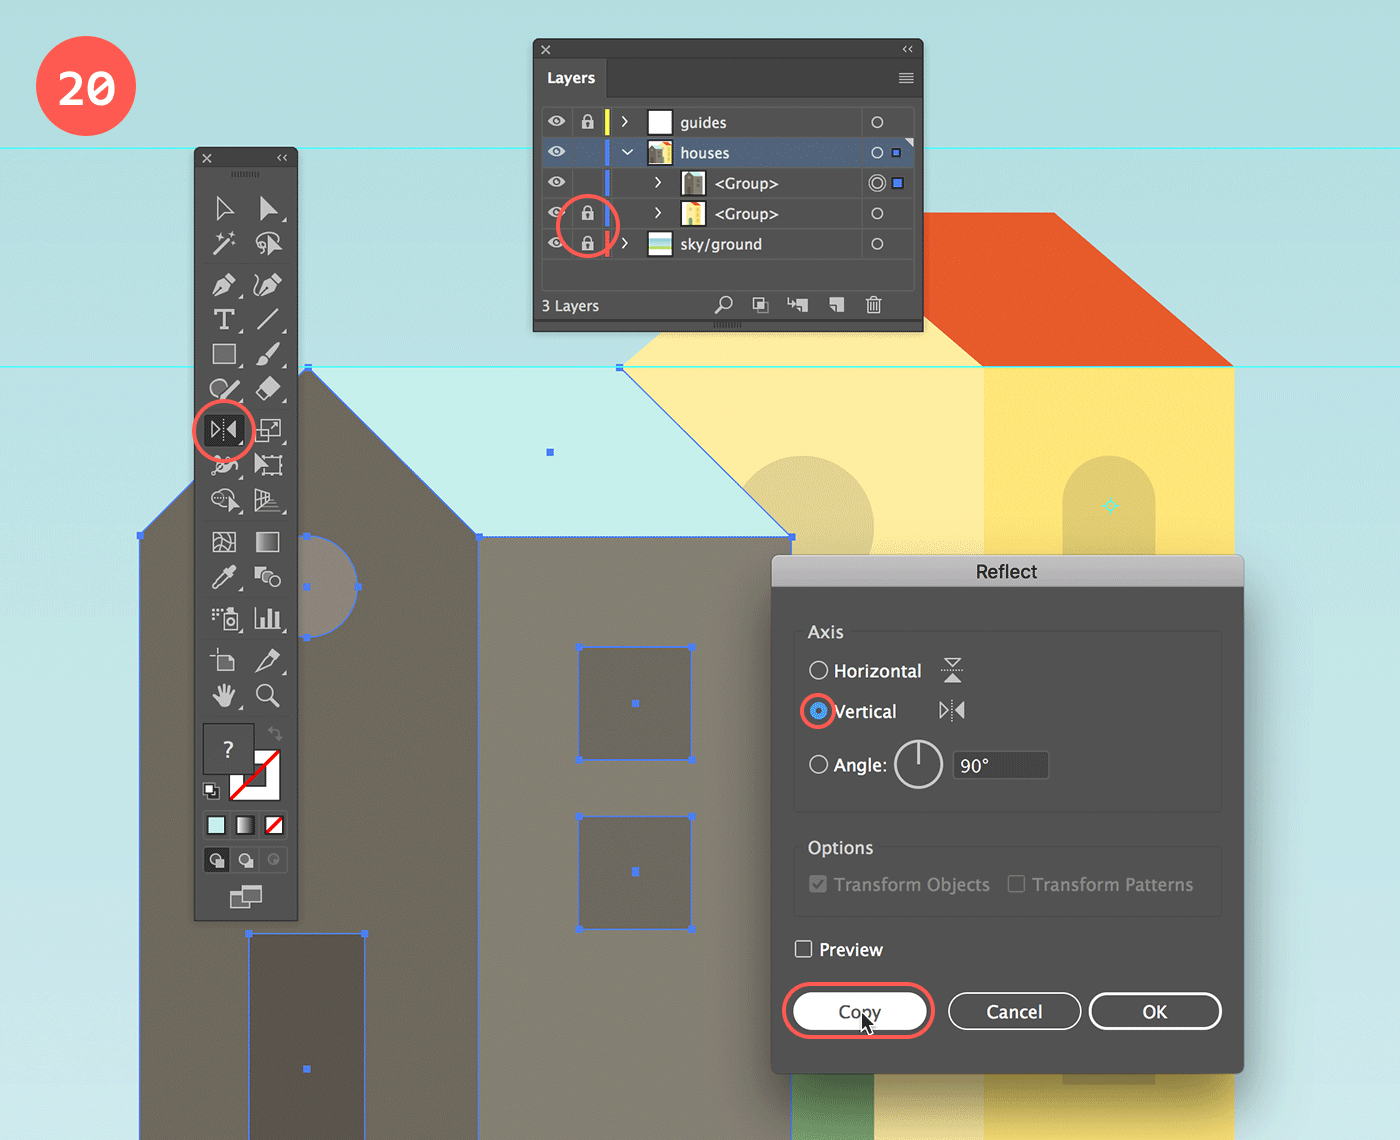
Next, use the Reflect tool: hold down the Alt/Option key and click somewhere in the center of the house. In the window that appears, choose Vertical Axis and hit OK. Remove the door and windows using the Direct Selection tool (white arrow).
 {target=”_blank”}
First deselect the house. Then drag a rectangle selection over the top part of the house using the Direct Selection tool (white arrow).
Drag the selected anchor points vertically down by holding down the Shift key while dragging.

Make the house bigger by selecting it and dragging the top right corner outwards (holding down the Shift key to keep its proportions). Then make the side wall of the house less wide, again by selecting the anchor points (white arrow) and dragging them while holding down the Shift key.
Apply new colors to the new house, and add 4 vertical windows on the side wall. Use the same technique as before to duplicate an object: select and drag by holding down the Option/Alt + Shift key. First, draw the two windows at the top, then select both and copy-drag them below, holding down the Option/Alt + Shift key again.
To Horizontal Center Align the windows with the wall, group the windows together (Cmd/Ctrl + g). Ensure the wall is the target or key object.
Go out of Isolation mode and move the house into place. With Smart Guides enabled, showing visual clues, this should be easy.
Double-click the house to go back into Isolation mode. Create the side/garage part of the house by drawing two rectangles. Use the visual clues of the Smart Guides so the rectangles are perfectly aligned to the right and bottom of the house. For the roof, select only the top-right anchor point, and move it to the left by holding down the Shift key (or use the left arrow key). Lastly, add the garage door by drawing another rectangle on top. Give it the same dark color as the roof, but apply 20% opacity.
[
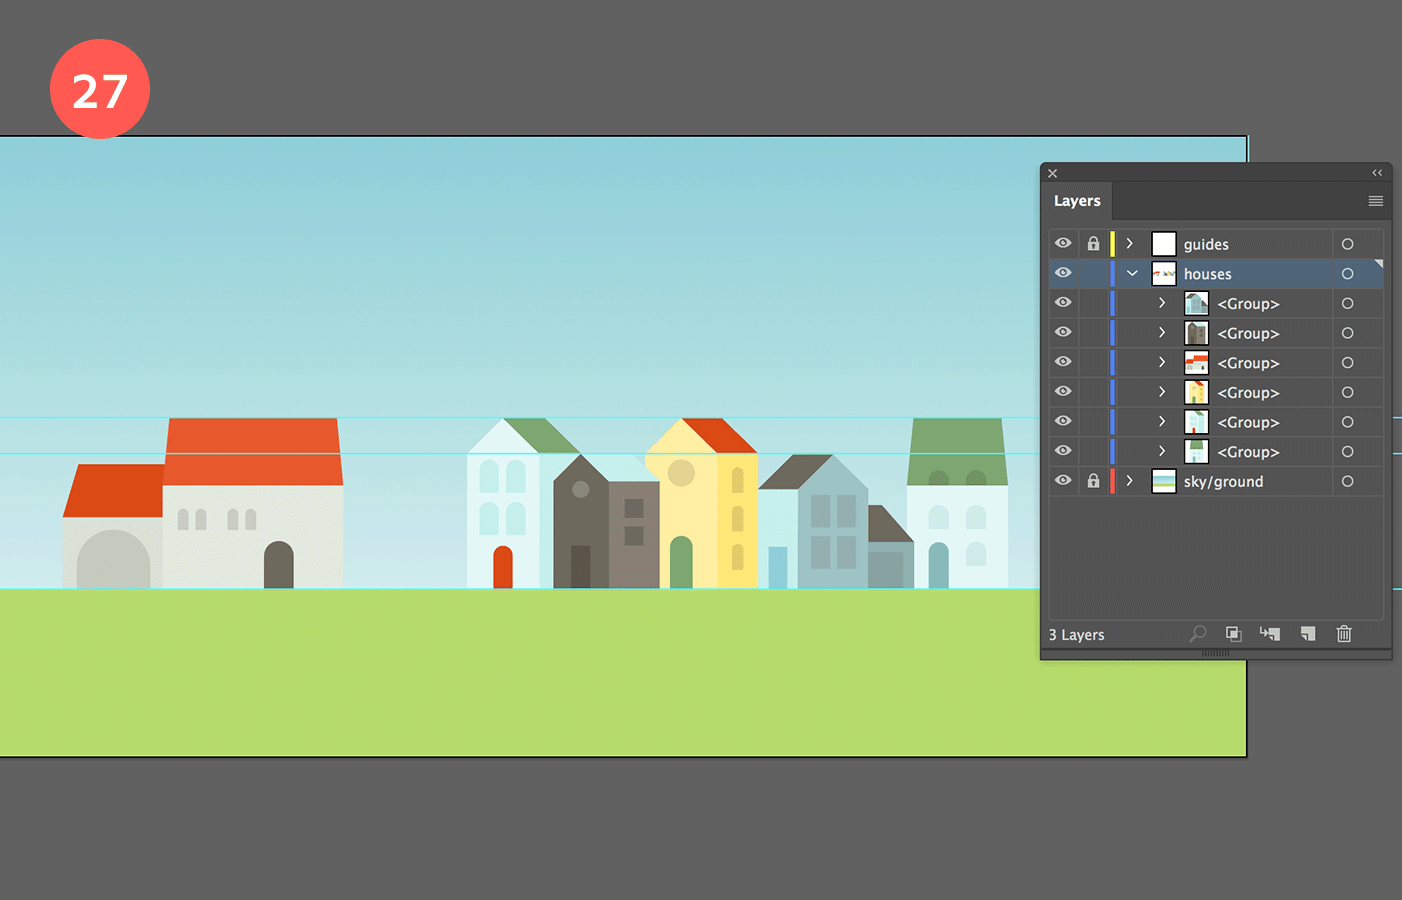
Based on what you’ve learned so far, draw the other houses using the same techniques of copying, reflecting, aligning, recoloring, etc. You can look at the image below as a reference for how things can look. Feel free to do your own thing.
[
Attention to detail is everything. To finalize our houses, we add a few special details to some of them. This way, they will stand out a little more, adding extra finesse to the illustration. Double-click the (grouped) house first to go into Isolation Mode. This way, the detail you add to the house will also be part of the group.
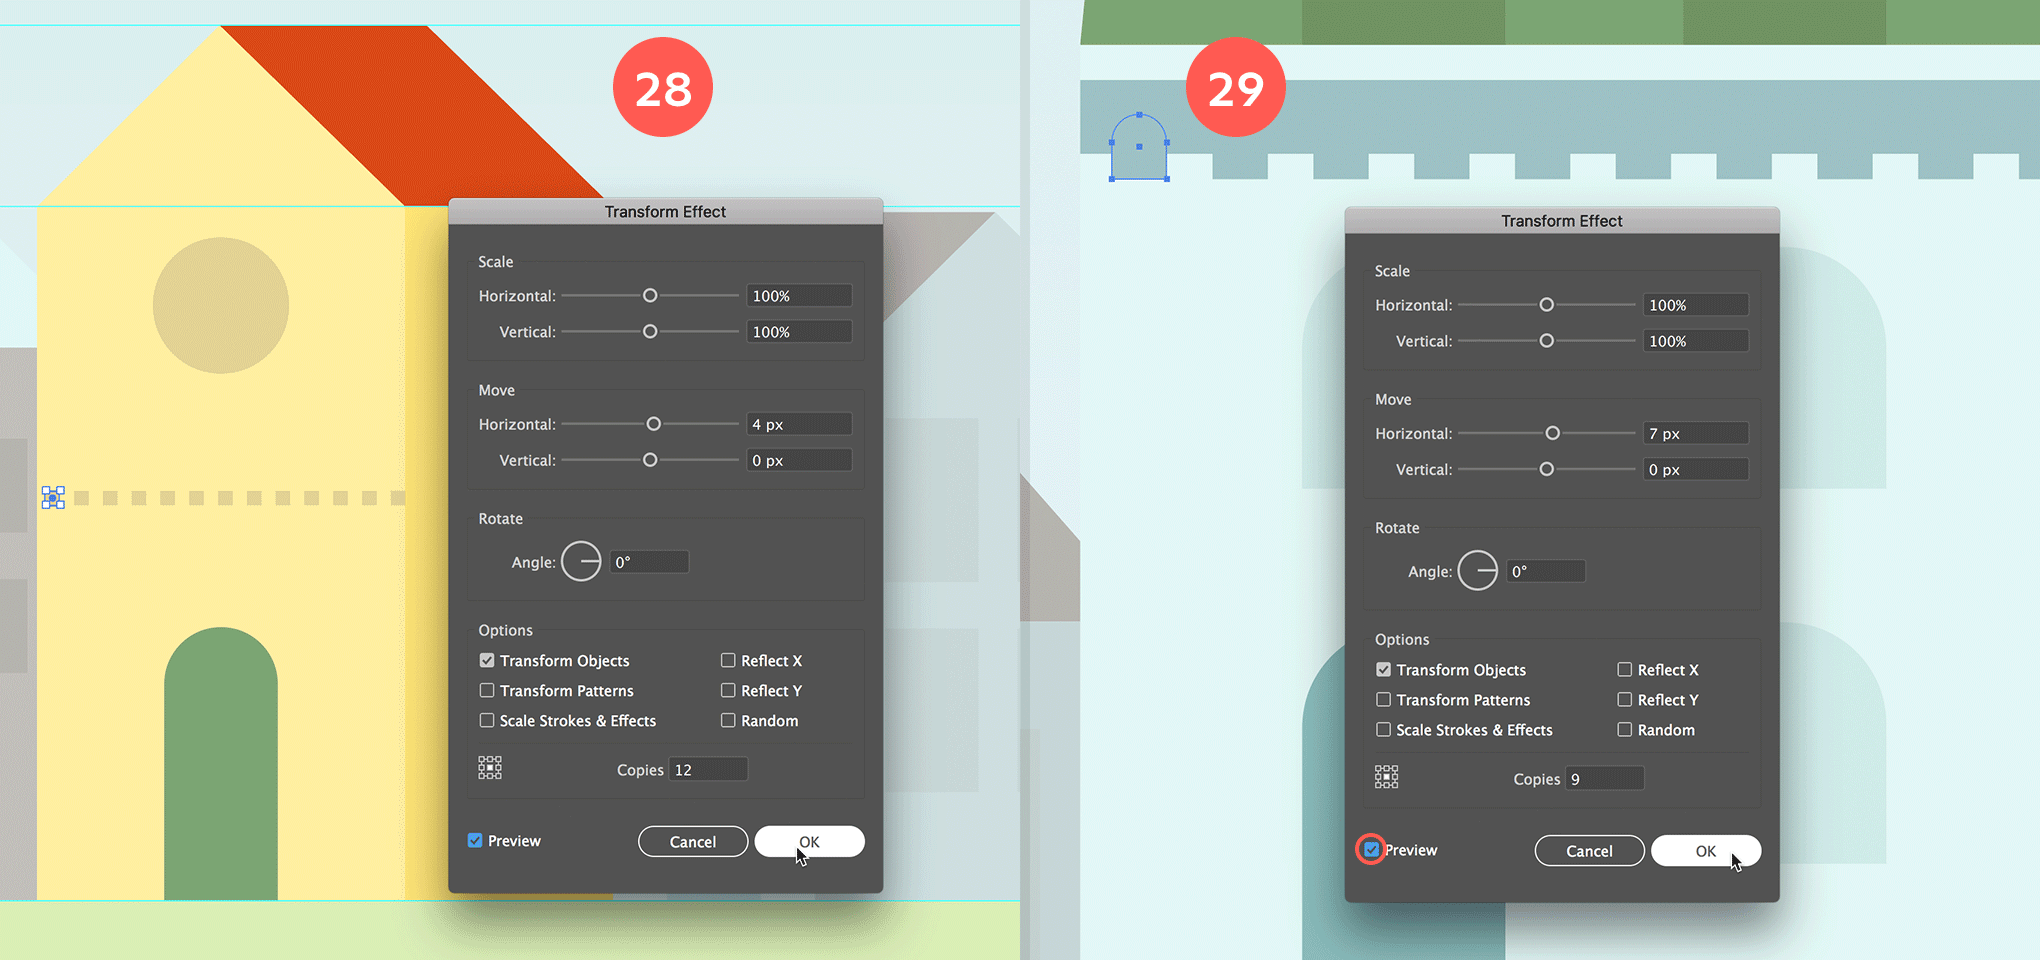
On the yellow house, add a tiny square of 1 x 1px on the right and use the Transform effect (Effect > Distort & Transform > Transform…) to duplicate this square horizontally, leaving some space in between each by moving it 4px for 12 times.
[
On another house, add an ornamental line. First, draw a horizontal rectangle. Then on top to the left, draw a small (almost square) rectangle, half overlapping the big horizontal rectangle. Select the top anchor points of this small rectangle using the Direct Selection tool and make the corners fully round. Duplicate this shape 9 times horizontally, moving it 7px each time (Effect > Distort & Transform > Transform…).
Expand this effect via Object > Expand Appearance. Select both the big rectangle and all the smaller shapes. Use the Minus Front option from the Pathfinder panel.
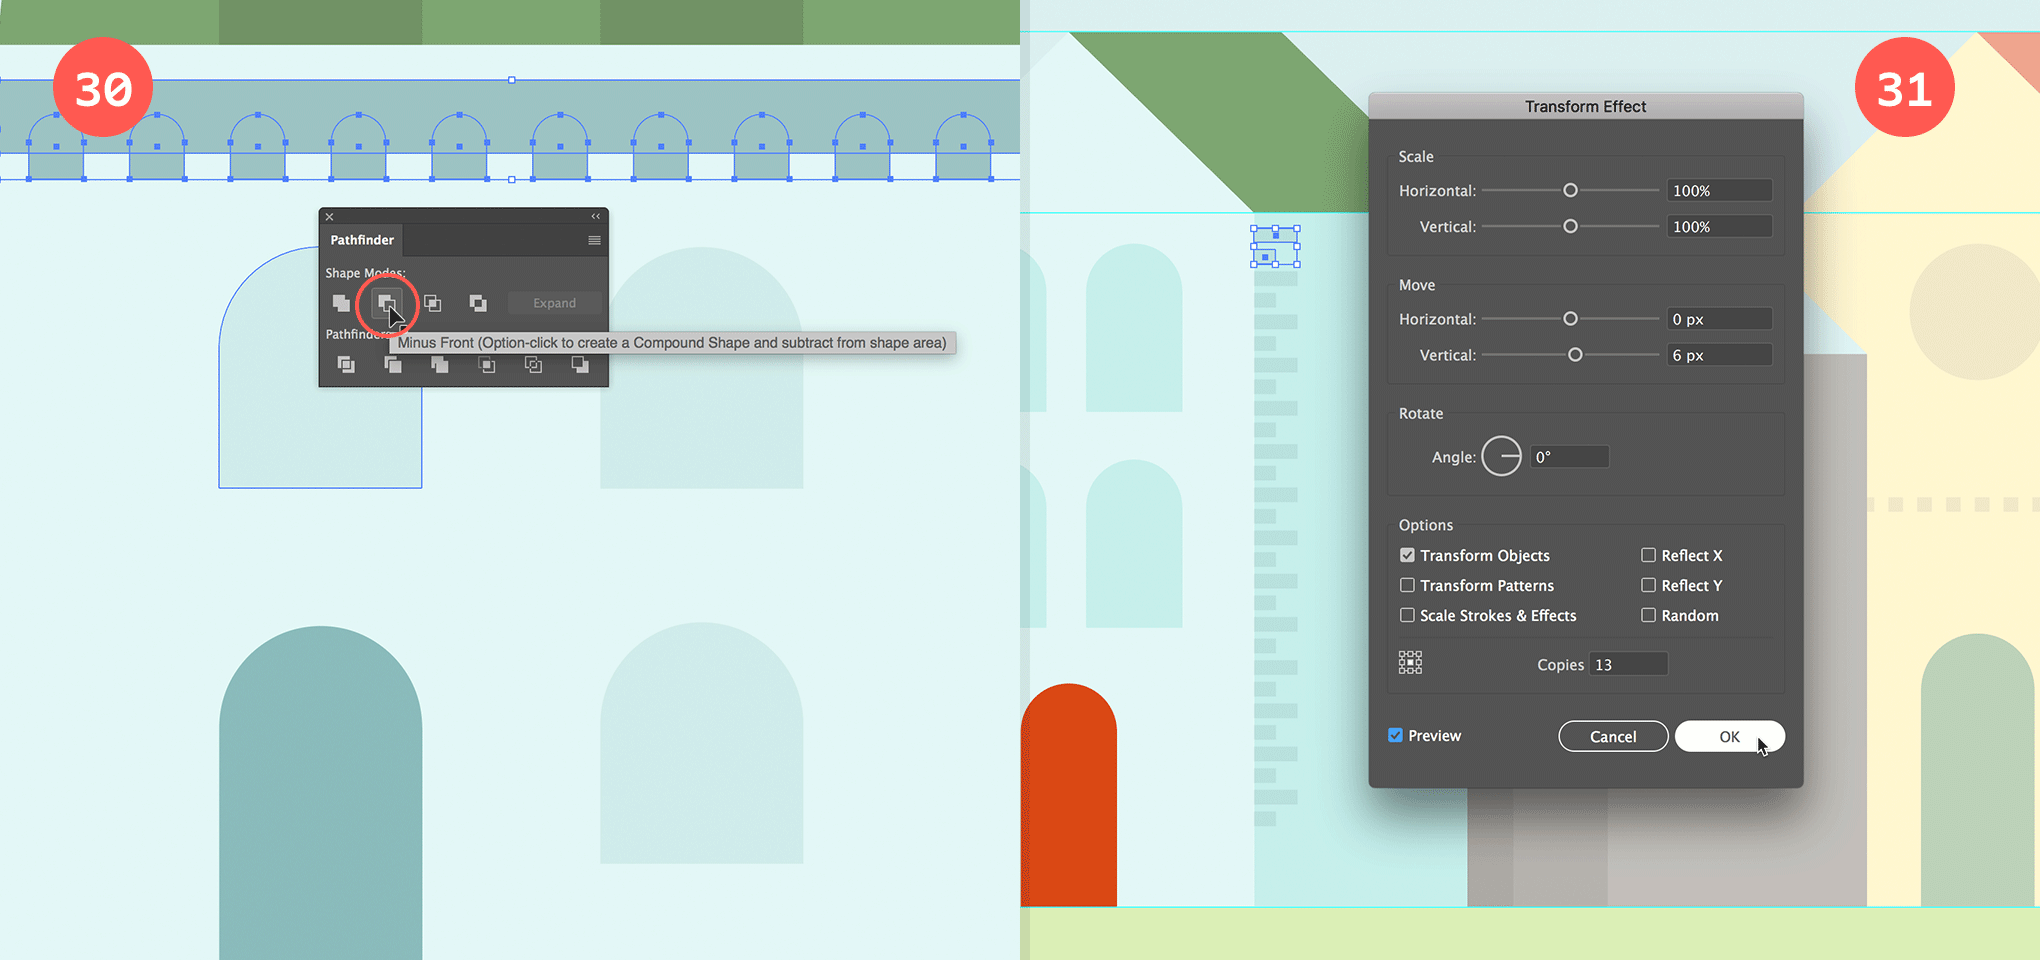
Draw two small horizontal rectangles at the left border of the house. Duplicate them vertically 13x with some space in between (Effect > Distort & Transform > Transform…).
Draw a dark green vertical rectangle. Use the Pen tool to remove the top-left anchor point.
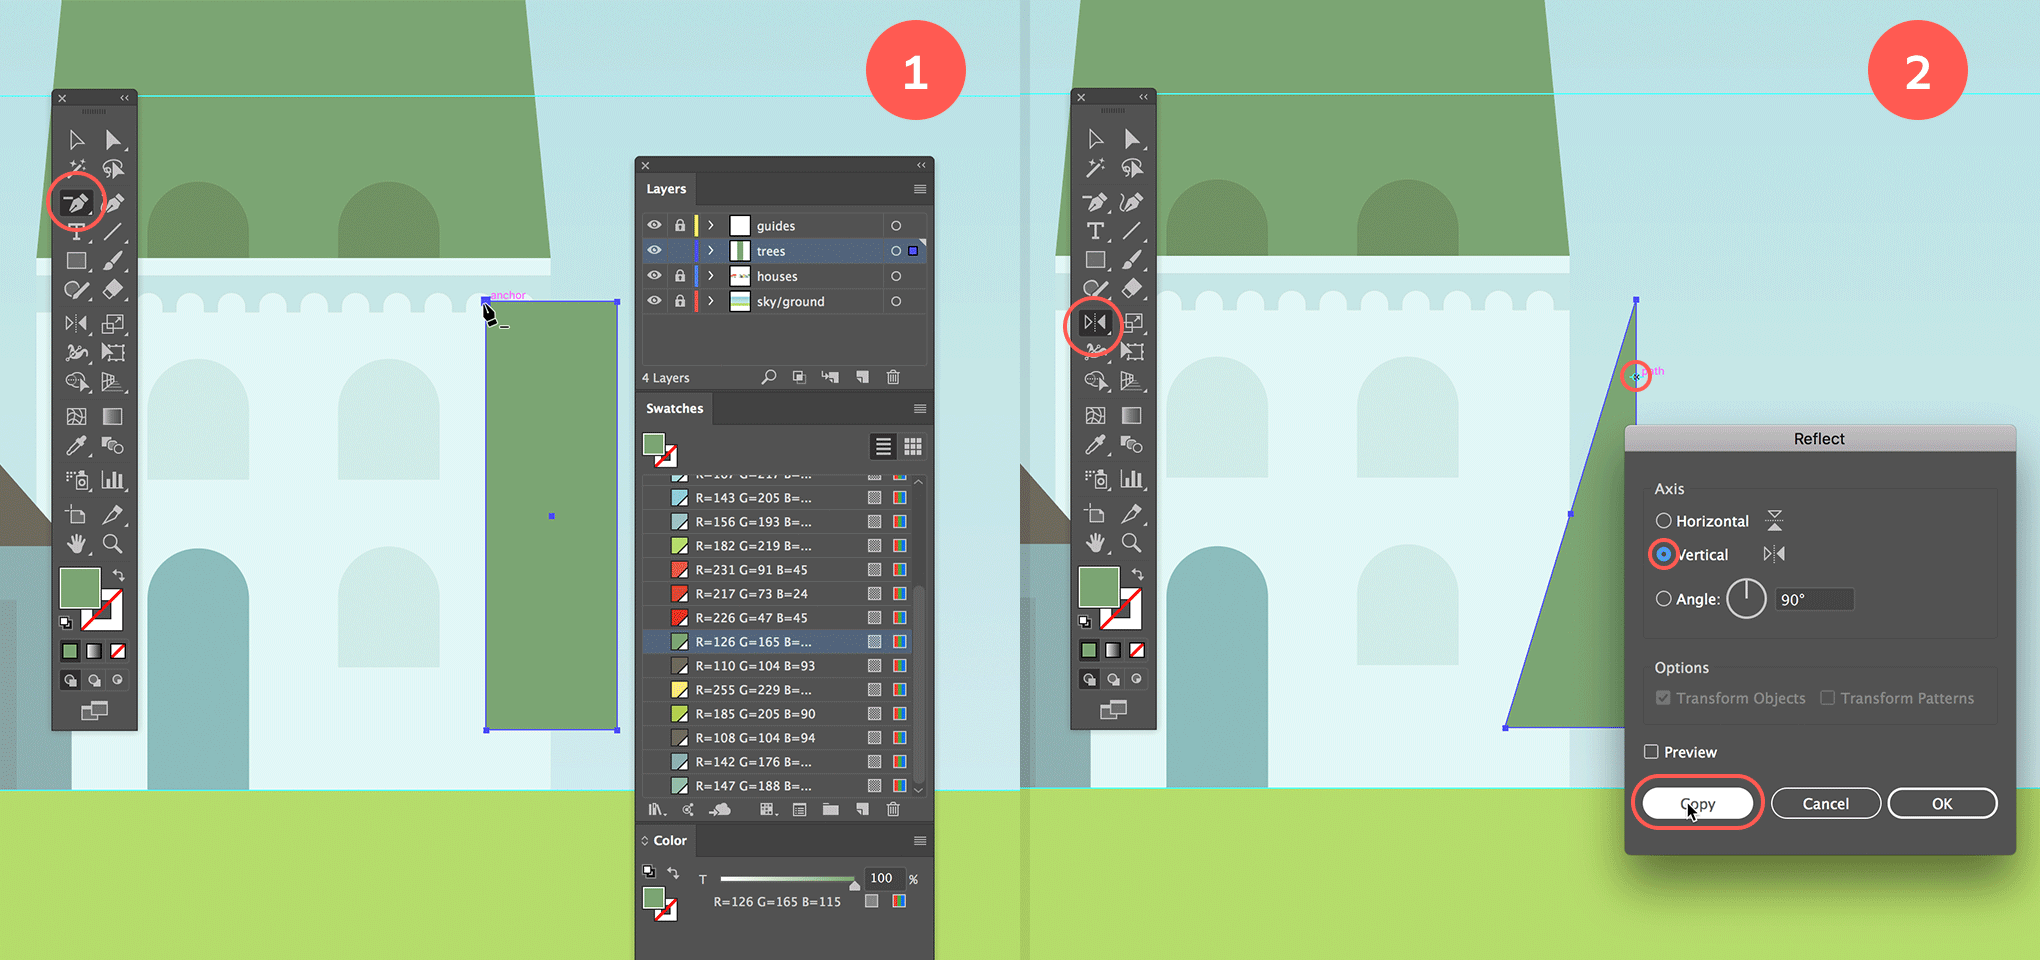
Use the Reflect tool, hold down Alt/Option, and click on the vertical line of your triangular shape. Select Vertical as Axis and hit the Copy button.
Give the other side of the tree a lighter green color. Add a small brown rectangle for the trunk and group all shapes. Move the tree onto the horizon guide.
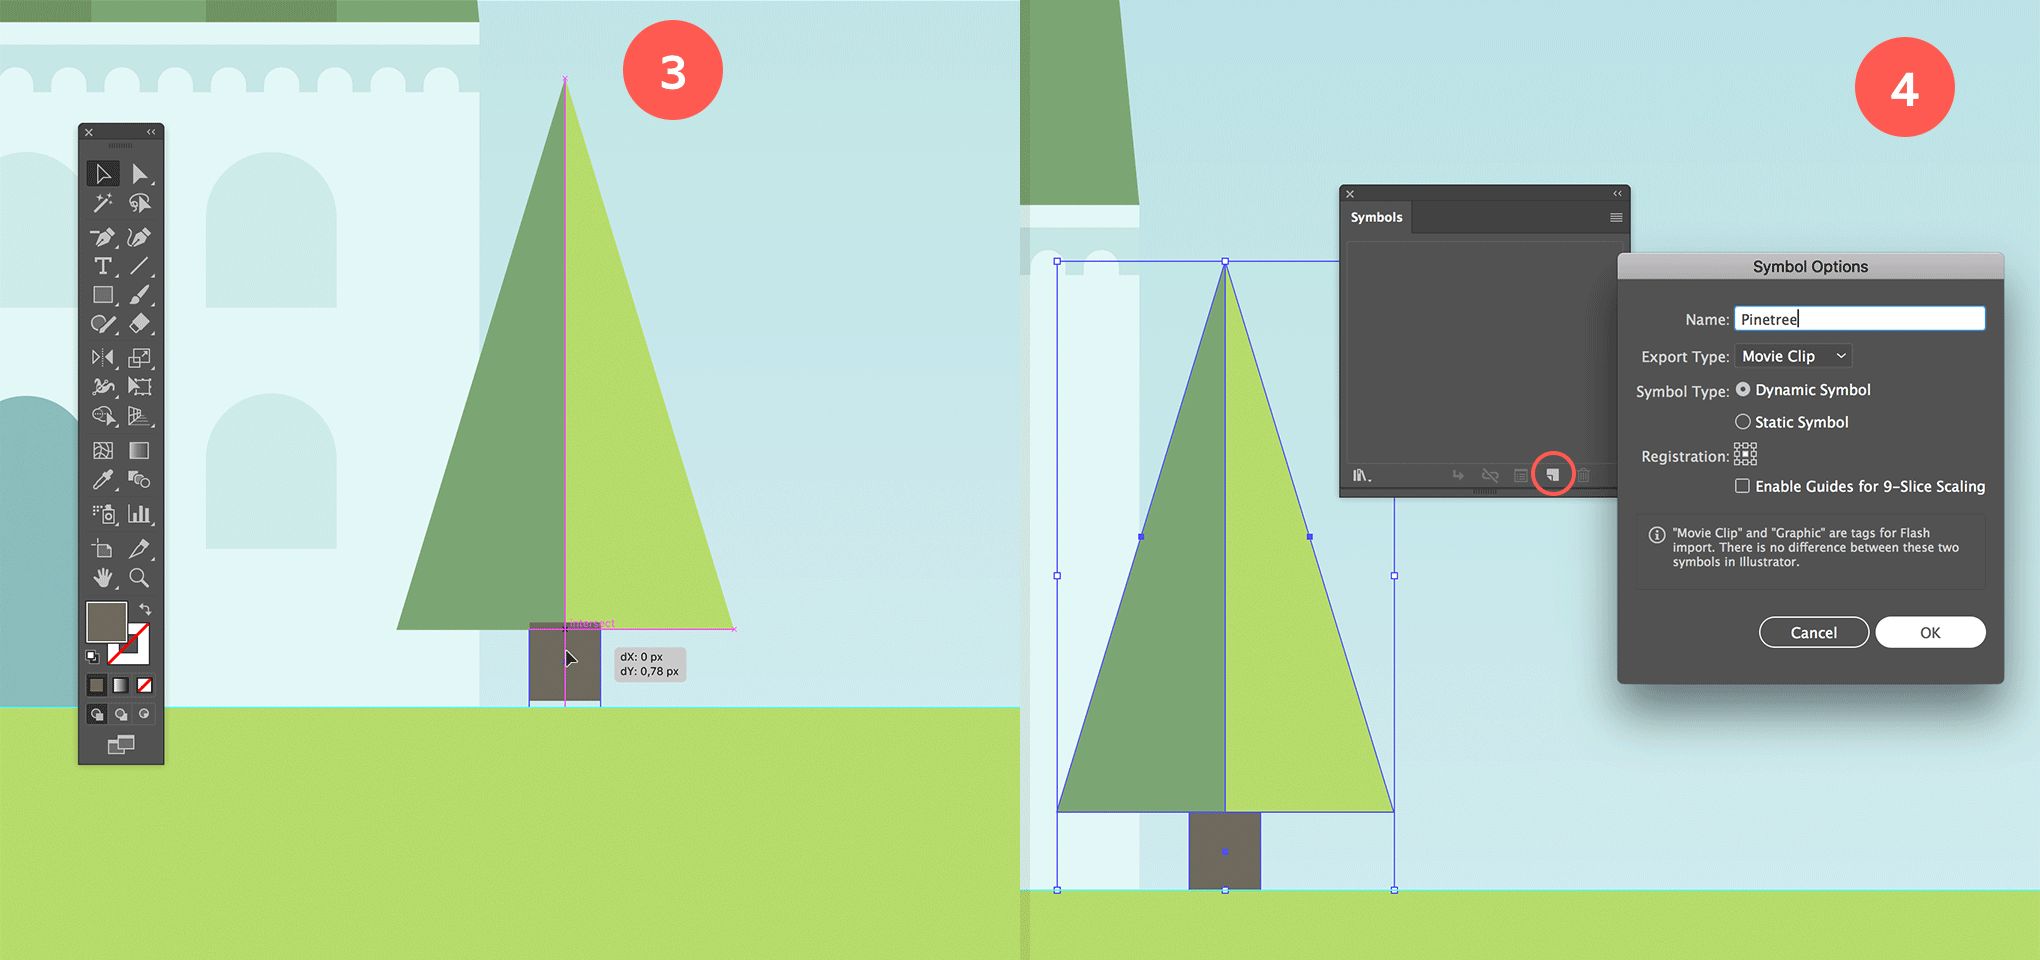
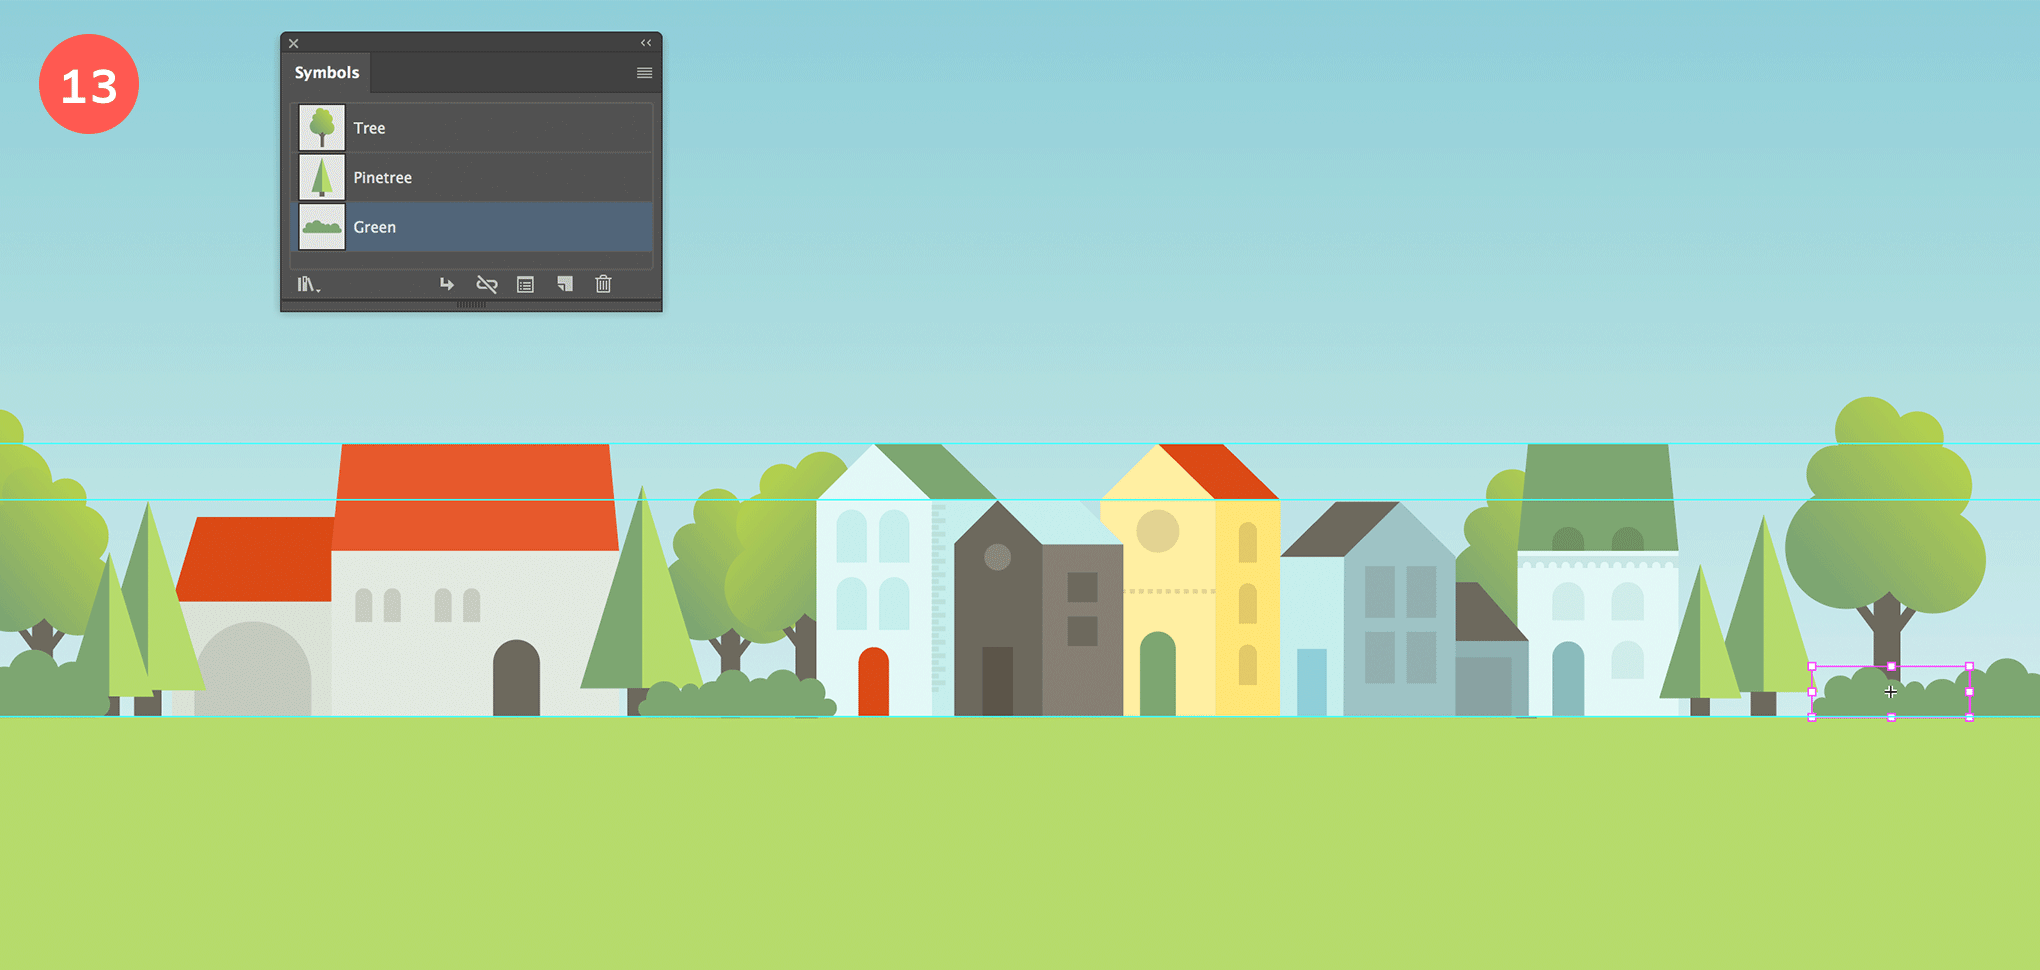
Drag the tree into the Symbols panel and create a symbol for reuse. Scale or reflect the tree to add variation to your landscape.
Next we’ll create the deciduous trees. Lock the other layers first, and create a new layer (‘trees’), this time make sure this layer sits below the layer ‘houses’. These trees will be bigger than the pine trees, as we’ll be placing them behind the houses to achieve an interesting landscape composition.
Start by drawing a vertical brown rectangle for the trunk of the tree. Then add another smaller and thinner vertical rectangle to create a branch on the left of the trunk. Rotate and position the branch a bit similar of how I show in the image below. Select the Rotate tool, then click into the right bottom anchor point of the rectangle and start rotating the rectangle to the left (by dragging).
Select the branch and reflect it to the other side of the tree, by selecting the Reflect tool, holding down the Alt/Option key and click in the center of the trunk. Choose Vertical as Axis and hit the Copy button.
Now draw a bunch of light green overlapping circles to finalize the tree. You can decide to Unite all the circles into one single path via the Pathfinder panel and choosing Unite if you are happy with the result. If you want to maintain the flexibility to edit these circles later on, then hit the Unite option while holding down the Alt/Option key.
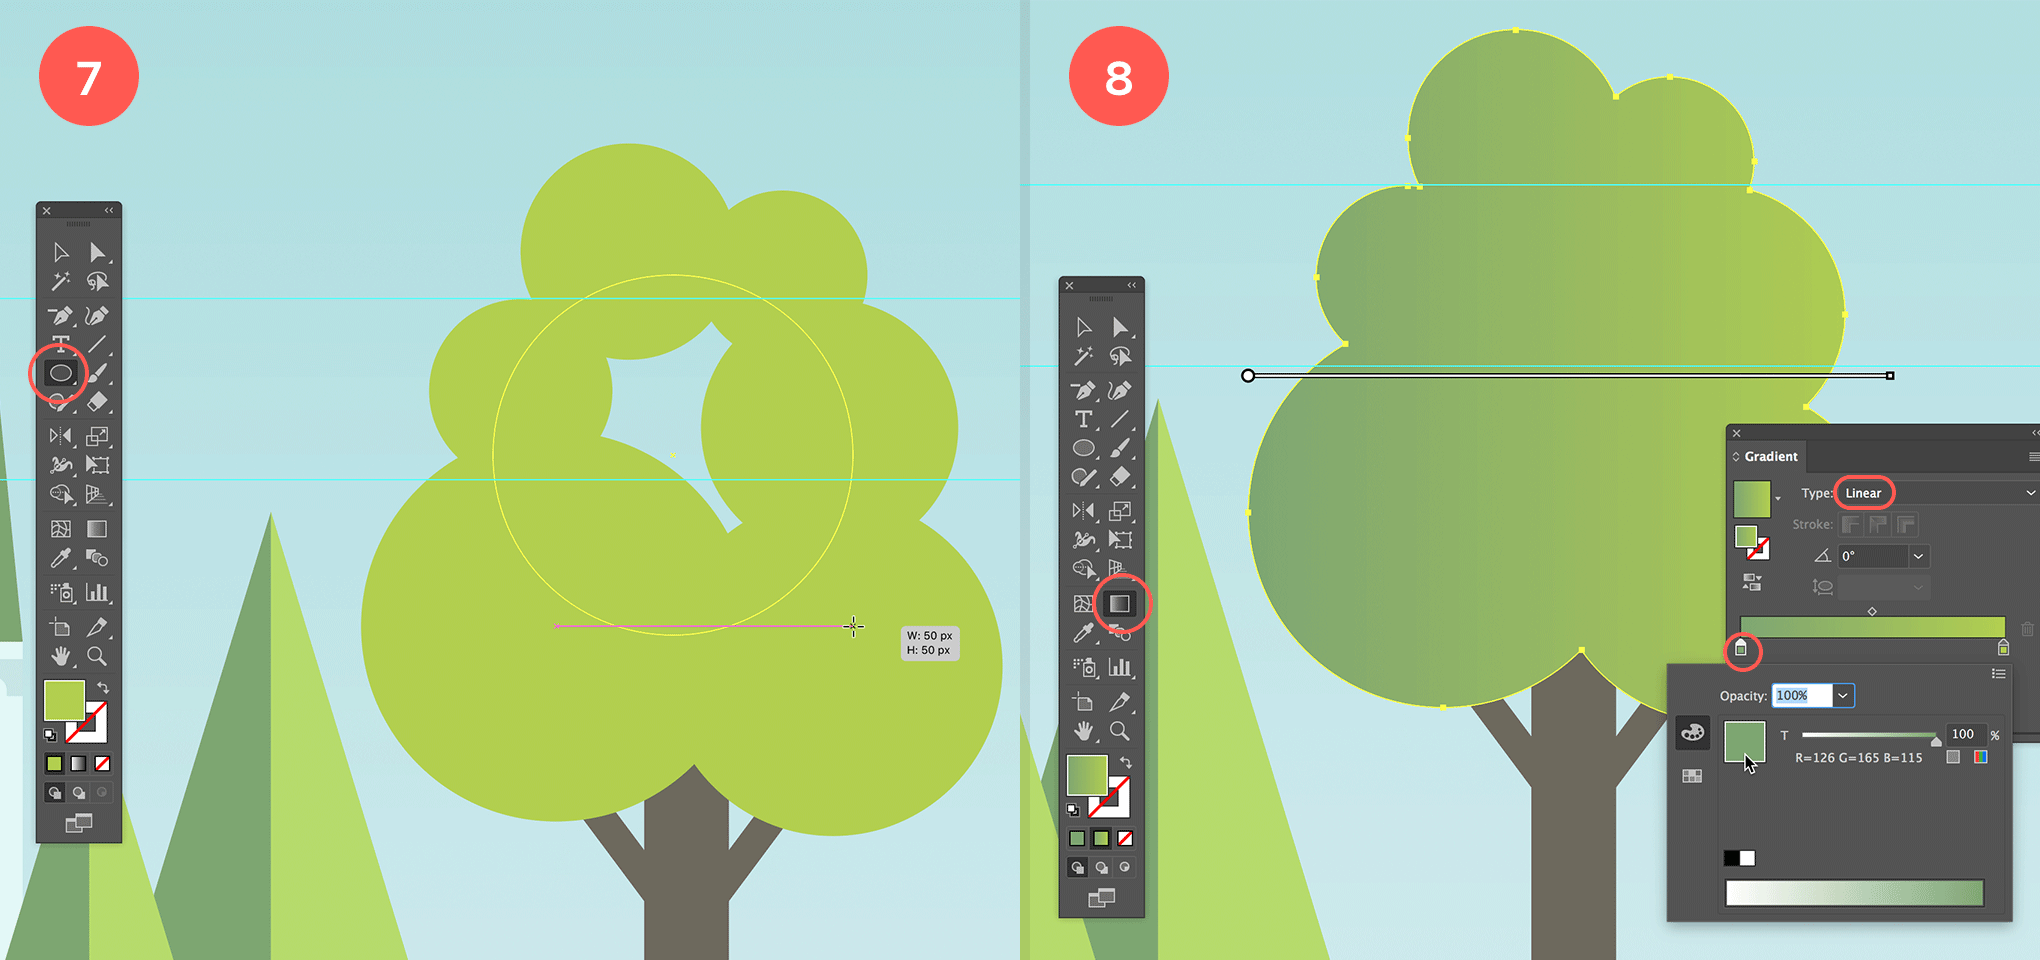
I’ve decided to unite the shapes into 1 path, and I’ve also applied a linear gradient fill as well (see image above). Again, group the shapes together and drag the object into the Symbols panel to create a symbol so we can use it multiple times in our landscape.
Place the trees in different ways (smaller, bigger, mirrored…), and on different places on your illustration.

Next up we’ll draw some simple bushes to fill up some of the areas. Just like before, lock the other layers first to be safe, and create a new layer ‘bushes’ on top of all other layers (below ‘guides’). I named mine ‘green’, thinking I would probably add more than bushes alone in this layer at that time. Of course it doesn’t matter what you name it, as long as you keep oversight of things.
Start by drawing a couple of slightly overlapping circles in different sizes in a horizontal sequence, with the first and last one lower than the ones in between, and having the bottom of the first and last circle aligned with the horizon guide (as shown in the image below). Select the most left and most right circle in the row and Vertically Bottom Align them both (via the Properties, Control or Align panel).
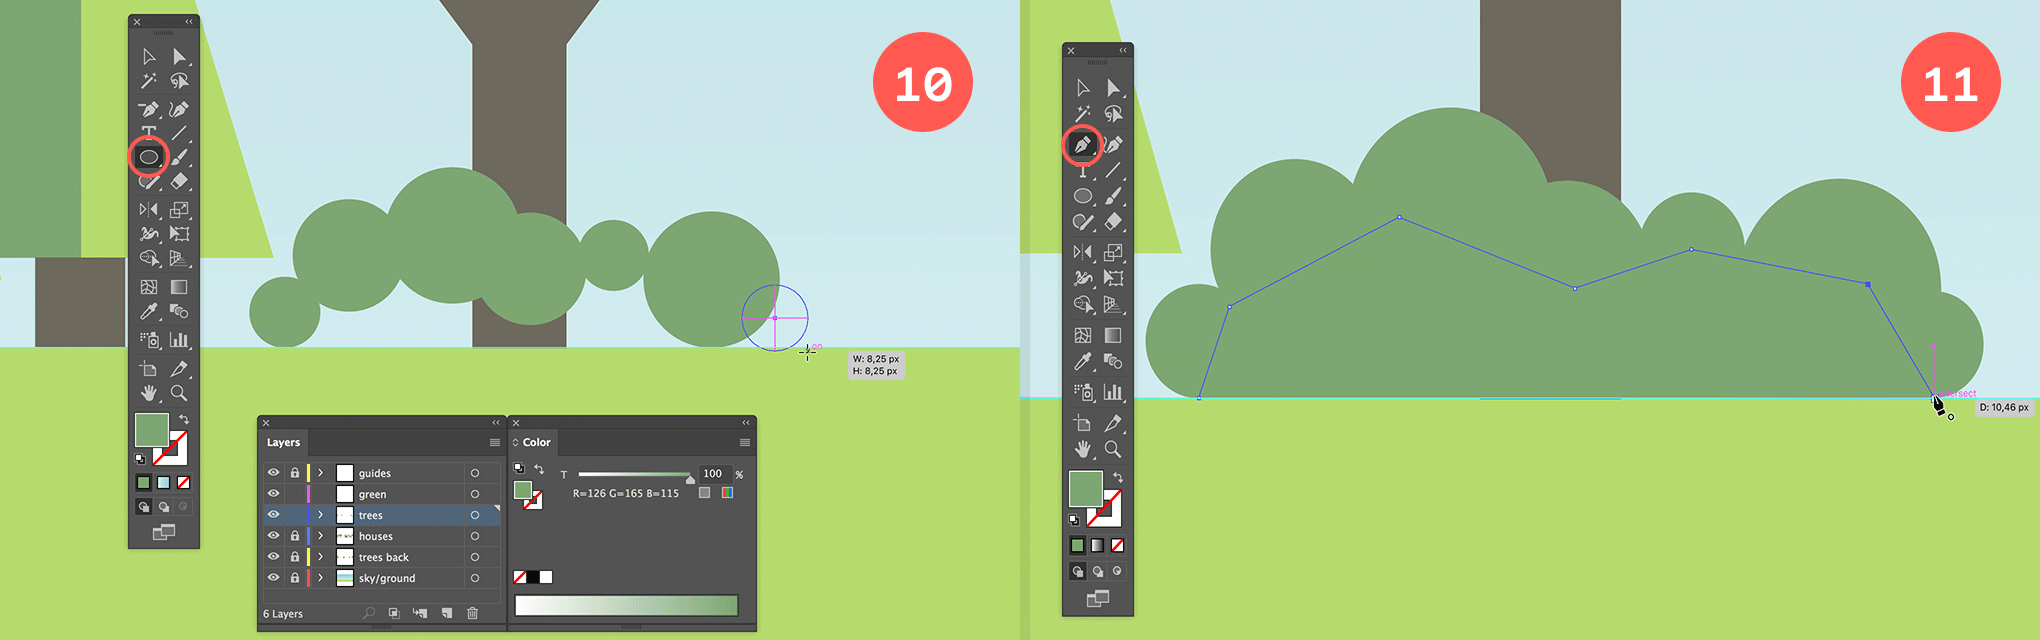
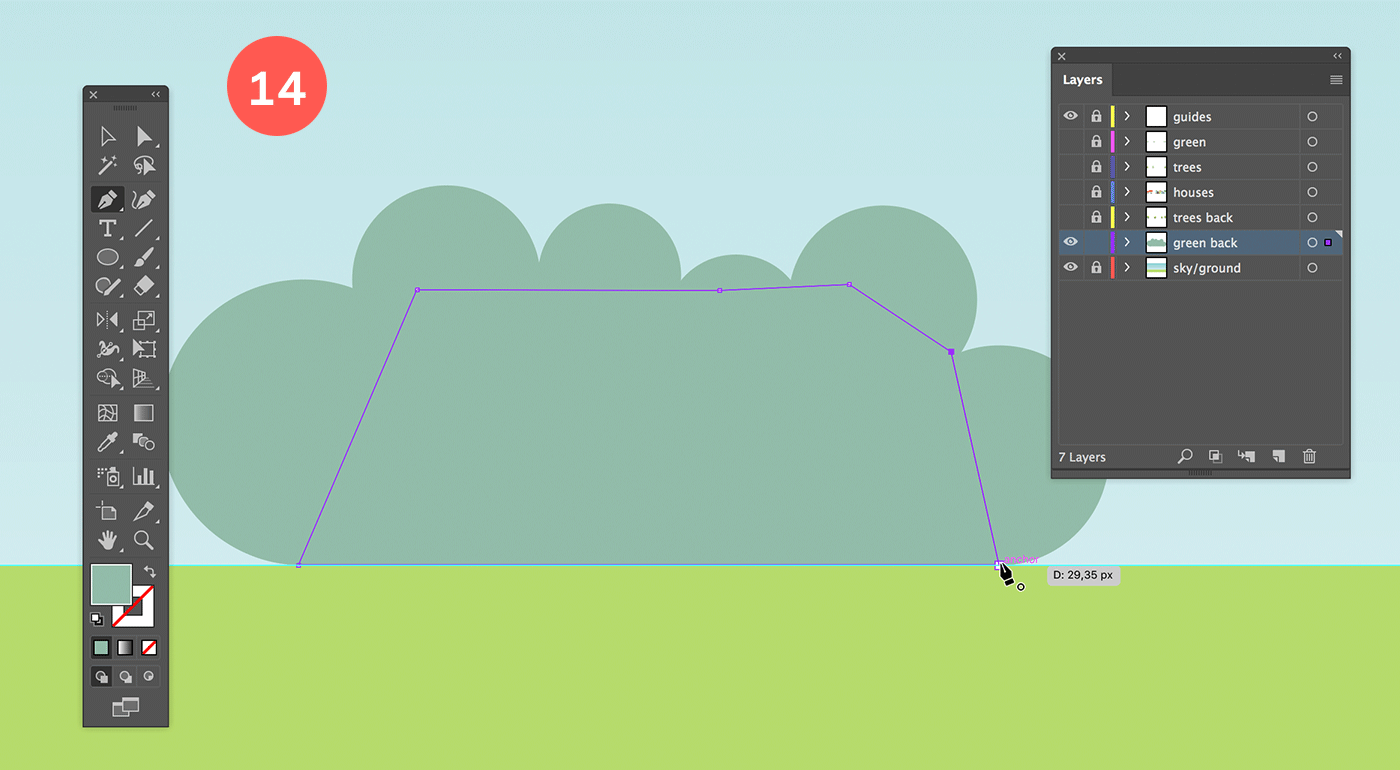
Now select the Pen tool and draw a shape that fills up the area between the circles, starting at the intersection of the horizon guide with the bottom anchor point of the most right circle, then hold down the Shift key and click in the intersection point of the horizon guide with the bottom anchor point of the most left circle, and add more points where needed to fill the gap in a clockwise direction until you end at your starting point to close the shape. You get to see a circle sign at the bottom right of your pen cursor to indicate you’ll be closing your path (see image above).
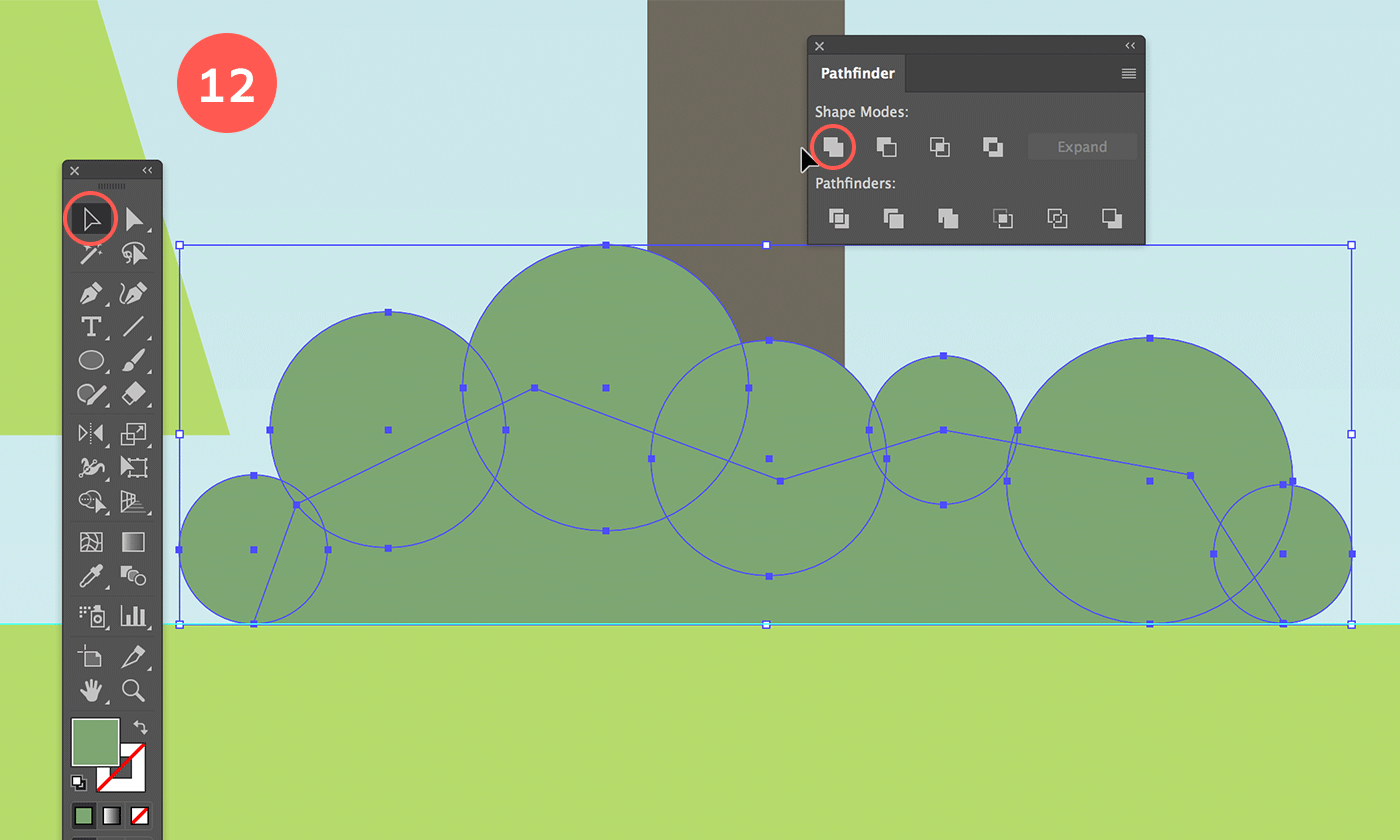
Select all the shapes and Unite them together via the Pathfinder panel. Again it’s up to you whether you want to keep the flexibility to be able to change this shape later on. If you do, then hold down the Alt/Option key when you click the Unite option. You can also use the Shape Builder tool to unite the shapes together by selecting this tool and dragging over each segment of the object.
Just like you did before, drag your object into the Symbols panel to make it a symbol. Then drag and place the symbol on different places of your landscape. I have also placed some of them in an overlapping composition together to create an extra long bush.
I’ve also created another bush shape in a different green that I turned into a symbol and then used in bigger a size on another layer behind the houses and the trees.
I also played with the opacity value. Some of the bushes use 60% opacity.
Now we’ll be creating a soft skyline in the distance behind the houses and trees. To get started lock all layers except the layer ‘houses’, and create a new layer right above the sky and ground. You can name it skyline.
Next, click the small colored square to the right of the ‘houses’ layer to target and select all objects in this layer (see image below). Hold down the Option/Alt key and drag the little square downwards to the new layer you’ve just created. This will duplicate all the objects into the new layer. You can also use this technique to move objects from one layer to another, but without holding down a key. So holding down Alt/Option will just duplicate what you’re moving.
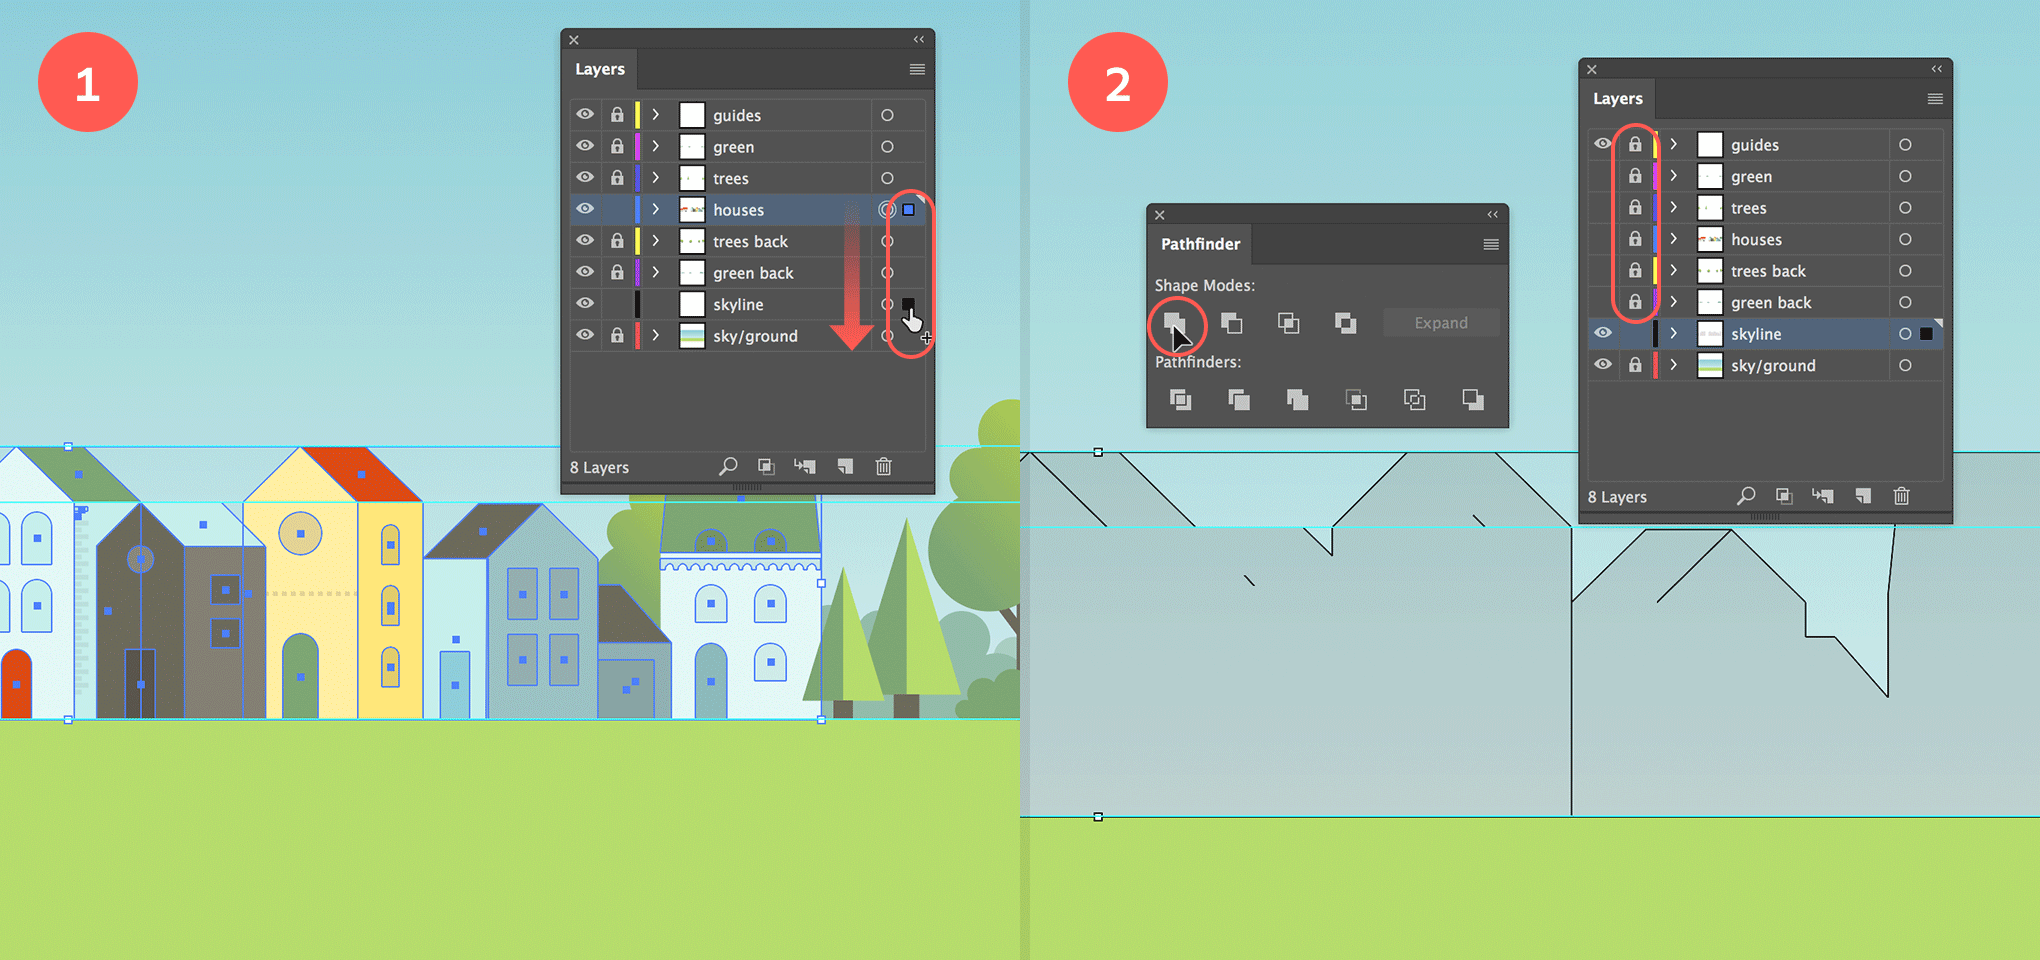
Now also lock the ‘houses’ layer, and to make it easier to work, hide all the layers except the ‘skyline’ one by clicking the eye icon. With the duplicated houses still selected, go to the Pathfinder panel and click the Unite option.
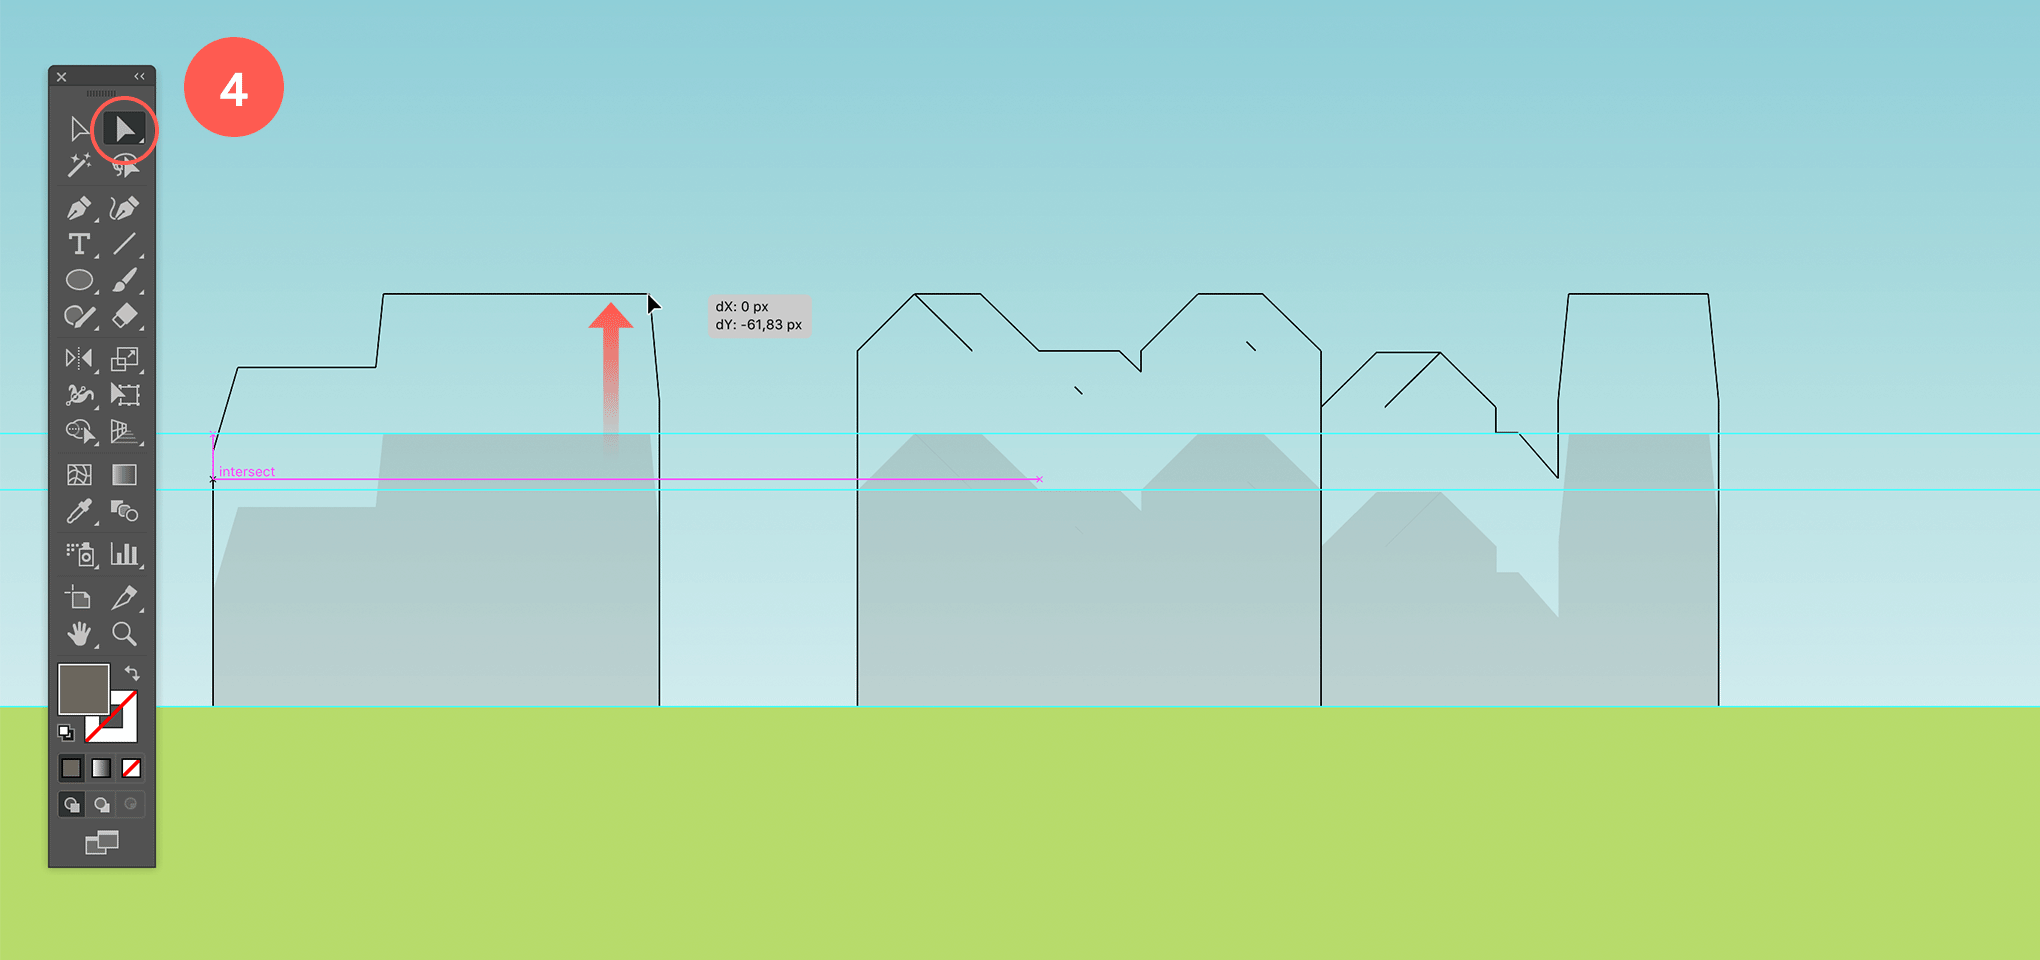
Now select the Direct Selection tool and drag a rectangle selection over the houses’ rooftops. You can use the Lasso selection tool for this (see image below).

Use the Up Arrow key (or the Direct Selection tool) to move the selected anchor points upwards to make the skyline taller than the houses. You can make the ‘houses’ visible again to see how high you should make the skyline by clicking the eye icon in the Layers panel.
Next, you could clean up the object and remove the unnecessary anchor points by selecting the Delete Anchor Point tool (located behind the Pen tool) if you like. This is not needed, but if you’re like me and you prefer clean paths you do the small effort. You can also use the regular Pen tool and hover over an anchor point. This will also give you the minus sign to your cursor to remove an anchor point. To complete the skyline duplicate some of the shapes to fill up the empty gaps. Create some diversity by tweaking the roofs here and there. You can also mirror an object. Finally, apply the subtle green blue fill.
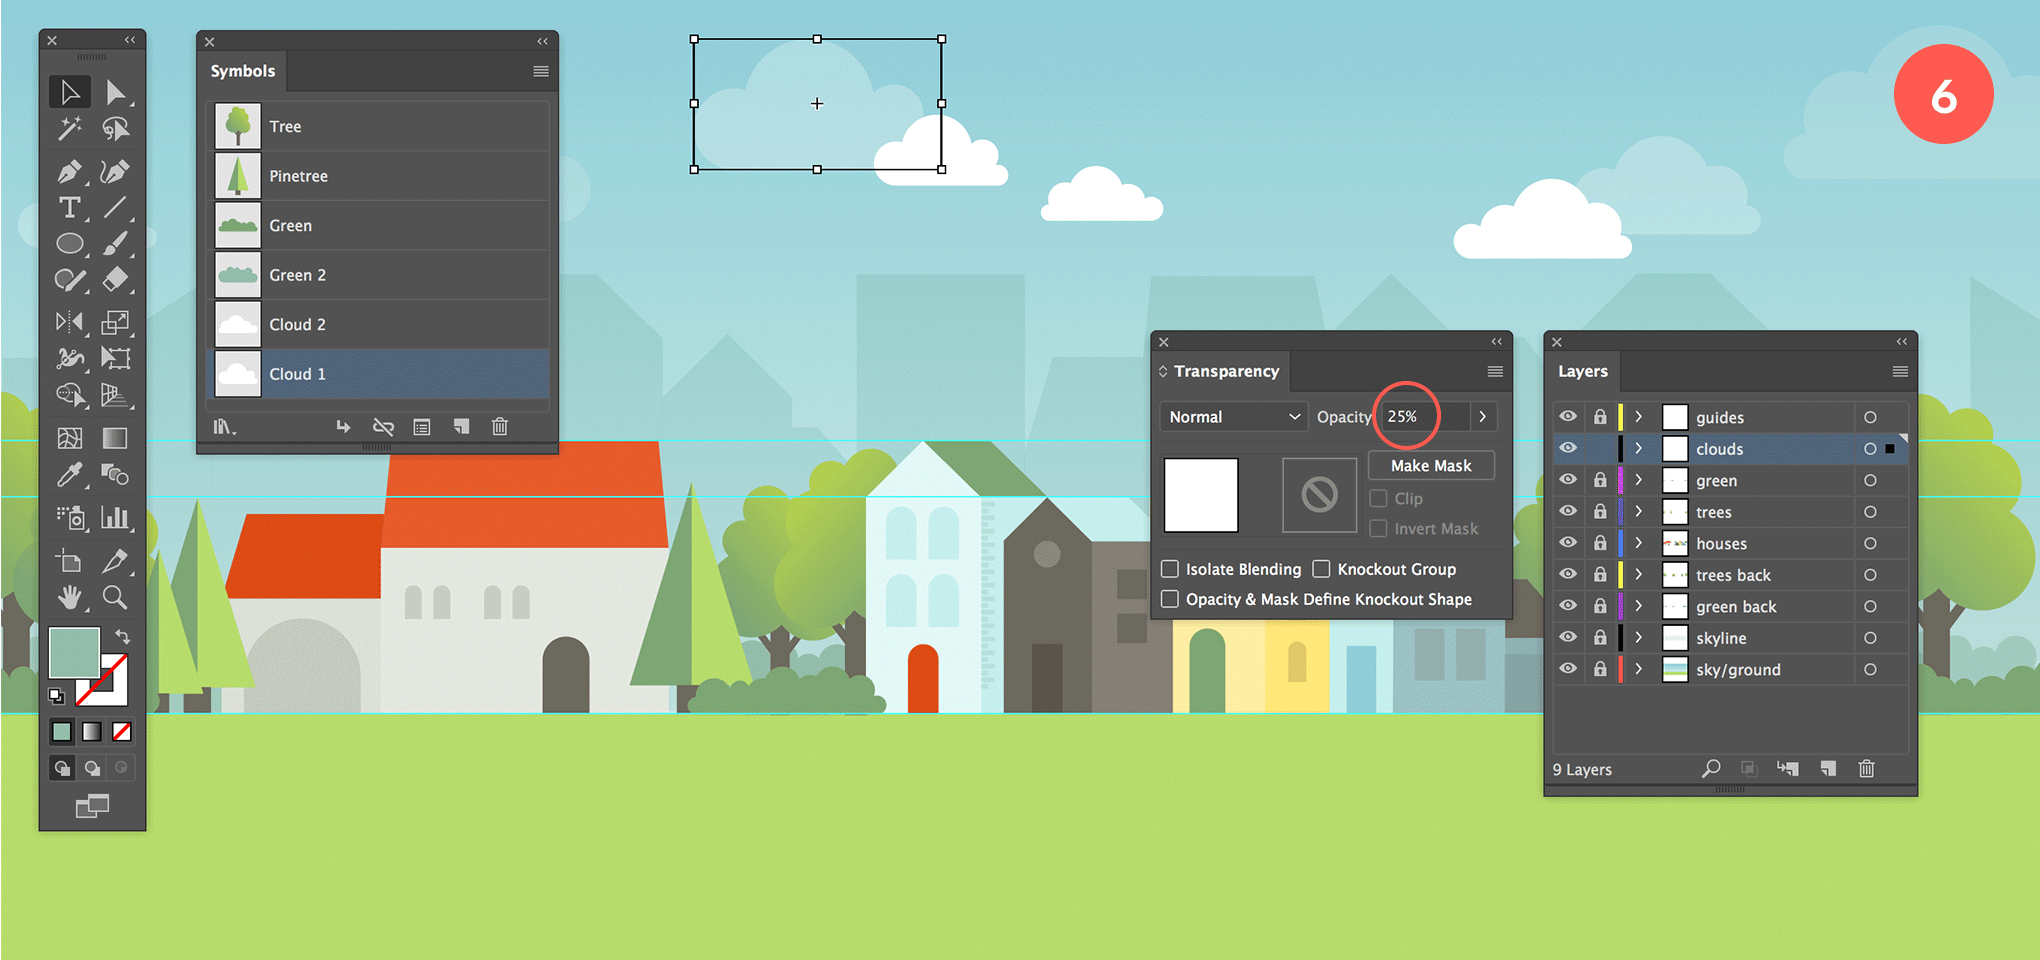
The last item left to create are the clouds. As you can see, the clouds have a similar shape as the bushes, except that they consist of fewer circles. So to create them, you use the exact same technique as for the bushes: draw a couple of slightly overlapping circles in different sizes in a horizontal sequence with a big one in the middle or to the side. Make sure the first and last one are a bit lower than the ones in between. Select the most left and most right circle in the row and Vertical Bottom Align them both. Then fill the bottom space by drawing a path using the Pen tool. Make sure the bottom line is perfectly horizontal (use the Shift key) and that the beginning and end points of this line are at the same position of the bottom points of the (first and last) circle.
Give the object a white fill, and Unite the shape. Then drag the object into the Symbols panel so you can apply the symbol a couple of times in different ways in the sky. To create a bit of diversity, create at least 2 different clouds and apply them in different sizes with different opacity values as shown in the image below.
You are almost there! To finish things off we’ll apply a Clipping Mask to our entire illustration so the bushes or the other objects that are on the side of our illustration and kind of fall off our canvas are nicely masked away.
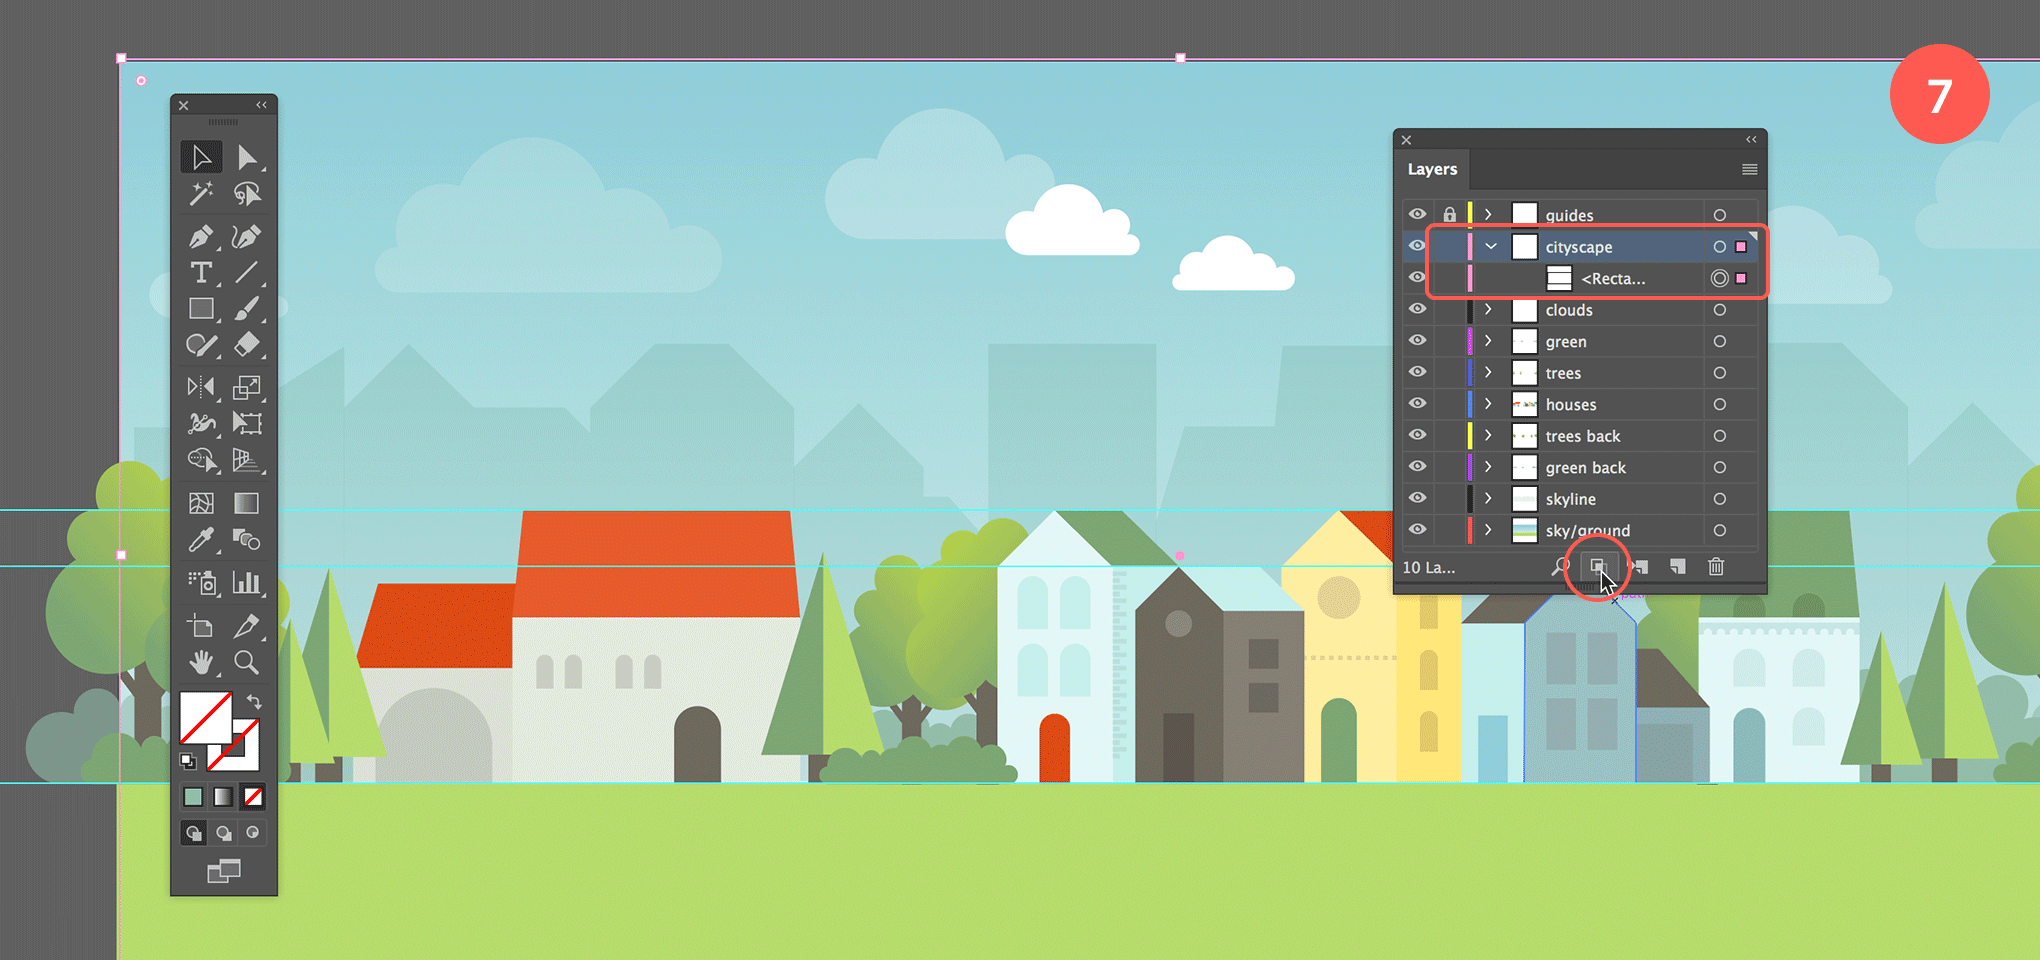
Create a new layer on top of all other layers (ignore the ‘guides’ layer, its position in the panel doesn’t matter), and name it ‘cityscape’. Draw a rectangle in this layer that has the size of your canvas, and make sure it is placed exactly on the canvas’ border, but with Snap to Point still enabled this should be easy to do. You can also double-check the Y and X coordinates in the Control panel at the top. Make sure to click the top left Reference point first if you do. The X and Y values should both be 0, the W should be 942 px, and the H should be 440 px. You edit the values of course if you have to. Apply no fill and no stroke (the swatch with a red diagonal line) and click on the Make Clipping Mask icon button at the bottom of the Layers panel.
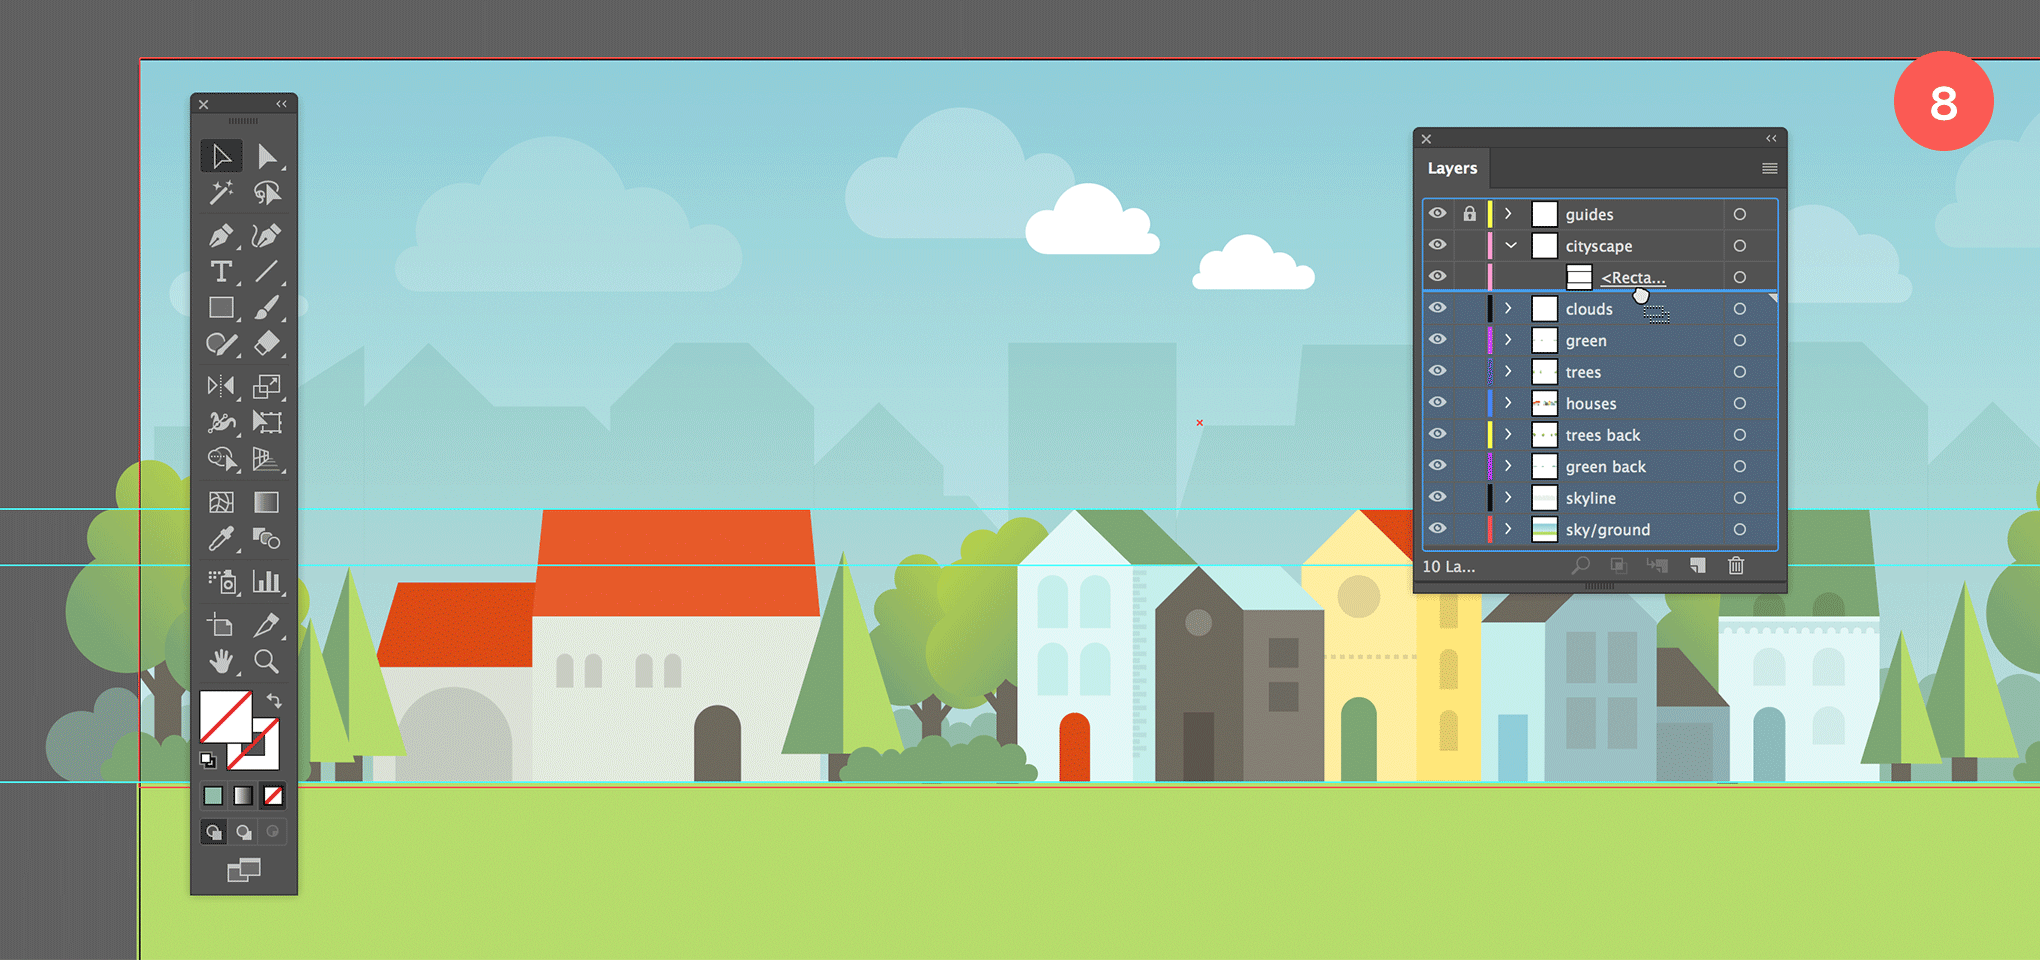
Click the triangle icon of the ‘cityscape’ layer to reveal the object layers. Now select all the layers of your illustration (click in the middle of each layer and use the Shift key to select the 2nd, 3rd, 4th… layer), and drag them right below the rectangle path layer (see image below). You should get a thick horizontal line to indicate you’ll be dropping the selected layers right below the mask path. The result should be that your illustration is now perfectly framed into your document.
BRAVO if you’ve followed this one to the end! I hope you enjoyed this tutorial, had much fun, and learned a thing or two along the way. Don’t forget to share it with your friends.