Learn how to use Adobe Illustrator in this free course for absolute beginners. By the end, you’ll know how to draw in Adobe Illustrator, how to make a pattern in Illustrator, and so much more.
I’m Dan Scott, a digital designer and a certified Adobe instructor. I’ve won multiple Adobe teaching awards at their annual MAX conference. Sharing is who I am, and teaching is where I am at my best.
In this course you’ll learn:
Let’s get everything set up so that you can follow the Adobe Illustrator course easily. The good news is that you don’t need anything other than a copy of the software to follow along and do the exercises in this course.
We do need to reset our Illustrator workspace, though, so that we can work more efficiently and make sure we’re all on the same page—I’ll explain how to do that in this section.
You can download all the source files for the course by clicking this button:
Our first exercise to practice in Illustrator will be to draw a penguin! You’ll start with a pencil drawing and learn how to draw over it to create your own vector artwork. Watch this lesson to find out how to import the drawing from the source files and set up your document properly.
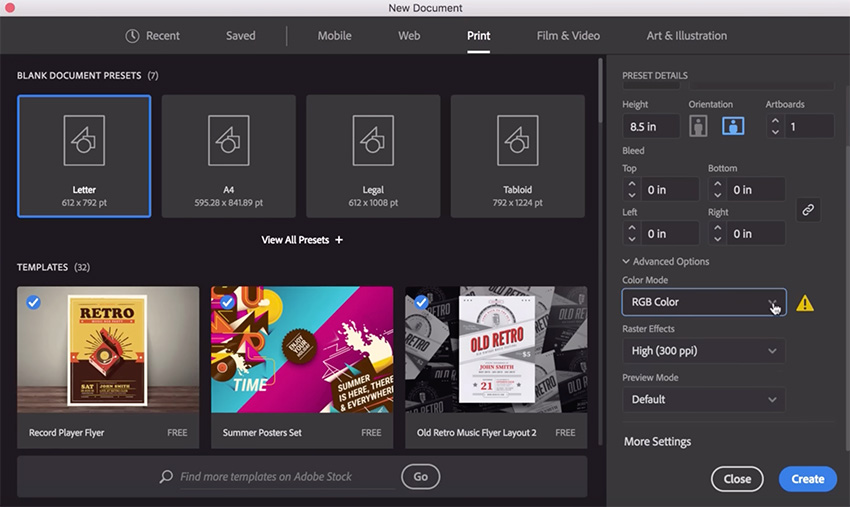
Once we’ve set up your document, we’ll look at how to import our drawing using File > Place and then lock the layer so that we can easily draw over the top of it.
Now let’s learn how to draw shapes in Illustrator. This is a fundamental skill when learning how to draw in Illustrator because you can create many common objects by creating and adjusting simple shapes and lines.
For example, we can start by creating a simple rectangle using the Rectangle Tool.
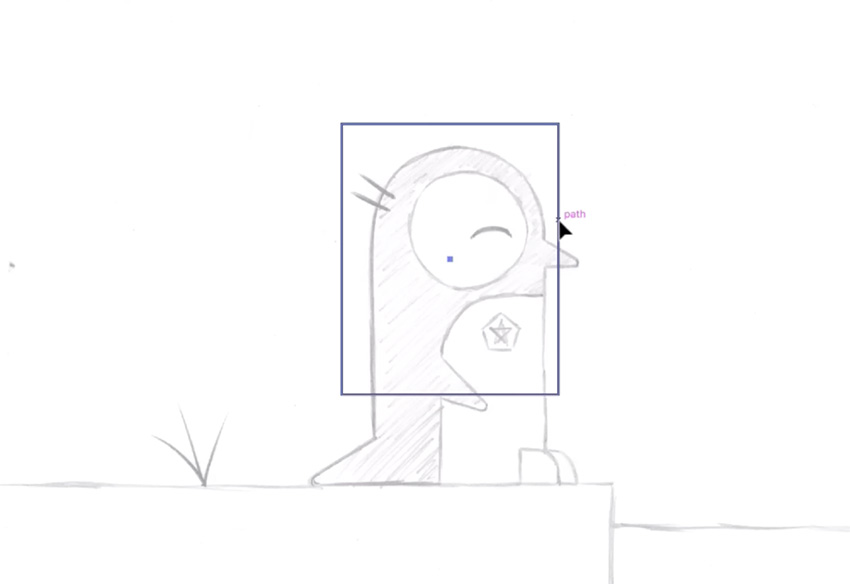
Then we can make adjustments to the shape so that it matches the outline of our penguin.
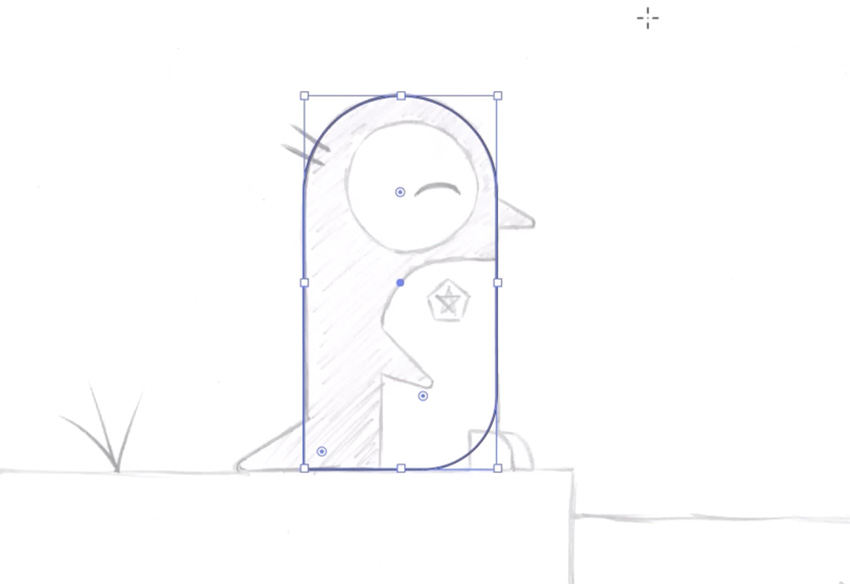
And eventually we can create a whole drawing, just using simple shapes.

This is the longest part of the course, but the skills you pick up here will help you create all sorts of cool artwork in Illustrator, so it’s time well spent!
The drawing we just created looked pretty good, but we can improve it by filling in the shapes with color and making it look more professional and finished.

To create this result, you’ll need to learn:
I cover all of those things in the video, so follow along to see how it’s done!
Our penguin drawing keeps getting better! This time, we’re adding shadows to give our drawing more of a 3D look, and we’re working on details like the eye. Let’s practice in Illustrator.

Again, we’re just using simple shapes as the building blocks, but we’re making them overlap to create more complex results.
You’ll learn all about the Shape Builder Tool in this video—it’s a powerful tool to help you transform simple shapes into more complex ones.
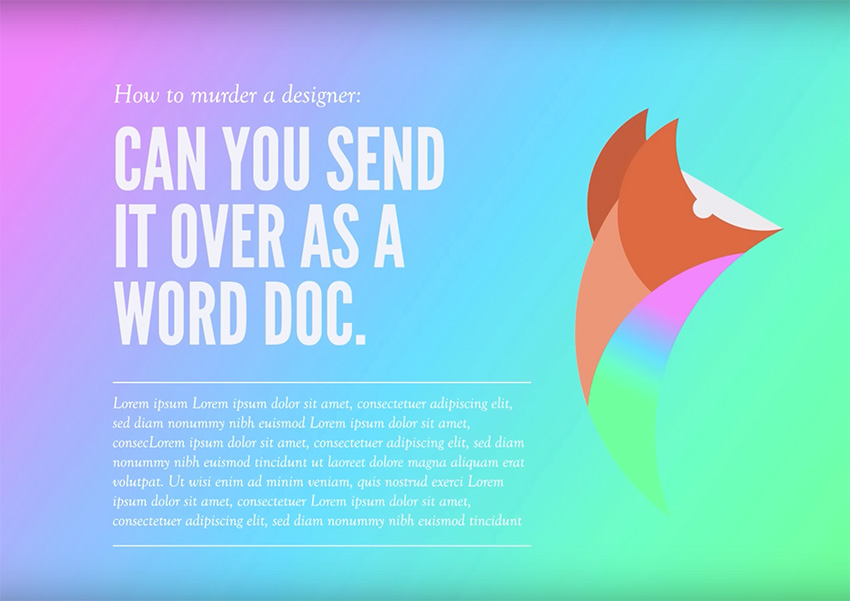
We’ve learned some useful techniques now, so let’s put them into practice with a real-world example: logo design. Let’s see how to turn a drawing into the logo shown below, using the tools and techniques we’ve covered so far.
![]()
Although drawing with simple shapes can get you a long way, you’ll also need to master some of the more complex drawing tools in Illustrator. Let’s start with the Curvature Tool.
You can create a fluid, curving line simply by choosing the Curvature Tool and then clicking to create anchor points along the curve.

Then you can go in and refine your curve by adjusting the guides for each anchor point.
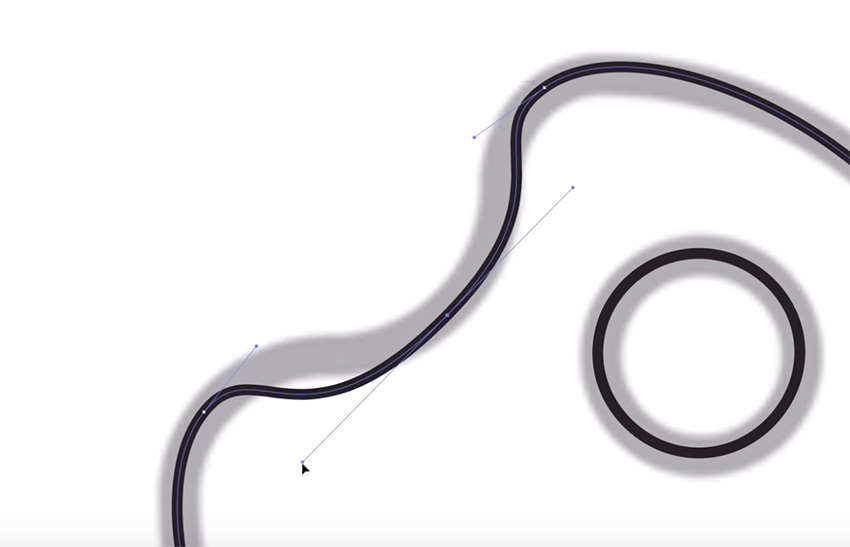
Despite its name, you can also use the Curvature Tool in Illustrator to draw straight lines! Double-click as you create each anchor point to create a corner instead of a curve.
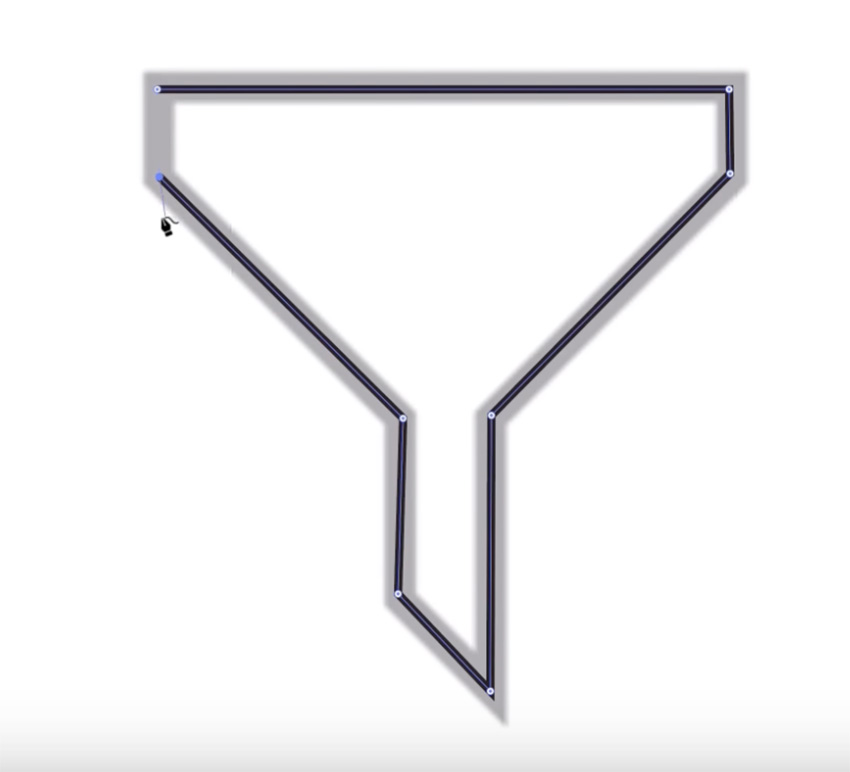
Another important drawing tool to master is the Pen Tool. So let’s jump in and learn how to use the Pen Tool in Illustrator by creating these icons:
![]()
We’ll talk about when to use the Pen Tool vs. the Curvature Tool, and how to use them both together to draw more complex yet easily adjustable shapes. The Pen Tool is very powerful, so mastering it is an important step in learning how to draw in Illustrator.
Learn more in this free course
What if you want to draw freehand? Then you’ll need yet another drawing tool—the Pencil Tool! Let’s learn how to use the Pencil Tool in Illustrator to draw these freeform lines and arrows over a photo:

We’ll finish off this section on drawing in Illustrator by looking at how to use brushes. Here’s what you’ll be creating:

You’ll learn to transform the lines you’ve created with the pen, curvature, and pencil tools into stunning “painterly” strokes. Learn how to use Illustrator brushes, how to change the brush size in Illustrator, and more.
This chapter is all about color, one of the top Illustrator basics. First, let’s explore how Illustrator controls color through RGB and HSB settings.
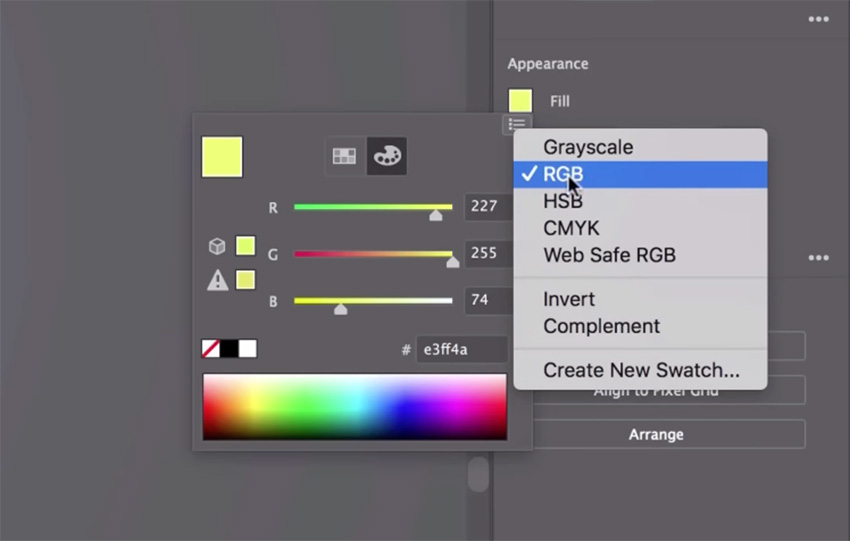
RGB stands for “Red, Green, Blue”, and HSB stands for “Hue, Saturation, Brightness”. They’re two ways of defining colors, and you’ll learn about them in more detail in the video.
You’ll also learn how to use Adobe Color to find exciting color combinations. Just go to Window > Color Themes > Explore to find some inspiring color swatches to use in your projects.

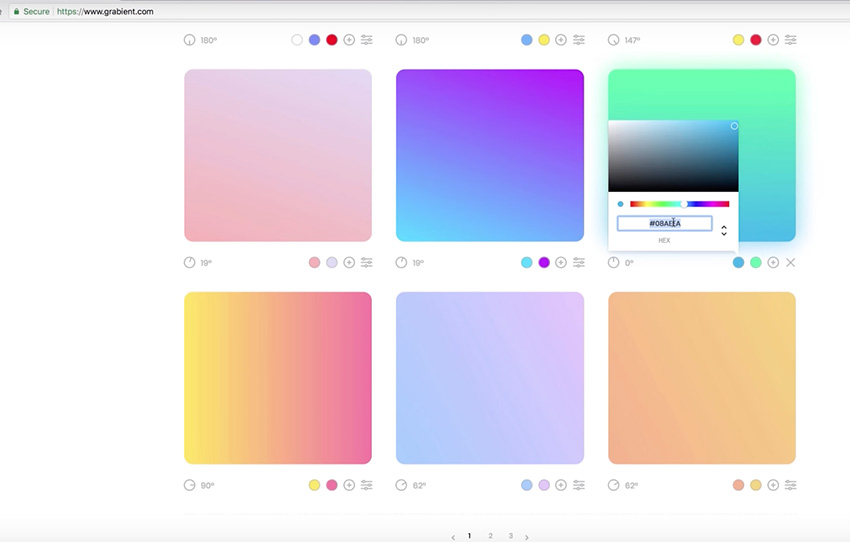
In this Adobe Illustrator course section, you’ll learn how to use Illustrator’s Gradient Tool to apply and adjust gradients to objects. We’ll take a plain document and give it a colorful gradient background.
I’ll also show you how to get gradient color inspiration from a site called Grabientand copy the color values into Illustrator.
Now let’s see how to work with text in Illustrator. I’ll show you how to use Illustrator’s Type Tool and how to choose the font color, style, size, weight, and spacing.

You’ll learn the differences between point type and area type boxes. You’ll also learn how to use Adobe’s Typekit system to find exciting new typefaces for your projects. See how to add and change fonts in Illustrator, and much more.
How do you apply effects to shapes and typography? In this part of the Adobe Illustrator course, you’ll learn how to use the Liquify Tool in Illustrator and how to distort text in Illustrator. You’ll also learn how to cut, twist, and explode your artwork in creative ways.

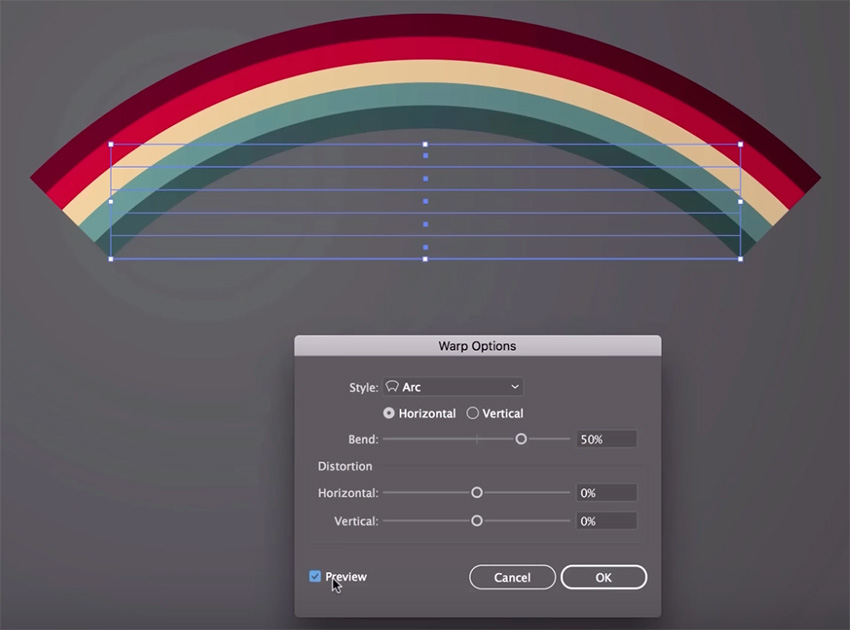
You can find the Warp Tool and other liquifying and distorting tools by clicking and holding on the Width Tool in the toolbar to reveal the dropdown menu.


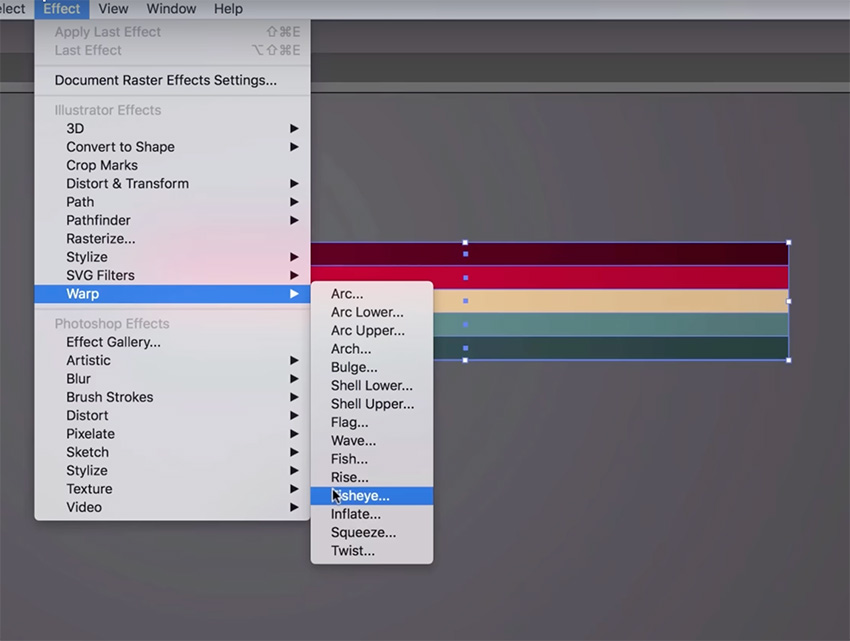
After you’ve applied an effect, the Warp Options window will open automatically. There you can adjust the values to customize your effect. Simple!
The Adobe Illustrator for beginners course isn’t complete without this section. Now, you’ll learn how to create a pattern in Illustrator. This pattern can then be repeated—great for backgrounds, wallpaper, fabric prints, and wrapping paper.
We’ll start with the logo we created earlier, and flip it upside-down…
![]()
Then we’ll go to Window > Pattern Options to turn this logo into a repeating pattern:

And finally, we’ll rotate and duplicate our logo to make a more complex pattern:

Adobe Illustrator for Beginners: Envato Tuts+. (n.d.). Retrieved from https://design.tutsplus.com/adobe-illustrator-for-beginners–ytc-5c